Wednesday, April 12, 2023

My Personal Guide to All the Best Features in Nicepage, Part 1

My Personal Guide to All the Best Features in Nicepage - Part 3

My Personal Guide to All the Best Features in Nicepage - Part 3

This is my third article in a four-part series about my favorite web builder, Nicepage. In the first article, "My Personal Guide to All the Best Features in Nicepage, Part 1," we discussed the Nicepage subscription plans. We also mentioned its desktop app for Windows and Mac allows you to design and edit your website offline. Then, in my second article, "My Personal Guide to The Best Features in Nicepage Part 2," I highlighted special design features in Nicepage that I especially like. Some are even unique to Nicepage.

In this third article, we will discuss the options available on Nicepage, allowing you to publish your site to your website from the desktop app.

Publication Options

I have provided screenshots to help you visualize the comments, but there is also a video further down you can view.
Nicepage Best FeaturesNicepage Publishing Options

So let's go to the desktop app for Nicepage. In this case, it is in Windows, but there is also a version for Mac computers. The website showing on the desktop is one I have been working on in the second video for demonstration purposes. We demonstrated some animation, grids, and how they contribute to a responsive website. We also presented a modal, accordion, and tab feature.

Assuming that we are ready to publish our website on the internet, let's look at our publication options. These methods export the site from our desktop app to our online website. So we go to the publication feature, where you can see the following options:

- Website. This option uploads the site directly to the Nicepage server. This is a simple way to post the site online and allow clients to view it before launching it publicly.- HTML. For those who prefer a simple, straightforward website rather than a CMS such as WordPress or Joomla.- WordPress. This is the most popular website option, and Nicepage is a leading theme builder for WordPress.- Joomla. Though less popular than WordPress, Joomla offers another CMS option.- Image. Publish a one-page image of the site.- Website project. This packages the website project for transfer to another computer.

Website Publication

website publicationWebsite Publish option

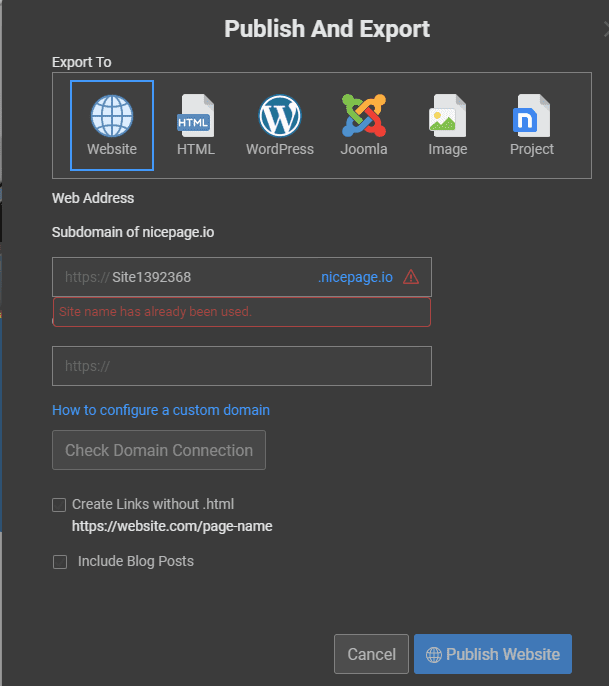
Starting with the first option, we will publish to a website. The subdomain to which it will be posted is shown in the window. Use this URL to view the site once it's published. A custom domain name that you have registered can also be configured to direct viewers to the Nicepage subdomain. A few other options can also be selected in the window, but we will skip them and go straight to "Publish Website."

Now we can use the subdomain URL to view the site. As you scroll down the home page, you can observe the animation in action with the various page elements as they zoom out or slide in. Click on the button for the modal to have it pop up with the photo slider. And then, you can see how the accordion and tab look and operate. Both are good options for offering viewers an opportunity to view the data or not.

HTML Publication
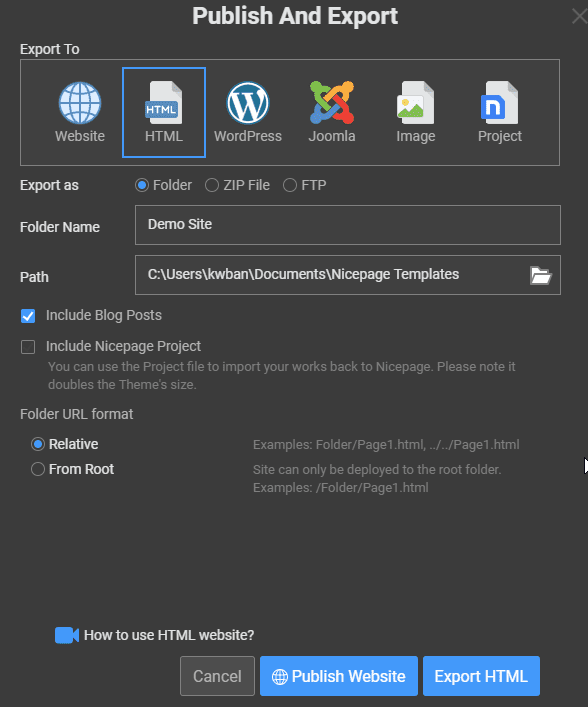
HTML publicationHTML Publish option

With the option to publish to HTML, we can export the site to a folder, a zip file, or directly to our website using FTP. I use my FTP client, so I take the Folder option and select where to export it.

I will go over to Filezilla, connect to the export folder, and then to my website folder online. I will select all files and folders in the export folder, then drag and drop them into the online folder on my hosting site.

There is no further configuration necessary. I can go to my browser, enter the URL of my website, and immediately view the site. This assumes that my domain is set up with the hosting site and has propagated across the internet.

WordPress Publication
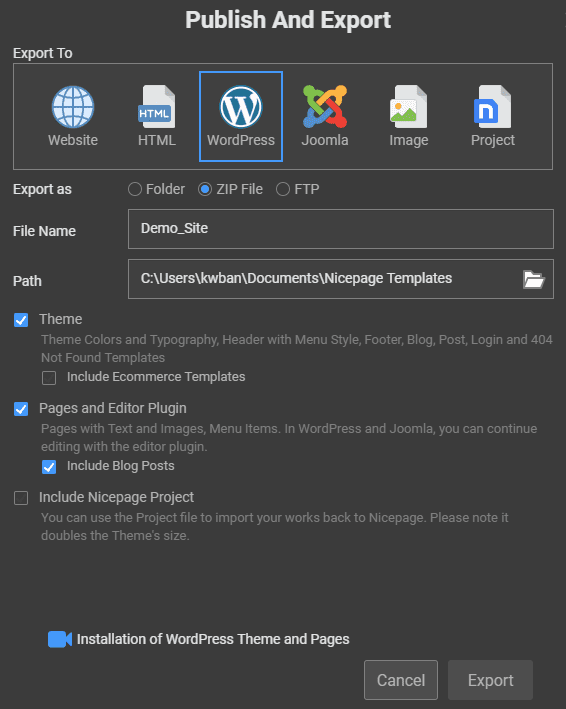
wordpress publicationWordPress Publish option

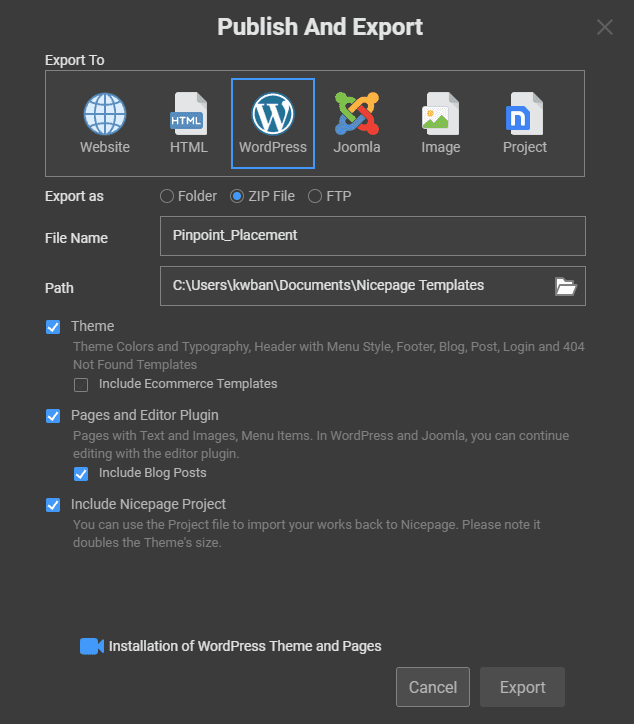
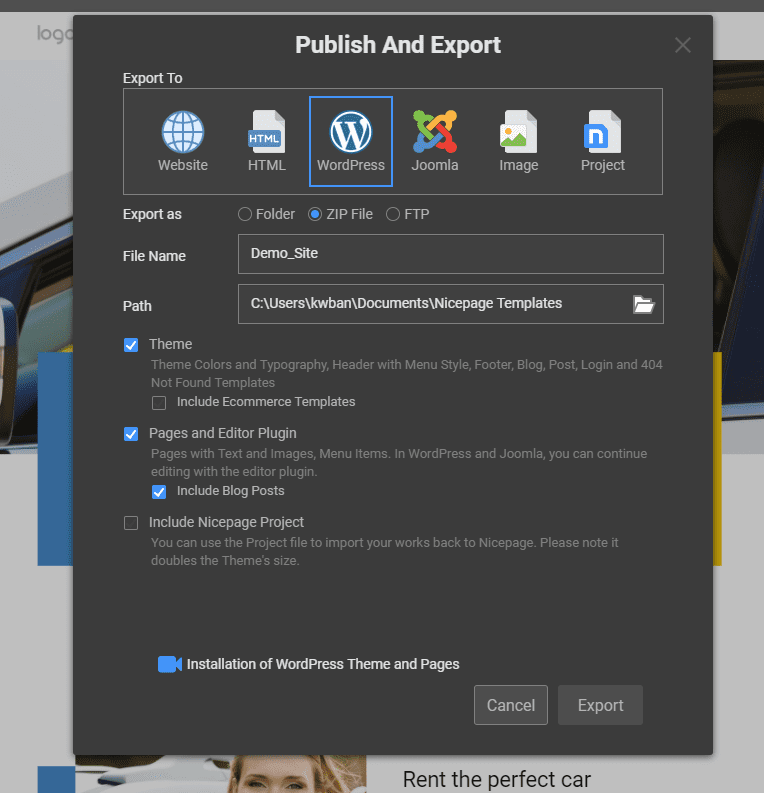
Finally, we will choose the WordPress option for publishing. Again, we can export to a folder, zip file, or FTP. Selecting the zip file option is the most straightforward choice. You will need a more advanced understanding of WordPress to use the folder or FTP approach.

By choosing to export to a zip file, I will install the site on my WordPress website as with any other theme. The only difference will be the import of content and installation of a plugin. The Nicepage plugin will serve as your editor in WordPress to work with your Nicepage web pages.

Before exporting the WordPress zip file, choose which features you want to export to your website. You will want to include the Theme along with pages and Editor Plugin. If you are planning an eCommerce site, retain the templates. If you want to export your site to the desktop app, choose to have the Nicepage Project. Now we are ready to export.

Next, we will go to the wp-admin section of our WordPress website to install the zip file. Once you are in the wp-admin area, select "Appearance" from the left menu and select themes. At the top of the page, click on "add new" and then on "upload theme." You will locate the exported zip file on your computer and click "install."

Now that we have installed our website, we need to activate it. Having done that, click on customize, and you will need to go to self-identity. In this section, you will insert your logo and Favicon from your media library or upload them from your computer. Then go further down to insert the site icon.

Now click the back arrow, then go down to the menus. Under menus, you will need to select the menu you will be using. Most likely, it will already be set.

Next, click the back arrow and go to "Homepage settings." Here you will choose whether the homepage will use the latest post or will be a static page. Although posting is a significant function of my Digital Chowder website, I use a static homepage with links to posts.

At this point, you're ready to click publish and view your WordPress website online.

In my fourth and final Nicepage-oriented article, I will discuss working with your Nicepage-generated website within WordPress. In addition, I will show how to go back and forth between your online and offline versions of the site. You can view all four articles on YouTube for a better visual demonstration of this presentation.

Website Building and Repair

Elite Web PresenceElite Web Presence

Do you find all this a bit overwhelming, or do you not have the time to work with a site? Let me make a suggestion. Go over to Elite Web Presence for some help. Whether you need a complete website build and update, or some cleanup and maintenance, they can do the job for you. They can also help with SEO, along with website backup and security.

Conclusion

Has this series been helpful? Building a website with Nicepage is an easy and efficient way to get your site up and running quickly. Using the tools it offers, you can create an attractive design that drives traffic to your pages and gives customers what they need.

Finally, does all of this sound too daunting or time-consuming? In that case, Elite Web Presence can help build, update or maintain your website to optimize it for success.

Have questions or comments? Please leave them in the comment section below.

Top Posts

As an affiliate marketer, Digital Chowder earns from qualifying purchases.


https://digitalchowder.com/guide-to-all-the-best-features-in-nicepage-part-3/My Personal Guide to All the Best Features in Nicepage, Part 1


My Personal Guide to All the Best Features in Nicepage, Part 1


Introduction


Hello, and welcome to the Digital Chowder blog. I'm Wayne, and this is the first of four posts and videos I will be doing about All the Best Features of Nicepage, my favorite website builder. This post will not be a how-to about how to use Nicepage. Nor will it be a review comparing Nicepage alongside other web builders. Instead, I will highlight some of my favorite features found in Nicepage.


This first post/video will address the Nicepage subscription plan, why I like it, and why it is a good fit for me. Then I will touch on the desktop app with Nicepage, giving an overview. Finally, I will discuss the options for publishing your website after designing it in the desktop app.


Nicepage Subscription Plans:


Nicepage subscription plans

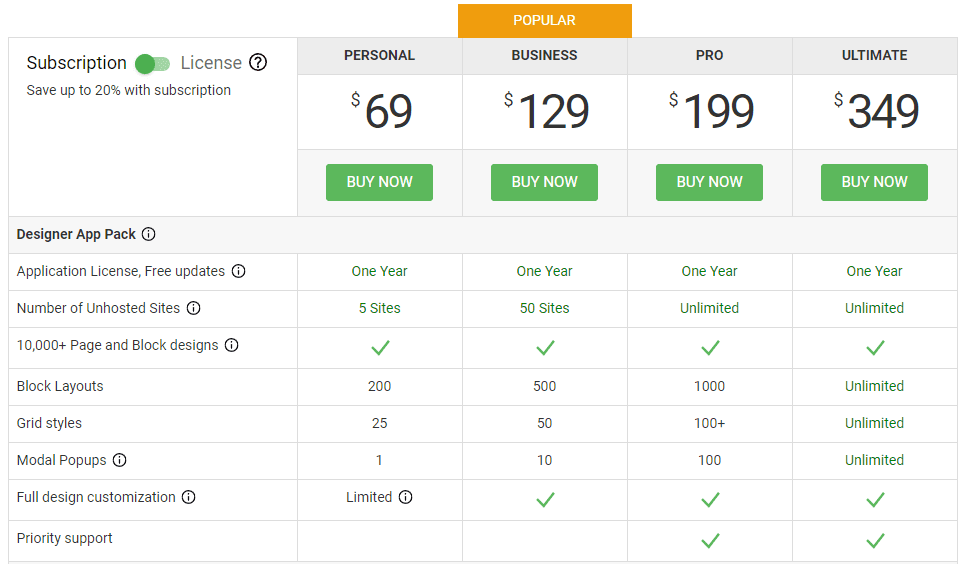
If you go to the Nice Page website and then to their premium page, you will see four subscription plans outlined. Each plan has two options: a subscription and a license. So what is the difference? With the license, you're paying a one-time fee to purchase the software; with that, you're getting one year of updates for the software. But beyond the first year, there will be an additional fee if you want any updates. I have chosen the subscription approach. With the subscription, you pay an annual fee and receive the software and all updates during the year. And it is ongoing.


When I started with Nice Page, I used the Personal plan since I only needed one website for my business plus a personal site. With the Personal plan, I could have as many as five websites. So that was quite adequate. But now I design websites for other businesses besides my own. So I need to use Nicepage for more than five websites. However, I don't need an unlimited number of sites.


Elementor subscription plans

So, let's jump over to the Elementor website and look at their plans to understand why the Nicepage subscription is a good fit for me. With Elementor, three plans start with the Essential plan, which is $59 a year. This plan allows you one website. If you jump to the Expert Plan, which is $199 a year, you are allowed 25 websites.


Now let's go back to the Nicepage website. Back there, the Business plan offers a middle ground between the Personal and Pro plans, which Elementor does not have. The Business plan for $129 a year allows me 50 websites and additional features. This is just right for me. I need more than the Personal plan offers, but I don't need all that the Pro plan provides. So the Business plan is the one I use. I would pay $199 annually at Elementor and only get 25 sites.


Desktop App:


The next feature I want to highlight is the desktop app with Nicepage. There is a desktop app for both Windows and Mac computers. If you're building a WordPress website, you also get a WordPress plugin; if you're doing a Joomla site, you get that one.


You can do the whole website on your computer before you import it to your WordPress website. But it is not required. Creating the site layout is the only portion of building a website that requires the desktop app. Once you have created a layout for your website, you can export the site to a zip file and install it as a WordPress theme. You can do the remainder of the design online. Or not! You can also build the complete site on your desktop before installing it online.


Once you have installed the design theme on your WordPress site, you can work back and forth between online and offline.


Once your site is online, you can edit it on the desktop or do it online, whichever you choose. I do both. I like to be able to do major edits on my desktop, knowing that when I do a save, it's not going to go public.


Next, let's look more closely at the desktop app.


You can check the video above to see what I'm talking about in the following comments.


Nicepage desktop app

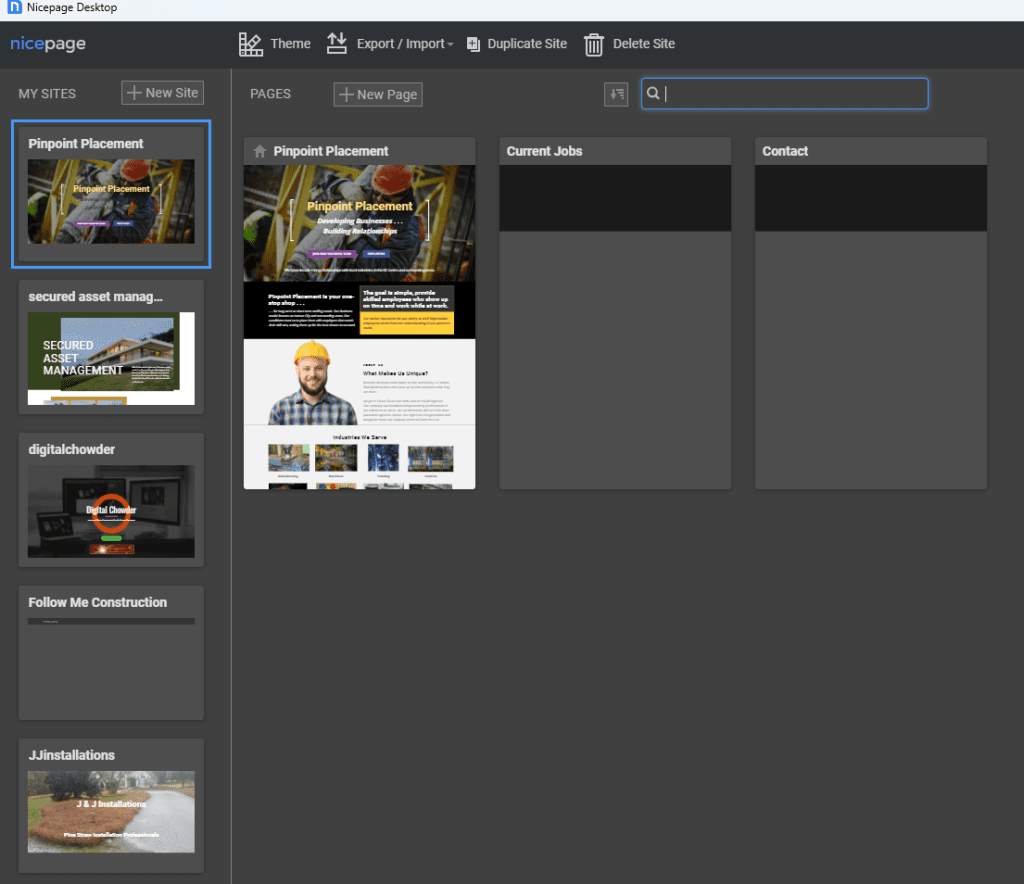
As you view the desktop application listed in the left-hand column, you will see a list of your websites. Click the appropriate icon to open the site you want to work with. You can also delete a website you are no longer working with from this page. To create a new website, use the "New Site" button.


If you are creating a new website, you can start with a blank website and build the site from scratch, adding elements as you go. Or, you can use your graphics to form the bases of the site. Yet another option is to select a design template from the various categories listed. Once you choose a template, you can stay close to the template design or use it only as a starting point.


Publishing The Website:


When you are ready to export my website to an online host, I can click the "Publish" button. You can publish a temporary Nicepage-hosted site, an HTML format, or a WordPress theme.


publishing the website

The temporary "Website" option is quick and easy. Press the publish button to install the site on the Nicepage server. Then share the subdomain with a client for their review of the site. There is no configuration or installation or uploads to do to have a site looking like the one on your desktop.


Another option is an HTML site. This choice requires an FTP app to upload to the host server.


If you publish a WordPress site, use the output zip file to install in WordPress as you do with any other theme.


Conclusion


In this post, I have given an overview of Nicepage. In the next post, I will detail some of my favorite design features in Nicepage. Meanwhile, I encourage you to get a free Nicepage download and try it. Then come back to the other posts for further help.


Facebook

Twitter

Instagram

LinkedIn

Top Posts


https://digitalchowder.com/all-the-best-features-of-nicepage/

Monday, April 10, 2023

My Personal Guide to All the Best Features in Nicepage - Part 3

My Personal Guide to All the Best Features in Nicepage - Part 3

My Personal Guide to All the Best Features in Nicepage - Part 3

This is my third article in a four-part series about my favorite web builder, Nicepage. In the first article, "My Personal Guide to All the Best Features in Nicepage, Part 1," we discussed the Nicepage subscription plans. We also mentioned its desktop app for Windows and Mac allows you to design and edit your website offline. Then, in my second article, "My Personal Guide to The Best Features in Nicepage Part 2," I highlighted special design features in Nicepage that I especially like. Some are even unique to Nicepage.

In this third article, we will discuss the options available on Nicepage, allowing you to publish your site to your website from the desktop app.

Publication Options

I have provided screenshots to help you visualize the comments, but there is also a video further down you can view.

Nicepage Best FeaturesNicepage Publishing Options

So let's go to the desktop app for Nicepage. In this case, it is in Windows, but there is also a version for Mac computers. The website showing on the desktop is one I have been working on in the second video for demonstration purposes. We demonstrated some animation, grids, and how they contribute to a responsive website. We also presented a modal, accordion, and tab feature.

Assuming that we are ready to publish our website on the internet, let's look at our publication options. These methods export the site from our desktop app to our online website. So we go to the publication feature, where you can see the following options:

- Website. This option uploads the site directly to the Nicepage server. This is a simple way to post the site online and allow clients to view it before launching it publicly.- HTML. For those who prefer a simple, straightforward website rather than a CMS such as WordPress or Joomla.- WordPress. This is the most popular website option, and Nicepage is a leading theme builder for WordPress.- Joomla. Though less popular than WordPress, Joomla offers another CMS option.- Image. Publish a one-page image of the site.- Website project. This packages the website project for transfer to another computer.

Website Publication

website publicationWebsite Publish option

Starting with the first option, we will publish to a website. The subdomain to which it will be posted is shown in the window. Use this URL to view the site once it's published. A custom domain name that you have registered can also be configured to direct viewers to the Nicepage subdomain. A few other options can also be selected in the window, but we will skip them and go straight to "Publish Website."

Now we can use the subdomain URL to view the site. As you scroll down the home page, you can observe the animation in action with the various page elements as they zoom out or slide in. Click on the button for the modal to have it pop up with the photo slider. And then, you can see how the accordion and tab look and operate. Both are good options for offering viewers an opportunity to view the data or not.

HTML Publication

HTML publicationHTML Publish option

With the option to publish to HTML, we can export the site to a folder, a zip file, or directly to our website using FTP. I use my FTP client, so I take the Folder option and select where to export it.

I will go over to Filezilla, connect to the export folder, and then to my website folder online. I will select all files and folders in the export folder, then drag and drop them into the online folder on my hosting site.

There is no further configuration necessary. I can go to my browser, enter the URL of my website, and immediately view the site. This assumes that my domain is set up with the hosting site and has propagated across the internet.

WordPress Publication

wordpress publication

WordPress Publish option

Finally, we will choose the WordPress option for publishing. Again, we can export to a folder, zip file, or FTP. Selecting the zip file option is the most straightforward choice. You will need a more advanced understanding of WordPress to use the folder or FTP approach.

By choosing to export to a zip file, I will install the site on my WordPress website as with any other theme. The only difference will be the import of content and installation of a plugin. The Nicepage plugin will serve as your editor in WordPress to work with your Nicepage web pages.

Before exporting the WordPress zip file, choose which features you want to export to your website. You will want to include the Theme along with pages and Editor Plugin. If you are planning an eCommerce site, retain the templates. If you want to export your site to the desktop app, choose to have the Nicepage Project. Now we are ready to export.

Next, we will go to the wp-admin section of our WordPress website to install the zip file. Once you are in the wp-admin area, select "Appearance" from the left menu and select themes. At the top of the page, click on "add new" and then on "upload theme." You will locate the exported zip file on your computer and click "install."

Now that we have installed our website, we need to activate it. Having done that, click on customize, and you will need to go to self-identity. In this section, you will insert your logo and Favicon from your media library or upload them from your computer. Then go further down to insert the site icon.

Now click the back arrow, then go down to the menus. Under menus, you will need to select the menu you will be using. Most likely, it will already be set.

Next, click the back arrow and go to "Homepage settings." Here you will choose whether the homepage will use the latest post or will be a static page. Although posting is a significant function of my Digital Chowder website, I use a static homepage with links to posts.

At this point, you're ready to click publish and view your WordPress website online.

In my fourth and final Nicepage-oriented article, I will discuss working with your Nicepage-generated website within WordPress. In addition, I will show how to go back and forth between your online and offline versions of the site. You can view all four articles on YouTube for a better visual demonstration of this presentation.

Website Building and Repair

Elite Web PresenceElite Web Presence

Do you find all this a bit overwhelming, or do you not have the time to work with a site? Let me make a suggestion. Go over to Elite Web Presence for some help. Whether you need a complete website build and update, or some cleanup and maintenance, they can do the job for you. They can also help with SEO, along with website backup and security.

Conclusion

Has this series been helpful? Building a website with Nicepage is an easy and efficient way to get your site up and running quickly. Using the tools it offers, you can create an attractive design that drives traffic to your pages and gives customers what they need.

Finally, does all of this sound too daunting or time-consuming? In that case, Elite Web Presence can help build, update or maintain your website to optimize it for success.

Have questions or comments? Please leave them in the comment section below.

Top Posts

As an affiliate marketer, Digital Chowder earns from qualifying purchases.


https://digitalchowder.com/guide-to-all-the-best-features-in-nicepage-part-3/
Saturday, April 8, 2023

Discover the Benefits of Using Ubersuggest

Discover the Benefits of Using Ubersuggest

Need help with SEO? Most of us do. SEO is probably outside your skill set list if you are a small business owner managing your website. And then, how high a priority in your budget can you allow for SEO costs?

I learned about Ubersuggest early in my pursuit of an affiliate marketing website. I found it to be a welcome partner. In this article, I want to share with you the benefits I have found using the Ubersuggest SEO tools. In short, Ubersuggest is a powerful digital marketing tool that can help you optimize your website, analyze your competitors, and manage campaigns more effectively.

It can help you with valuable keyword research, giving you keyword suggestions and insights. With this data, you will be on your way to meeting your SEO goals. So, keep reading as I delve into many of its features that can help meet those SEO goals.

How I Got Started With Ubersuggest

I have an affiliate marketing website that is about nine months old, and I am still trying to get traction with SEO traffic. As I prepared to launch my site nearly nine months ago, I was looking for tools I could afford to help with keyword research. But the tools I needed were expensive, so I initially settled for free tools. There were better choices than this, though.

Finally, I came across Ubersuggest. I am trying to remember how it came to my attention. As I explored the service, it was not only affordable but offered much more than I would have expected for the price. As I begin this overview, I want to start with the Ubersuggest subscription plans. Then I will go on to highlight some of the features that Ubersuggest.

Subscription Plans

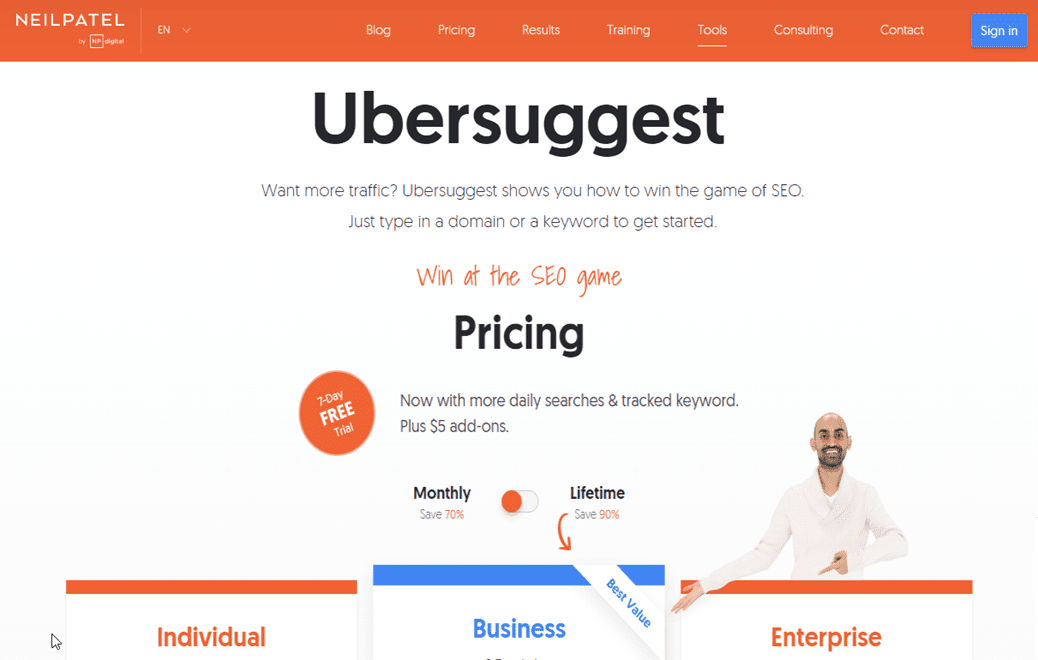
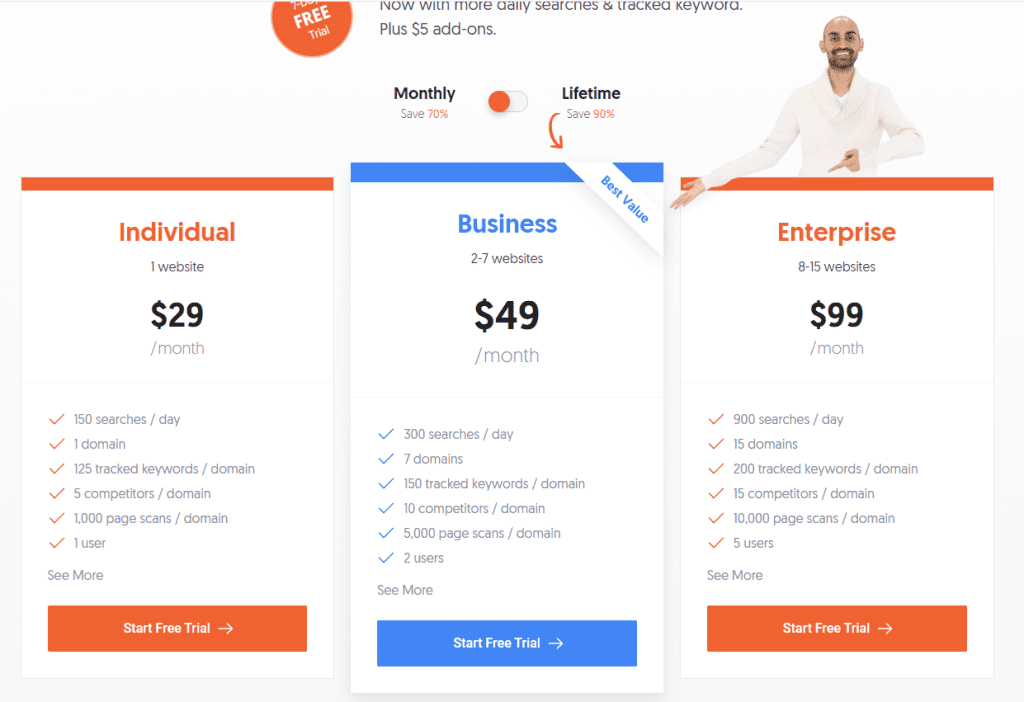
The subscription plan is shown in the image below. As you can see, there are three plans: the individual, the business, and the Enterprise. I chose the Individual Plan for $29 a month. I will get into the plan's features when I discuss the Dashboard.

The individual plan allows one domain, whereas the Business Plan allows seven domains, and 15 domains come with the Enterprise. And, of course, the number of searches and other allowances also vary with each plan. About five months after subscribing to Ubersuggest, a lifetime plan was introduced. This plan added even more value to the subscription.

Paying $29 a month amounts to $348 a year. At $290 for a lifetime plan, I'm paying less than I was per year on the monthly plan. And the lifetime is a one-time payment. If you want more features than this offers, you can add them at $5 a month per feature.

Ubersuggest Dashboard

As you would expect, the dashboard provides an overview of information from several different features. So, for instance, it displays SEO issues such as blocked pages and broken links. We also are given items to optimize, such as keywords with more significant potential for specific pages.

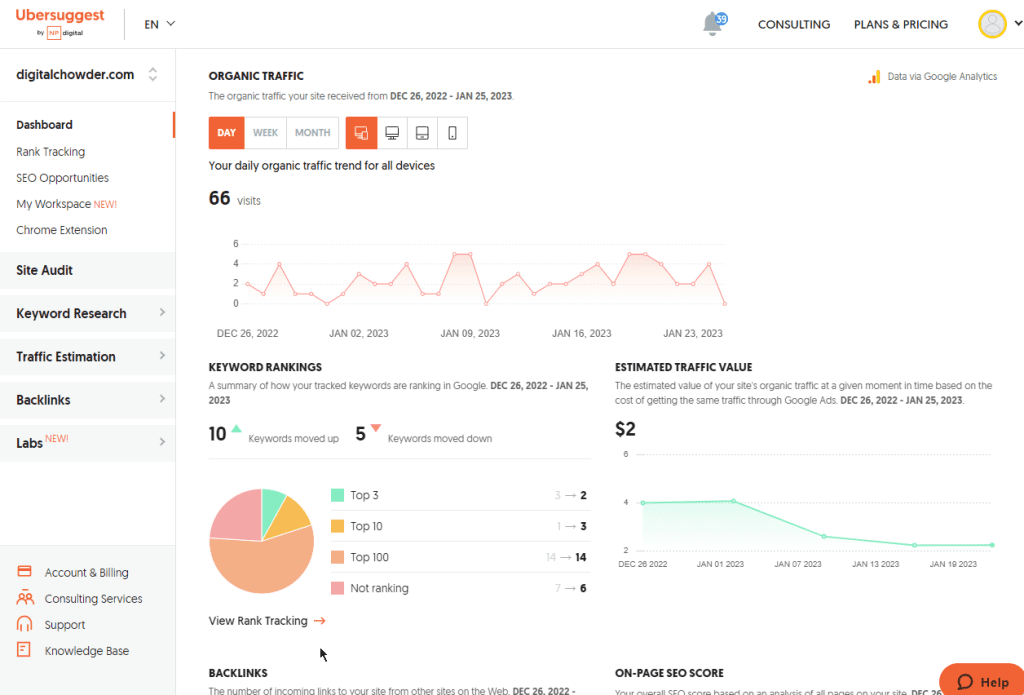
Further down, we see the organic traffic. Increasing organic traffic is a big goal. If you are new to this, organic traffic results from Google searches, whereas direct traffic may come from anywhere.

I was excited when my organic traffic began to exceed direct traffic. Now I'm seeing keywords ranking in the top 10 search results. You will see those in the image below.

I now have two keywords that are coming in, in the top three now, two that are coming in in the top 10 and then 15, and the top 100 and so forth on-page SEO score gives me my score. And then down here, I can click and go. Well, check out some of my competitors, which I'll not go into now.

Rank Tracking

Moving on to Rank Tracking, we see more details about keyword search results. For instance, my average search position is shown, and there is more detail on the ranking keywords. Ranking pages are listed along with their search position, volume, and difficulty. This information can be used to capitalize on the content ranking well.

Chrome Extension

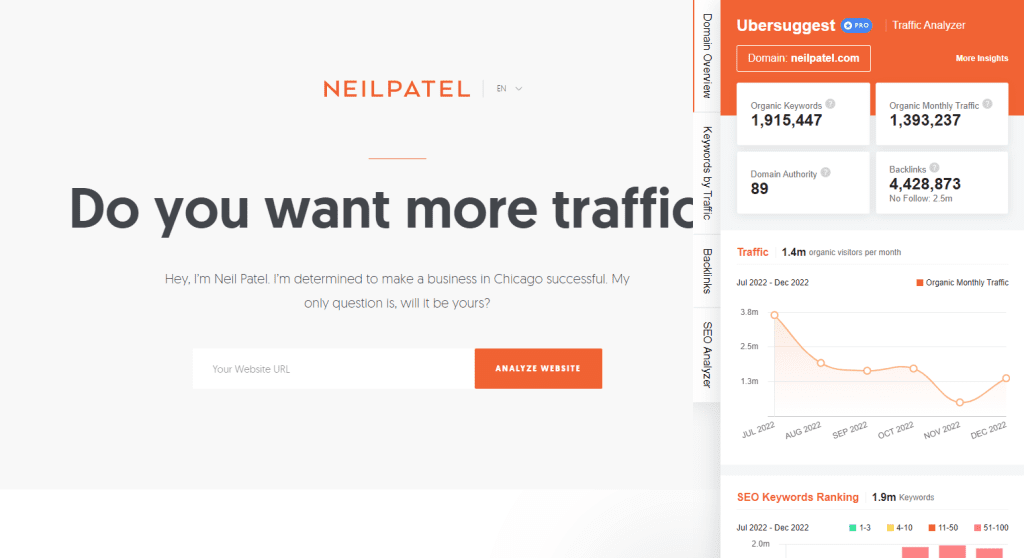
The next feature is the Chrome extension. Using this tool, we can learn SEO statistics for any webpage we load in our browser. In the image below, we see the chrome extension displaying information on the neilpatel.com website.

On the Domain Overview tab, We can see the organic keywords, organic month traffic, domain authority, and backlinks. We can also view keyword ranking. Clicking on the Keyword by Traffic tab, we see a list of keywords, their volume, and their position. Using the corresponding tabs, we can view Backlink information and SEO analysis.

The extension is a great tool to use while browsing similar or competitive sites to your own

Site Audit

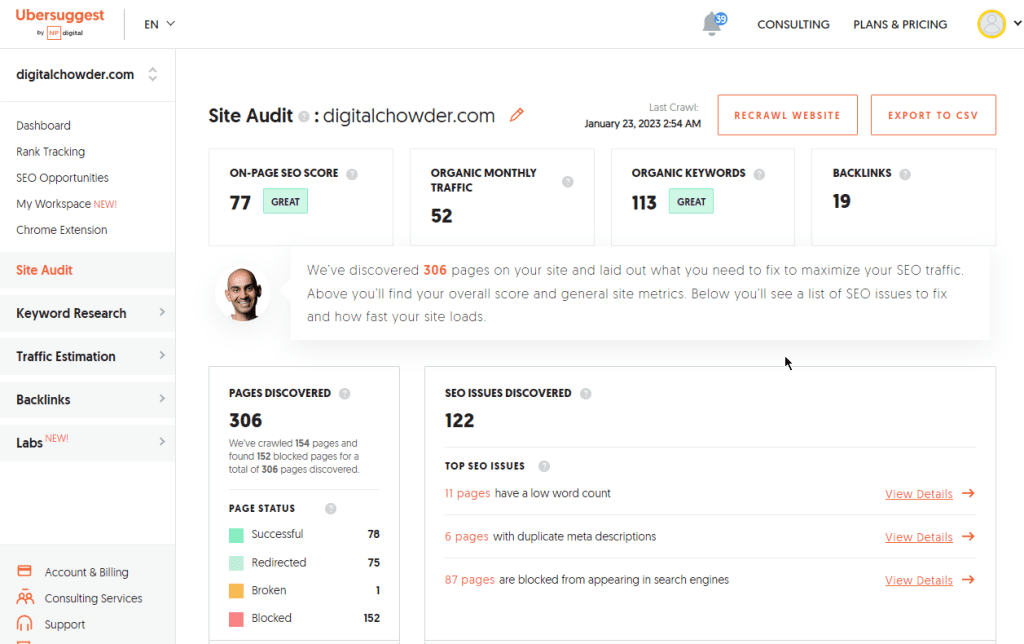
To continue down through the sidebar menu, the next feature to explore is the Site Audit. Your website will be crawled weekly using this feature and return an audit report. You can initiate an on-demand crawl using the "Recrawl Website" button.

In the image above, you can see that my last crawl was on January 23. My report from this crawl shows an on-page SEO score of 77, an organic monthly traffic of 52, an organic keywords count of 113, and 19 backlinks. As you can see, there is much room for improvement. Based on those numbers alone, I need to work hard at backlinks, keep tweaking on-page SEO scores, and keep up with keyword analysis and strategy.

Next, I could focus on the SEO issues discovered, such as pages with low word count, pages with duplicate meta descriptions, and pages with no H1 headings. From your own experience, you will know that addressing such issues is a never-ending task.

Moving on down the report, I want to check site speed. This, too, can be an ongoing effort to keep the site speed as high as possible. Every new post or major edit threatens to impact the speed.

Three concerns are targeted with site speed:

- Load Time is “The time it takes for the page’s main content to load.” This report shows a load time of 2.50 seconds which needs improvement but is on the borderline of great. Last week’s report showed great. Keep in mind that the server response during the speed test will have an impact. My next post will address site speed more as I review WPMU DEV WordPress tools.- Interactivity is the “total time a page is blocked from responding to user input, such as mouse clicks or screen taps.” This report shows excellent interactivity.- Visual Stability - “How much your page layout shifts or jumps while it’s loading.” The report gives a great response. 

Keyword Research

Let's move on to keyword research. This may be the main area in which you're interested.

Keyword Overview

Enter a keyword, such as "meal delivery," for an overview of the results you might expect with that keyword. Here is what we get:

- A search volume of over 60,500 - SEO difficulty of 75 out of a hundred- Paid difficulty is 56- Cost Per Click (CPC) is $14.18

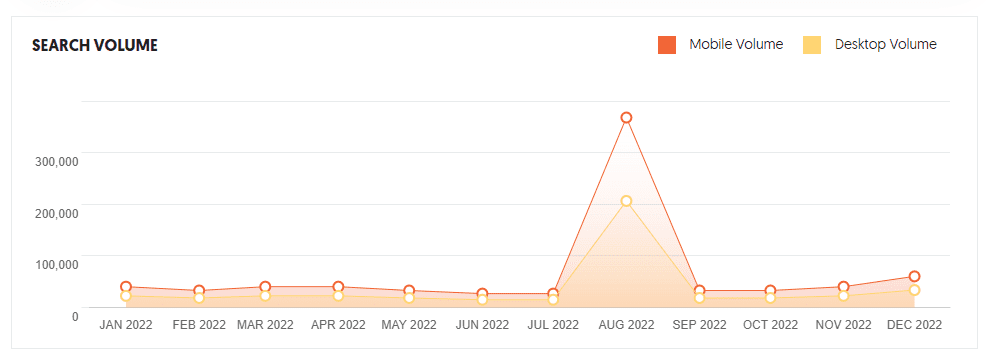
These numbers provide an overview. Let's go down to "Search Volume" and get the volume trend for the past year. This keyword peaked in August and dropped down the next month. It looks just at the start of an upward trend in December.

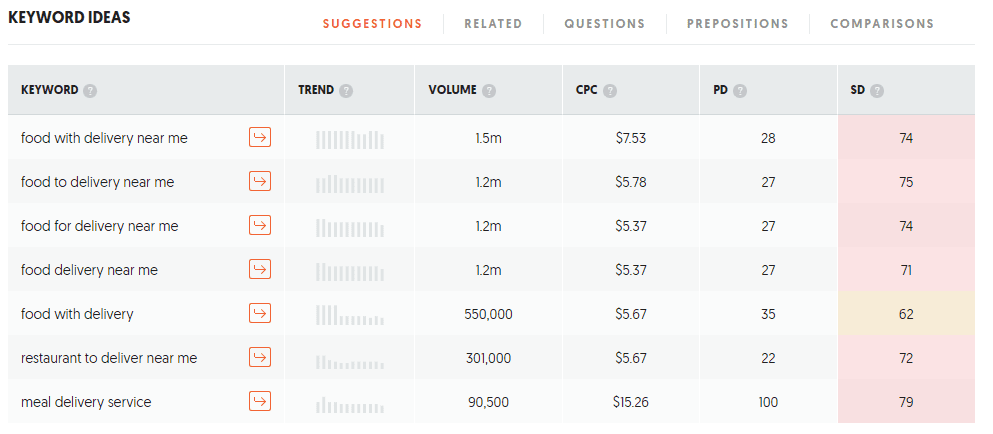
Keep going down the page, and next is "Keyword Ideas." This list gives a whole list of other forms of the keyword. For instance, based on meal delivery, other ideas include "food for delivery near me" and "food with delivery." With each picture, you see the trend and volume.

While "meal delivery" has a possible volume of 60,500, "food with delivery near me" has a potential of 1.5 million. You can see how this tool can be beneficial.

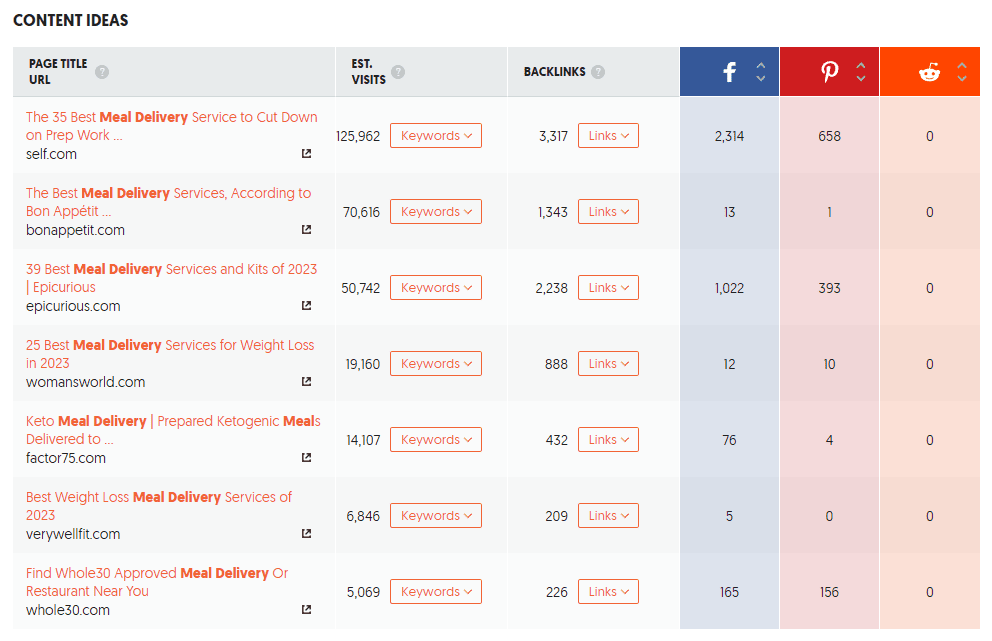
Moving along. The following section is "Content Ideas." This can be particularly helpful if you blog. Using the initial keyword, "meal delivery," this section lists content using that keyword along with estimated visits and backlinks. If you decide to go with one of the keyword ideas, enter it in the search at the top of the page and look at the keyword and content ideas.

Keyword Ideas

Next on the left sidebar menu is "Keyword Ideas." This is similar to the "Keyword Overview" we just discussed. But it takes a slightly different approach.

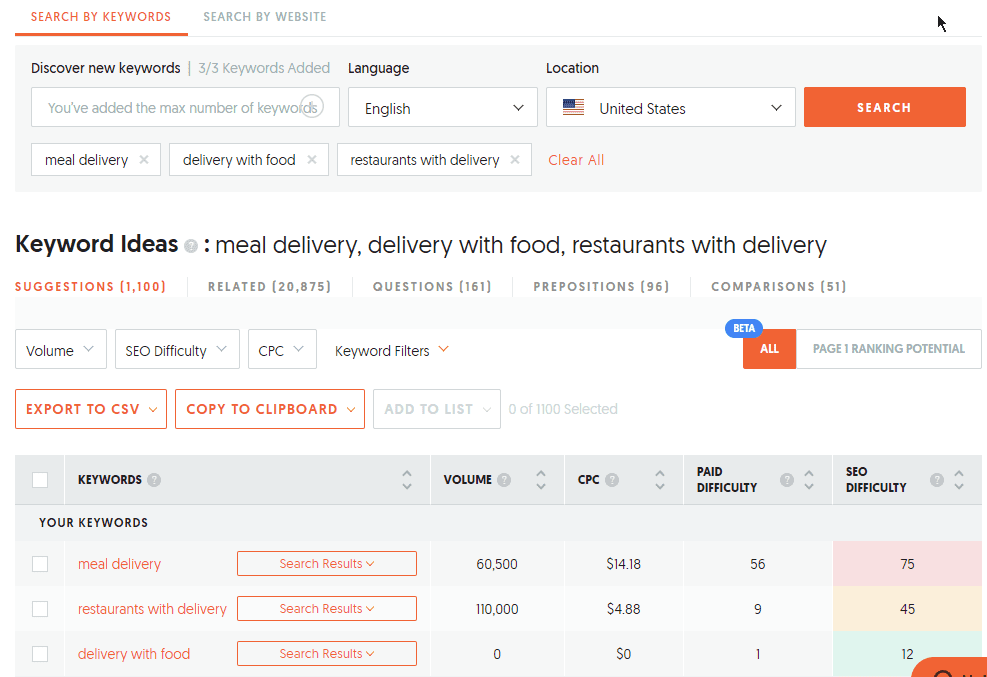
Here you can enter three keywords at one time and search. The result will be a comparison of results for the three keywords. In addition, you get a list of keyword ideas, including their search volume. You can drill down further by clicking on "search results" for a select keyword idea and get a list of URLs using that keyword idea.

Keyword Visualization

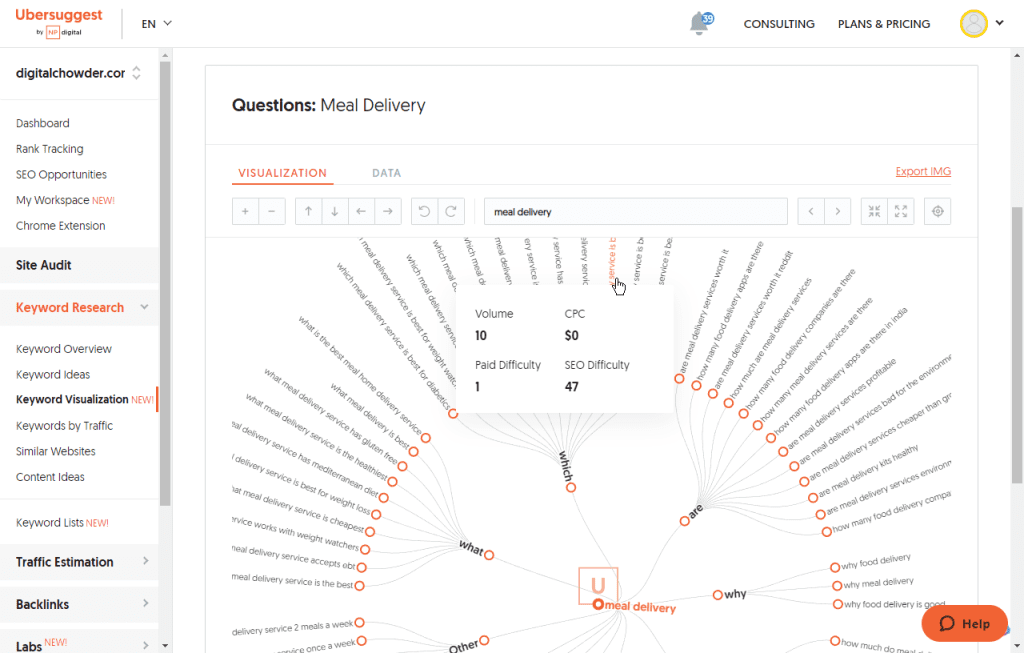
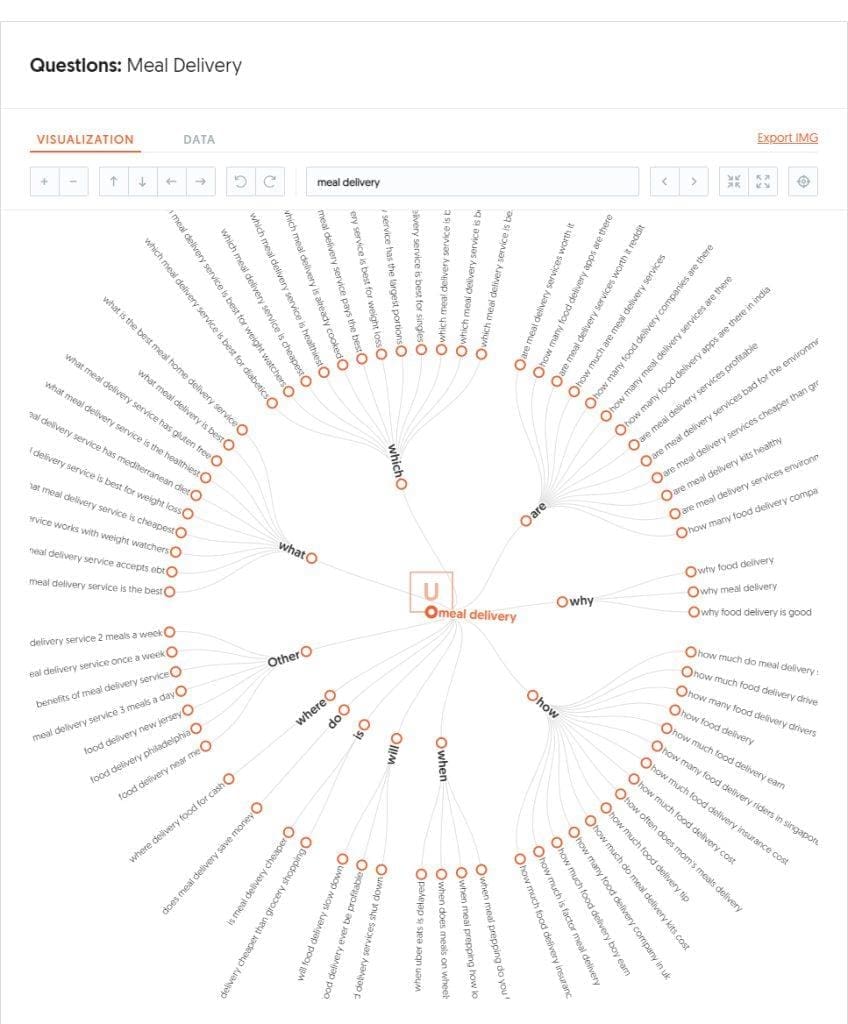
Continuing down the left sidebar menu, we come to "Keyword Visualization." This is yet another approach to keyword research. Enter your keyword and search. The result will be a large circle showing keyword variations, including words such as what, which, are, why, how, etc. By hovering over each item in the ring, you can see the data for that keyword. Notice the image below.

The visualization image can be exported and is shown here:

Traffic Overview

Skipping a few features in the sidebar menu, I will move on to Traffic Estimation and Traffic Overview.

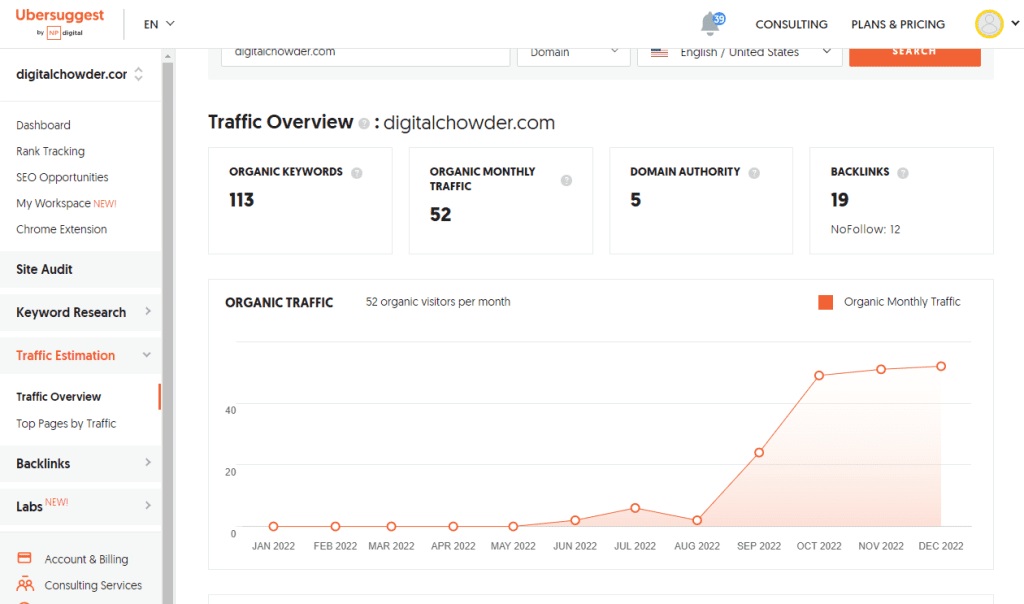
This feature allows you to analyze the keyword results on your website. Enter the URL of your website and search. The first output will be the same statistics you saw on the dashboard. Organic keywords and traffic. Next, you see a graph of your organic monthly traffic for the past year. You will see an image of this graph above.

I launched my website, digitalchowder.com, in April of 2022, so there is no data for the first five months of 2022. June shows two organic visits, July has 6, and August drops back to 2 visits. Beginning in September, the number started to climb dramatically, and since October, is showing slow growth.

As you review your organic traffic in this way, you can identify factors that may have contributed to growth or decline. Unfortunately, with traffic analysis, we are always looking in the rearview mirror. We are still waiting for immediate results for the adjustments we make. It is about three months later that we see the outcome.

AI Writer

Finally, I'm jumping down the sidebar menu to "Labs" and, under that, to "AI Write." This is one of my favorite features, probably because I blog.

There are several tools of interest with the AI Writer. For instance, you can enter a keyword you want to rank for using the Meta Title tool and get a list of possible meta titles suitable for that keyword. You continue by doing the same with the Meta Description and Headline Generator tools. Other tools include:

- Paragraph rewriter- Answer a "People Also Ask . . " Question- Product Description Generator- Listicle Generator- Related Hashtag Generator

I often use the feature at the top of the page, which is to "Create New Page." This feature combines the Meta Title and Description, plus the Headline Generator, all in one process. The result is an outline for a post. You start by entering the keyword for which you want to rank. Then select the title from several you are given, choose a description from several options, and finally, select as many of the headings you want from a list.

Next, turn the writer loose and it will write a document using all those elements, including a paragraph under each heading. If you check the search results in the left sidebar, you will find a list of the web pages from which the data was gathered. With this, you can do further research for your post.

View Video

You can view a video of the article for a more hands-on presentation.

Conclusion

So this has given you a preliminary glimpse of Ubersuggest. You now have a good overview of Ubersuggest features without registering for an account. Here is a link to go over Ubersuggest and sign up for a first-hand trial of the SEO research service.

As mentioned above, in my next article, I will give an overview of WPMU Div. This WordPress site management service offers an array of plugins covering everything from SEO to backup protection to security measures. Plus, it allows one to manage one or many websites at once.

Check back at DigitalChowder.com frequently for information on various topics related to digital resources for Home and Small Businesses. On the Home page, you will find a list of categories for subjects in which you may be interested.

Please leave comments in the section below, including topics you wish I would address in the future.

https://digitalchowder.com/discover-the-benefits-of-using-ubersuggest/

Friday, April 7, 2023

5 Recommended Cloud Storage Services For The Small Business (SOHO) in 2022

5 Recommended Cloud Storage Services For The Small Business (SOHO) in 2022

You can't afford to ignore data storage and backup as a small office or home-based company (SOHO). Small businesses require the security of data storage and backup services in the cloud. This blog will examine why a backup is essential and 5 recommended cloud storage services.

Why A Backup Plan?

One of the essential digital resources in a home-based company office is backup or synchronization services for office documents. However, it's similar to having flood insurance. We don't seriously consider it until the water rises inside the house.

Starting a home business is intimidating, and most people find themselves going from one time-consuming activity to the next with little time to consider some crucial but non-urgent tasks. Providing cloud storage for our computer files frequently falls into this category.

If my description matches your situation, I'm guessing you've never experienced a computer failure or a loss of your computer to fire, water damage or any other calamity. Otherwise, the devastation of losing essential data, much of which might be irreplaceable, would convert you into a believer. You'd already have some backup or cloud storage in place. 

The Convenience of A Backup Provision

It's more than simply a good idea to have a backup strategy. It's also convenient. Whether you suffer from a computer system collapse or lose your data, you'll need to purchase new hardware or upgrade your computers sooner or later. Restore your data to the new computer with an easy-to-restore solution is a life-saver.

I've had everything from a computer crash to a hard drive replacement and purchasing a second computer. In each instance, I could move all of my data in one easy step to the new machine or hard drive.

What Is Cloud Storage and Why Have It?

Cloud storage is a form of data storage in which data is kept on remote servers over the internet. Due to their superior attributes when compared to traditional on-site data storage solutions, cloud storage services are becoming increasingly popular.

One of the most significant benefits of cloud storage is that it allows users to store and access files from nearly any place on earth. You only need an internet connection and can quickly and simply access your data. Cloud backup also eliminates the need for hard drives for backup, which are less dependable and susceptible to physical catastrophes such as fires or floods.

The third significant advantage of cloud storage is that it is far more scalable than on-site data storage. You may quickly increase or decrease the storage space you use with cloud storage. This is ideal for companies with seasonal increases and decreases in data storage requirements.

As seen in the list of advantages to cloud storage, I recommend using cloud rather than onsite storage.

Backup VS Syncing?

When you look at cloud storage, you will find services that only back up your files and others that synchronize the contents of your computer with those in the cloud. So, what is the distinction?

  • Backup - With your documents backed up, a distinct operation is required to upload them to the cloud storage and then restore them to your computer. The backup procedure may be set up to run automatically or manually started. But restoration will require manual activation.
  • Syncing - If you choose to sync your files in the cloud, backup happens as you work within the file. The cloud storage replicates your hard drive files selected for syncing. As you make changes within the files on your computer, those changes are automatically made within the files stored in the cloud. You don't even have to think about backup. It takes place as you work. The only caution you must consider with file syncing is if you are also syncing those duplicate files on a second computer. For instance, after working with a file on your desktop, you can later pull up that same file on your laptop, which will be up-to-date with the one on your desktop. But here is where the caution arises. When you start working on your laptop, you need to allow time for it to sync with your cloud storage before starting to work on your synced files. This syncing process happens automatically once your computer connects to the WiFi. But you must give it a minute or two for the update to occur.

(We independently select these products — if you buy from one of our links, we may earn a commission.)


My Recommendations:

So, my first advice was for cloud storage instead of local storage. My second recommendation is for file syncing instead of file backup. As you can see from the description of synchronizing, it is a simple and automatic operation. This isn't to suggest that there won't be times when backing up rather than synchronizing is required. But these will be rare occasions.

Explanation of Recommendations --
  • All of the five suggestions below allow for synchronization. To be clear, syncing your data is equivalent to backing it up. In other words, multiple copies in the cloud may be reloaded onto your computer if you suffer a data loss or need to transfer all your information onto a new hard drive.
  • I'm not suggesting that these five are the best cloud storage services. That being said, they're all trustworthy and dependable services. You could discover features with services not included in the list that aren't available with those listed here. But for most home business offices, these five should suffice. 

Why these five?

  • The first three (Google Drive, Onedrive, and Dropbox) should work well with your existing system.
  • As far as Google Drive is concerned, you probably already have a Google account. If this is the case, whether or not you're currently using Google Drive, you already have access to it.
  • Onedrive is already included with Windows for PC users. If this is the case, whether you are using it or not, you already have the service.
  • Many individuals may already be using Dropbox in a limited way. If so, all you have to do now is expand your usage and sync all or most of your office documents.
  • If you want features unavailable through Google Drive, Onedrive, or Dropbox, IDrive or PCloud are good alternatives. We will get into their differences below.

Recommendations:

1. Google Drive


If you already have a Google account, Google Drive is a natural choice for cloud storage and data syncing. Suppose your Google account is your account, and you are the only employee in your home business. In that case, a personal account will be a sufficient alternative for a cloud storage service. 15 GB comes with a free account, but you can increase the storage limit at reasonable rates. Here is the rate schedule:

  • 2 TB will cost $99.99 per year or under $1 monthly.
  • 5 TB is $24.99 per month or $249.99 per year, a 17% savings.
  • 10 TB costs $49.99 per month.
  • 20 TB comes at $99.99 per month.

A Google Drive app is available for Windows and Mac users. When you install the app on your computer, a G Drive stores your synced files. Move all files you want syncing in the cloud to the G Drive. All files in the G Drive will be uploaded to the Google Drive cloud storage and automatically synced as you make changes to these files.

Should you experience a crash or loss of your computer, install the Google Drive app on a new computer, and all the files in the cloud will be downloaded to the G Drive on your computer.

File & Folder Sharing - Do you need to share documents with someone else? You have two options:

  • Create a shared folder - Create a folder and then share it with others. Give them editing privileges or just viewing privileges. Then move all documents to the folder you wish to share. Those with whom you are sharing will have access to all documents in the shared folder.
  • Create a shared document - Select any document in your Google Drive and share it with others. Again, choose to give editing privilege or just viewing privilege.  Then share the link with those you want to have access.

Office Apps

Google offers three office apps with Google Drive; Unlike Microsoft office apps, Google apps do not run independently on your computer. You must work within documents in the cloud or install a browser extension. If you wish to use one of these apps offline, you must set a document for offline editing while logging into your Google account. Once you are offline, you will use the browser extension for editing.

  • Google Docs - This is the Google word processor.
  • Google Sheets - Google's spreadsheet app.
  • Google Slides - Google's answer to PowerPoint.

Google One

When you upgrade your Google Drive storage from a free account to a paid version, you become a member of Google One. Additional benefits come with this membership.

  • Pro Session - Schedule a personal online session with a Google expert to learn about improving your account security.
  • Extra Google Photos editing - Access to Google Photos editing features for Android and iOS.
  • VPN protection on your device - With a VPN on your device, you can:
    •  Browse, stream, and download content with a secure and private connection
    • Shield against hackers on unsecured networks (like public Wi-Fi)
    • Reduce online tracking by hiding your IP address
  • Google Play & Google Store Points

Google Personal VS Google Workspace

To this point, we have been discussing a personal Google account. But if you are a home business person, you may consider Google Workspace, the business account.

So why should you use Workspace?  

Here are a couple of reasons you may want to consider Workspace:

  • Branding - If you are the only employee of your home business, there is no reason you could not simply use your personal Google account. If you need additional cloud storage, upgrade your subscription. But your account will not project a very professional image. This is particularly true if you are using Gmail as your email service. In this case, your email address will be like this -  businessperson@gmail.com. Using an email account with this address is more professional - businessperson@mybusiness.com. With Workspace, Google will interact with your domain name to use it with your email address.
  • Sharing - A Workspace account allows users to be added to the account and assigns all the same features and tools to each user. This provides a unified calendar; all email addresses use the business domain name. Further, the workspace owner has access to all cloud storage drives of other users, maintaining the ownership of all documents.

Cost - The cost of Workspace is $6 per user per month. This comes with 30 GB per user.

NOTE: Consider the discussion about Google Drive file syncing and sharing common to the other cloud storage services. Though these features may not be mentioned with the other services, assume they are true for each unless otherwise noted.


Nicepage

2. Microsoft OneDrive


Microsoft Onedrive is most attractive to those already using Microsoft Office apps, such as Word, Excel, and PowerPoint. The use of these apps comes with a subscription to Microsoft 365. A personal account costs $6.99 monthly and comes with 1 TB of storage. However, you can sign up for Onedrive storage without the apps at $1.99 per month for 100 GB. Then there is the Microsoft 365 Family Plan which is a real bargain. For $9.99 per month, you can have up to 6 users with 6 TB of storage.

Onedrive VS Google Drive

The two will run neck-and-neck if comparing only the file-syncing capabilities of Onedrive and Google Drive. The critical difference between them is the office apps they are designed to work with. For Onedrive, it is Microsoft Office Suite; for Google Drive, it is Google Suite.  And a significant difference between these two suites is their operating environment. For Google apps, the working environment is the browser. For Microsoft apps, the environment is your computer desktop.

Hybrid user

Based on these two comparisons, I might be considered a hybrid user. For my cloud storage service, I have chosen Google Drive. My choice was based on convenience. I already had a Google Account and slowly began using Google Drive incrementally. When Google developed the Google Drive app that installs on my computer and automatically syncs my computer files with files in the cloud, I jumped all in.

But I seldom use Google's suite of apps or office apps from my browser. Even though I work primarily on my computer desktop, neither am I a Microsoft Office apps user. I use the Corel Office Suite and, as I say, work directly on my desktop. But as I do, my files are automatically synced with those stored on Google Drive. I would probably use OneDrive instead of Google if I used Microsoft Office apps. The deciding factor between the two seems to hinge much on productivity apps.

All that has been said here goes equally for Mac users and Windows users.


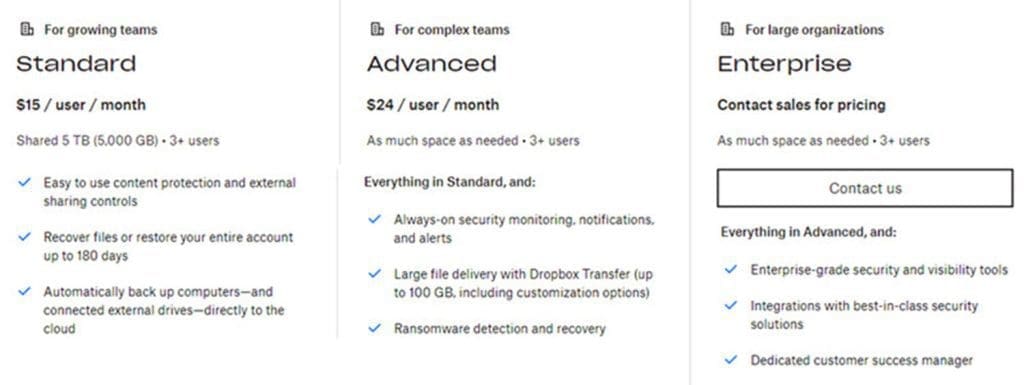
3. Dropbox


We have demonstrated so far through Google Drive and OneDrive that one's work style and need play a significant role in choosing a cloud storage service. The distinguishing feature between Google Drive and OneDrive is the productivity apps used. Dropbox brings yet another perspective. A significant focus for Dropbox is team collaboration. Team collaboration is indeed a feature in OneDrive and Google Drive, but with limited work tools. Dropbox has a large toolbox full of apps with which it integrates for team collaboration.


Dropbox Paper: 


https://youtu.be/fmsq1uKOa08

Paper is Dropbox's signature feature which is a collaborative document-editing service. A free Dropbox service helps teams create and share early ideas. Within Paper, you can work with almost anything, from video and images to code and sound. Paper is the place teams use to coordinate their work and keep projects moving. Building on Paper, teams can integrate their work using an arsenal of apps such as Trello, Slack, Dropbox for G Suite, Microsoft Office, Microsoft Teams, and many more.

So integration is a prominent feature with Dropbox. It is through the integration of many apps and services that team collaboration takes place. Through these partner integrations, Dropbox claims to . . .

  • Bring Magic to your creative workflows.
  • Provide High impact marketing and a speedier sales process
  • Keep your teams connected and keep projects moving
  • Bring it all together with the DBX Platform

Cloud Storage:

DBX Platform is the Dropbox platform. Through its platform, Dropbox reverses the focus. Rather than bringing your apps to their platform, Dropbox focuses on bringing their platform to your apps. So, as they say, "DBX Platform lets you add Dropbox features to your apps, such as file storage, sharing, previews, and search."


Pricing


(Click on images to enlarge)


Remote Access to your Computer

4. iDrive


As noted above, all the services listed have similar file syncing and sharing features. But IDrive approaches it differently. This is because there is no focus on the apps that will be working with their service. IDrive concentrates on backup and syncing. The features offered by IDrive reflect this concentration:

Multiple Device Backup:

Back up unlimited PCs, Macs, iPhones, iPads, and Android devices into a single account. In addition, data from external hard drives can also be backed up.

Online File Sync:

Files and folders will be synced in real-time across all devices you link using IDrive. Sync storage does not impact your backup storage and matches your backup storage limit.

IDrive Express:

Quick backup and data retrieval via physical storage shipment in less than a week, ensuring no bandwidth usage.

Snapshots and Versioning:

Snapshots provide a historical view of data for point-in-time recovery and help protect against ransomware; IDrive retains up to 30 previous versions of all files backed up to your account.

Manage Computers: 

The web-based console helps manage data backups, restores application settings, and more on remote computers.


Clone/Computer Backup: 

Perform sector- or file-level backup to secure your entire computer and restore the same to its initial state in the event of a disaster.  NOTE: This goes beyond data backup to whole-computer backup - including the operating system. Should you experience a catastrophic disaster rendering your computer inoperable, this backup can restore the computer to its initial state of operation.

Security and Privacy:

Transfer and store files with 256-bit AES encryption using a user-defined key not stored anywhere on the servers.


https://digitalchowder.com/5-recommended-cloud-storage-services-for-the-small-business-soho-in-2022/

10 Smart E-Commerce strategies to Increase Your E-Commerce Sales

Increase Your E-Commerce Sales If you need help to increase your e-commerce sales despite putting in much effort, you're not alone. With...