Showing posts with label wordpress design. Show all posts

Monday, February 13, 2023

Why Choose WPMU DEV for Your WordPress Projects?


Why might you choose WPMU DEV for Your WordPress Projects? First, let me ask, “What is your approach to using plugins for your WordPress websites?” If you’re like me, when I first got acquainted with WordPress, my use of plugins could have been better organized. I’d seek a plugin to fill whatever my current need happened to be. My preference was for free plugins.

In time, I had an array of plugins beginning to have conflicts and JavaScript errors. I was becoming increasingly frustrated with the problems arising and the time it took to find solutions.

One day, while looking for a better solution for image optimization, I came across a recommendation for Smush. Smush is for image optimization. The advice included Hummingbird for site performance. Initially, I saw them as individual plugins, but then I learned they were just two of a covey of plugins that WPMU DEV provides. As was my practice, I began using the free versions. But when I decided to upgrade Smush to the pro version, I learned that by upgrading this one plugin, I had access to the whole line of pro plugins offered by WPMU DEV.

Besides doing blogs for my affiliate website, I also developed WordPress sites for small businesses and organizations. While researching and experimenting with various plugins, I was also looking for a unified package I could offer my clients. Also, I can manage all the sites I host.

I had found that with one company and was on the way to making this my website management system for all my clients. But after I came across WPMU DEV, I changed my mind.

Why I selected WPMU DEV

So, what changed my mind? Well, it was the usual: quality and price. Beginning with quality, I knew Smush and Hummingbird have name recognition for quality products, and I liked what I saw in working with those two plugins. Initially, I assumed they would be out of my price range, at least for what I’m willing to work with. But this was not the case. So when I considered upgrading Smush to the pro version, I learned that for the price of what I was paying for the lowest level backup with the other company, I could have the pro version of every plugin that WPMU DEV offered just for the price of that one plugin.
image optimization

And guess what? There are no conflicts. They all work together. My website runs faster and smoother than it ever has. But this was only the beginning. I considered what I paid for backup, security, contact forms, SEO, and other plugins. When I compared the combined cost of those apps to the one price I was required to pay for all plugins by WPMU DEV, I was blown away.

Furthermore, I considered the cost of multiple websites. I got all the pro plugins for $7.50 a month for my one site. I paid $5 per month for the basic backup with the other company. If I were to add more websites, it would cost me $12.50 a month for three sites. This would allow one license for my site plus two clients. And I would share the cost with those clients. If I were so inclined, I could also add a small surcharge.

This monthly fee for three sites gives access to all pro plugins for all three sites, plus a dashboard. I can monitor each site from the dashboard, check if they are down, update plugins, check analytics and security, and make backups or site recovery. I can also use their tools for client billing and reporting.

If any of this piqued your interest, keep reading. In the remainder of the article, I will give an overview of the various plugin features. Even though I’m an affiliate marketer, I don’t receive any benefits if you should sign up with WPMU DEV. I want to help readers find quality services for their websites and small businesses.

WPMU DEV Hub
WPMU DEV Hub

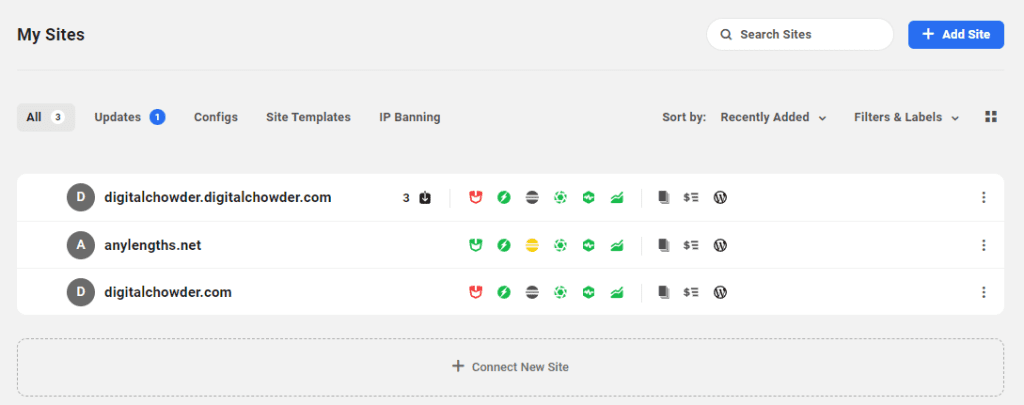
You can see the WPMU DEV “Hub” in the displayed image. I have websites linked to all three of the licenses with my subscription. I get an overview of the activity from the Hub for all three sites. I hover over the corresponding icon to check any feature and get a report. Moving from left to right, I can check the following:

  • Available updates
  • Security
  • Performance
  • SEO
  • Backups
  • Uptime
  • Analytics
  • Reports
  • Client billing
  • And link to the client admin panel.

WPMU Features

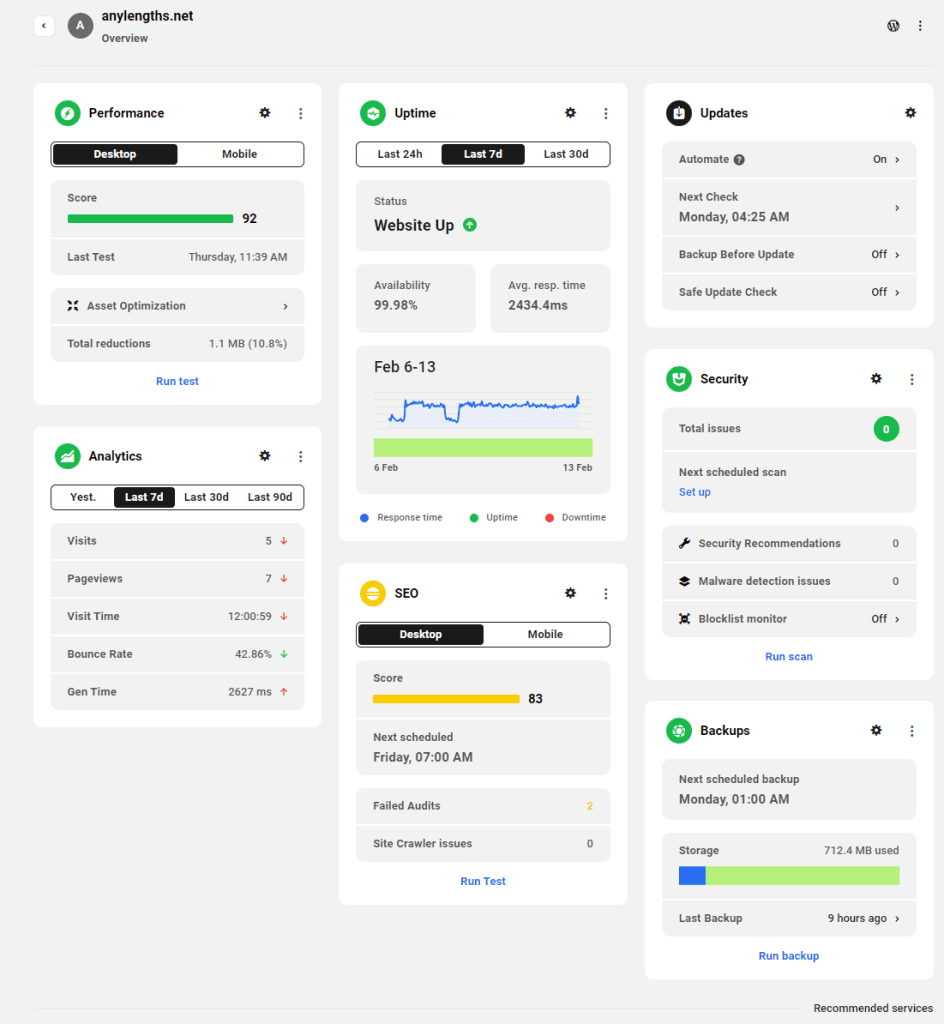
Based on what I see when I glance at the sites listed in the Hub, I may take a closer look. First, I must click on the website I want to explore. This opens a dashboard for that site. This page gives us a more detailed summary of all the features we glanced at on the Hub.
WPMU DEV Dashboard

I may not need to go further, depending on what I see here. Even if there are no performance or security issues, I often move on to a detailed page for a feature, so I might check my settings or take a closer look at the data.

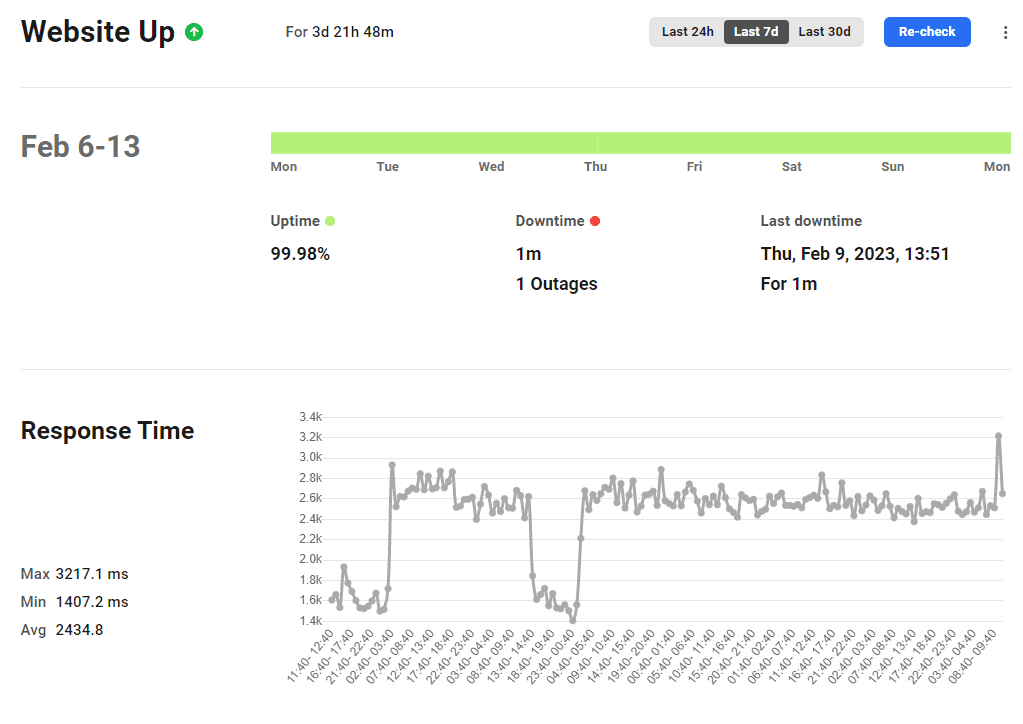
For this article, I checked the uptime details for the website I’m reviewing. Because I noticed a few dips in response time over the past week, I selected the detail page for uptime. From this page, I can see the times when the drops took place, and if I choose, I can compare it to other issues that might result from the low response time.

I can also see one downtime during that period of one minute. However, the uptime average for that week was 99.98%. A score that is within the promise of the hosting service and could even correspond to a maintenance episode.
Website Uptime

I also noticed on the dashboard page there were two failed audits under SEO. After going to that detail page, I learned that the failures have to do with a missing image alt and an uncrawlable link. So I fix these issues.

While on the SEO detail page, I noticed some other details needing attention, though they were not causing alerts.

These examples show how the WPMU DEV website management helps me monitor and maintain client websites. The examples I used with Uptime and SEO could also be applied to: Plugin updates, Security, Backups, Performance, and Analytics.

WPMU DEV Plugins

Here is a complete list of WPMU DEV plugins:

Smush Pro – User’s choice, award-winning, and benchmark tested – The best image optimizer plugin for WordPress.

Hummingbird Pro – Everything you need to get your site running super fast.

Defender Pro – Regular security scans, vulnerability reports, safety recommendations, and security tweaks for WordPress.

Hustle Pro – Grow your business and audience with this super easy, super slick email opt-in and marketing plugin.

Forminator Pro – Drag and drop WordPress form builder plugin with interactive polls and quizzes for increasing user engagement and building a following.

SmartCrawl Pro – Boost your PageRank and drive more traffic to your site with little effort and simple configuration.

Snapshot Pro – Make and schedule incremental backups of your WordPress websites and store them on secure cloud storage.

Branda Pro – White-label WordPress branding for both the front and back end of your site or network.

WPMU DEV Dashboard – Instant access to brilliant support and one-click plugin and theme installation.

Shipper Pro – Shipper Pro moves WordPress websites with one click, from host to host, local to production, development to live, and top to bottom, without using FTP.

Beehive Pro – Customizable Google Analytics dashboards, statistics, and reports for WordPress and Multisite.Integrated

Video Tutorial – Complete, quality, always up-to-date list of unbranded WordPress training videos.

WPMU DEV Support
WPMU DEV Support

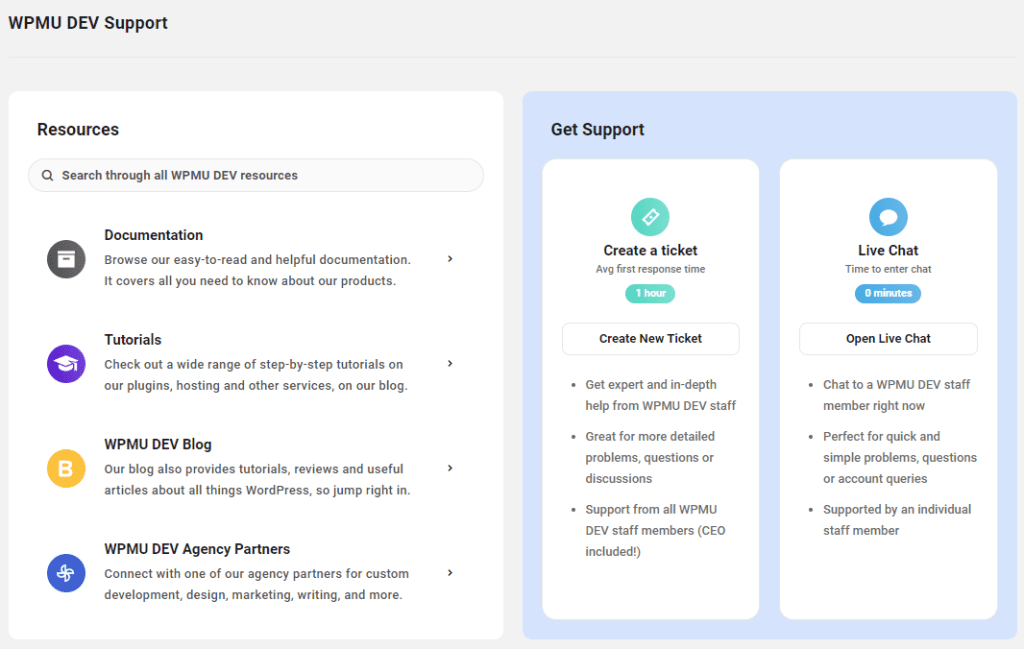
I want to conclude with a comment about WPMU DEV Support. Support is always an important factor, along with the price and the quality, when selecting a product. Before investing heavily in a product, I want to know if I will receive help should I need help with the product.

With WPMU DEV, the answer is a yes. I give it an A+ rating. This is my response to the help I received when setting up the Snapshot plugin for backups. It needed to be fixed with my site.

I began by making contact through chat. The chat agent spent a couple of hours with me seeking the solution. When we were unsuccessful, he elevated the issue to technical support, activating a support ticket before we signed off. It was also necessary for me to give wp-admin and FTP access.

By the next day, the backup was working, but they had also made some changes in the plugin to make it work. Changes will be reflected in the next update. I was asked to create a staging site to allow further debugging so they could find and implement a fix in future releases.

View Video

You can view a video of the article for a more hands-on presentation.


Conclusion

Thank you for joining me in this article about WPMU DEV and its all-in-one monitoring system. If you found it helpful, please leave a comment below. Let me know what you think and the questions you have. I would love for you to share any ideas for future articles.


Simple drag-and-drop website builder software to implement any ideas
Nicepage

WordPress Websites for Small Businesses & Organizations

Elite Web Presence


Thursday, January 5, 2023

My Personal Guide to All the Best Features in Nicepage - Part 3

My Personal Guide to All the Best Features in Nicepage – Part 3


This is my third article in a four-part series about my favorite web builder, Nicepage. In the first article, “My Personal Guide to All the Best Features in Nicepage, Part 1,” we discussed the Nicepage subscription plans. We also mentioned its desktop app for Windows and Mac allows you to design and edit your website offline. Then, in my second article, “My Personal Guide to The Best Features in Nicepage Part 2,” I highlighted special design features in Nicepage that I especially like. Some are even unique to Nicepage.

In this third article, we will discuss the options available on Nicepage, allowing you to publish your site to your website from the desktop app.

Publication Options

I have provided screenshots to help you visualize the comments, but there is also a video further down you can view.

Nicepage Publishing Options

So let’s go to the desktop app for Nicepage. In this case, it is in Windows, but there is also a version for Mac computers. The website showing on the desktop is one I have been working on in the second video for demonstration purposes. We demonstrated some animation, grids, and how they contribute to a responsive website. We also presented a modal, accordion, and tab feature.

Assuming that we are ready to publish our website on the internet, let’s look at our publication options. These methods export the site from our desktop app to our online website. So we go to the publication feature, where you can see the following options:

  • Website. This option uploads the site directly to the Nicepage server. This is a simple way to post the site online and allow clients to view it before launching it publicly.
  • HTML. For those who prefer a simple, straightforward website rather than a CMS such as WordPress or Joomla.
  • WordPress. This is the most popular website option, and Nicepage is a leading theme builder for WordPress.
  • Joomla. Though less popular than WordPress, Joomla offers another CMS option.
  • Image. Publish a one-page image of the site.
  • Website project. This packages the website project for transfer to another computer.

View Video


Website Publication

Website Publish option

Starting with the first option, we will publish to a website. The subdomain to which it will be posted is shown in the window. Use this URL to view the site once it’s published. A custom domain name that you have registered can also be configured to direct viewers to the Nicepage subdomain. A few other options can also be selected in the window, but we will skip them and go straight to “Publish Website.”

Now we can use the subdomain URL to view the site. As you scroll down the home page, you can observe the animation in action with the various page elements as they zoom out or slide in. Click on the button for the modal to have it pop up with the photo slider. And then, you can see how the accordion and tab look and operate. Both are good options for offering viewers an opportunity to view the data or not.

HTML Publication

HTML Publish option

With the option to publish to HTML, we can export the site to a folder, a zip file, or directly to our website using FTP. I use my FTP client, so I take the Folder option and select where to export it.

I will go over to Filezilla, connect to the export folder, and then to my website folder online. I will select all files and folders in the export folder, then drag and drop them into the online folder on my hosting site.

There is no further configuration necessary. I can go to my browser, enter the URL of my website, and immediately view the site. This assumes that my domain is set up with the hosting site and has propagated across the internet.

WordPress Publication

WordPress Publish option

Finally, we will choose the WordPress option for publishing. Again, we can export to a folder, zip file, or FTP. Selecting the zip file option is the most straightforward choice. You will need a more advanced understanding of WordPress to use the folder or FTP approach.

By choosing to export to a zip file, I will install the site on my WordPress website as with any other theme. The only difference will be the import of content and installation of a plugin. The Nicepage plugin will serve as your editor in WordPress to work with your Nicepage web pages.

Before exporting the WordPress zip file, choose which features you want to export to your website. You will want to include the Theme along with pages and Editor Plugin. If you are planning an eCommerce site, retain the templates. If you want to export your site to the desktop app, choose to have the Nicepage Project. Now we are ready to export.

Next, we will go to the wp-admin section of our WordPress website to install the zip file. Once you are in the wp-admin area, select “Appearance” from the left menu and select themes. At the top of the page, click on “add new” and then on “upload theme.” You will locate the exported zip file on your computer and click “install.”

Now that we have installed our website, we need to activate it. Having done that, click on customize, and you will need to go to self-identity. In this section, you will insert your logo and Favicon from your media library or upload them from your computer. Then go further down to insert the site icon.

Now click the back arrow, then go down to the menus. Under menus, you will need to select the menu you will be using. Most likely, it will already be set.

Next, click the back arrow and go to “Homepage settings.” Here you will choose whether the homepage will use the latest post or will be a static page. Although posting is a significant function of my Digital Chowder website, I use a static homepage with links to posts.

At this point, you’re ready to click publish and view your WordPress website online.

In my fourth and final Nicepage-oriented article, I will discuss working with your Nicepage-generated website within WordPress. In addition, I will show how to go back and forth between your online and offline versions of the site. You can view all four articles on YouTube for a better visual demonstration of this presentation.

Website Building and Repair

Elite Web Presence

Do you find all this a bit overwhelming, or do you not have the time to work with a site? Let me make a suggestion. Go over to Elite Web Presence for some help. Whether you need a complete website build and update, or some cleanup and maintenance, they can do the job for you. They can also help with SEO, along with website backup and security.

Conclusion

Has this series been helpful? Building a website with Nicepage is an easy and efficient way to get your site up and running quickly. Using the tools it offers, you can create an attractive design that drives traffic to your pages and gives customers what they need.

Finally, does all of this sound too daunting or time-consuming? In that case, Elite Web Presence can help build, update or maintain your website to optimize it for success.

Have questions or comments? Please leave them in the comment section below.


Facebook Twitter Instagram LinkedIn

Friday, December 23, 2022

My Personal Guide to All the Best Features in Nicepage, Part 1

My Personal Guide to All the Best Features in Nicepage, Part 1


Introduction

Hello, and welcome to the Digital Chowder blog. I’m Wayne, and this is the first of four posts and videos I will be doing about All the Best Features of Nicepage, my favorite website builder. This post will not be a how-to about how to use Nicepage. Nor will it be a review comparing Nicepage alongside other web builders. Instead, I will highlight some of my favorite features found in Nicepage.

This first post/video will address the Nicepage subscription plan, why I like it, and why it is a good fit for me. Then I will touch on the desktop app with Nicepage, giving an overview. Finally, I will discuss the options for publishing your website after designing it in the desktop app.

Nicepage Subscription Plans:

If you go to the Nice Page website and then to their premium page, you will see four subscription plans outlined. Each plan has two options: a subscription and a license. So what is the difference? With the license, you’re paying a one-time fee to purchase the software; with that, you’re getting one year of updates for the software. But beyond the first year, there will be an additional fee if you want any updates. I have chosen the subscription approach. With the subscription, you pay an annual fee and receive the software and all updates during the year. And it is ongoing.

When I started with Nice Page, I used the Personal plan since I only needed one website for my business plus a personal site. With the Personal plan, I could have as many as five websites. So that was quite adequate. But now I design websites for other businesses besides my own. So I need to use Nicepage for more than five websites. However, I don’t need an unlimited number of sites.

So, let’s jump over to the Elementor website and look at their plans to understand why the Nicepage subscription is a good fit for me. With Elementor, three plans start with the Essential plan, which is $59 a year. This plan allows you one website. If you jump to the Expert Plan, which is $199 a year, you are allowed 25 websites.

Now let’s go back to the Nicepage website. Back there, the Business plan offers a middle ground between the Personal and Pro plans, which Elementor does not have. The Business plan for $129 a year allows me 50 websites and additional features. This is just right for me. I need more than the Personal plan offers, but I don’t need all that the Pro plan provides. So the Business plan is the one I use. I would pay $199 annually at Elementor and only get 25 sites.

Desktop App:

The next feature I want to highlight is the desktop app with Nicepage. There is a desktop app for both Windows and Mac computers. If you’re building a WordPress website, then you also get a WordPress plugin, or if you’re doing a Joomla site, you get that Joomla plugin.

You can do the whole website on your computer before you import it to your WordPress website. But it is not required. Creating the site layout is the only portion of building a website that requires the desktop app. Once you have created a layout for your website, you can export the site to a zip file and install it as a WordPress theme. You can do the remainder of the design online. Or not! You can also build the complete site on your desktop before installing it online.

Once you have installed the design theme on your WordPress site, you can work back and forth between online and offline.

Once your site is online, you can edit it on the desktop or do it online, whichever you choose. I do both. I like to be able to do major edits on my desktop, knowing that when I do a save, it’s not going to go public.

Next, let’s look more closely at the desktop app.


You can check the video above to see what I’m talking about in the following comments.

As you view the desktop application listed in the left-hand column, you will see a list of your websites. Click the appropriate icon to open the site you want to work with. You can also delete a website you are no longer working with from this page. To create a new website, use the “New Site” button.

If you are creating a new website, you can start with a blank website and build the site from scratch, adding elements as you go. Or, you can use your graphics to form the bases of the site. Yet another option is to select a design template from the various categories listed. Once you choose a template, you can stay close to the template design or use it only as a starting point.

Publishing The Website:

When you are ready to export my website to an online host, I can click the “Publish” button. You can publish a temporary Nicepage-hosted site, an HTML format, or a WordPress theme.

The temporary “Website” option is quick and easy. Press the publish button to install the site on the Nicepage server. Then share the subdomain with a client for their review of the site. There is no configuration or installation or uploads to do to have a site looking like the one on your desktop.

Another option is an HTML site. This choice requires an FTP app to upload to the host server.

If you publish a WordPress site, use the output zip file to install in WordPress as you do with any other theme.

Conclusion

In this post, I have given an overview of Nicepage. In the next post, I will detail some of my favorite design features in Nicepage. Meanwhile, I encourage you to get a free Nicepage download and try it. Then come back to the other posts for further help.

Facebook Twitter Instagram LinkedIn


Wednesday, November 16, 2022

6 Steps to Building A Website for Your Small Business


Introduction

You need a website to promote your business but can’t afford to pay someone to build it for you. What are you to do? Your first option is to recognize it is unnecessary to be an expert web developer to build your website. Read on to learn six critical steps to building a website. We will point you toward some of the needed resources along the way.

Research the type of website and features you need 

When you’re ready to build a website, the first step is to do your research. There are many different types of websites, and it’s crucial to pick the one that’s right for you. You’ll need an eCommerce website to sell products or services. If you’re a blogger or writer, you’ll need a site that’s easy to update and add new content. And if you’re promoting a brand or business, you’ll need a professional site that’s easy to navigate.

Once you’ve figured out what website you need, the next step is determining what features are important to you. Do you need a shopping cart? A contact form? A blog? A newsletter sign-up? Take some time to figure out what you need, and then start looking for a web builder with all the features you need.

Select a Web Builder and Web Host

Once you have determined the type of website you need and some of its requirements, the next step will be to assess your web builder. Here I’m referring to the application you will use to build the site. Knowing what web builder you will use will help you decide on a web host.

A web host is a service that leases storage space on its servers. Web servers have software specific for connecting or broadcasting websites to the internet. You will need a web host to make your website available on the internet. The amount of storage space and bandwidth required will determine the service’s cost. 

As suggested above, a site with a shopping cart will be more data-driven than one primarily used for blogging. Therefore, the shopping cart will use more bandwidth than the blog.

While storage and bandwidth are factors to consider when selecting a web host, your web builder will be another factor.

In its article, “10 Best Website Builders for Small Business: Compared for 2022,” WebsiteBuilderExpert recommends these five web builders for small businesses:

  • Wix– Best small business website builder.
  • Squarespace– Best for building your brand.
  • GoDaddy– Best for businesses that need to get online quickly.
  • Weebly– Best for value for money.
  • Zyro– Best for business basics.

Each of these five builders comes as part of a web hosting service package. Each is respected, and each is drag-N-drop in functionality, and thus easy to use. Using Wix as an example, Wix is a hosting service. For $22 per month, you get a free domain and free SSL certificate for one year, plus the web builder. You also get 5 GB of storage and one hour of video play. The video play is their way of limiting bandwidth.

WebsiteBuilderExpert gives Wix the top ranking in this list of builders, so it is a quality builder, as are the others.

I will discuss WordPress in a different category, which is not on the list but is one of the most popular platforms for building websites. WordPress is independent of any web hosting service. That said, some hosting services cater specifically to WordPress. Two of these are Siteground and Bluehost. These two services are special WordPress tools included in their service.

Pick a domain name

A domain name is what identifies your website on the internet. The name must be registered with a domain service and configured to locate your website when entered into a browser. A fee is required to register the domain name and is due annually to remain active. While specific sought-after names can be expensive, the typical cost is around $15 annually.

Choosing the right domain name for your business is vital for several reasons.

  • First, it’s one of the first things potential customers will see when looking for your site. Therefore, you want to ensure that it’s easy to remember and relevant to your work.
  • Second, the domain name is a crucial part of your branding. It should be unique and reflect the image that you want to project.
  • Third, you’ll want to choose an available domain name.
  • Finally, you will want a domain name with good keyword value.

What is a keyword? A keyword is a term that best describes the content on your page or post. It’s what you want to rank for when people search for that keyword or phrase in Google or other search engines. So, when they search, your page should come up. Several keywords may describe a page’s content. In this case, you will want to use multiple keywords. Multiple keywords will broaden the search possibilities for finding your content.

Based on the name and nature of your business, there will be words that best describe your business and perform well in search engine search results. Therefore, it could be profitable to do some keyword research to find a good keyword on which to base your domain name. Some services offering free keyword research are Keywords Everywhere and Ubersuggest.

Create your website content

Creating your website content can be a fun and rewarding experience or a real chore. It will depend on your skills and interests. Even if you know what you want to say, you may be at a loss for how to say it. How can you say it using good grammar and sentence structure while capturing the attention of your audience?

How to say what I want to say is where it becomes a chore for me. But I have discovered some tools that do much of the hard work for me and allow me to post content confidently:

  • Jasper ai – Jasper uses artificial intelligence to generate content and word it clearly and engagingly.
  • Grammarly – As its name suggests, Grammarly addresses spelling, grammar, and sentence structure. If you subscribe to the Jasper service, Grammarly will come with it. I subscribe to Grammarly separately, allowing me to use it wherever I write. Even in email. As I write, it is there offering corrections and making suggestions. When I complete an article, I don’t need a proofreader to catch what I have missed. Grammarly has my back.
  • Ubersuggest – When it comes to writing content, Jasper and Grammarly are adequate. Ubersuggest is a multi-tasker. As I mentioned above, it does keyword research. But it also does website analysis and offers SEO help to increase traffic to your website. It has yet another feature for which I suggest it in this context. It, too, has an AI writer. Though it is not as robust as Jasper, it is beneficial in giving help with content. If I need a boost to start writing on a topic, I go there first to ‘prime the pump.’

Add Images

A website without images can be a very dull site, indeed! At least visually. But where can you find images, photos, or videos that are free or inexpensive, about which you can be confident you have permission to use?

We all know about Google images, a rich storehouse of graphic content. But which images can you use on a website, and which are prohibited? Sure, you can contact the content owner, but that takes time, and you may or may not receive a prompt reply. So I rely on four services:

  • Graphic River – A combination of free and paid downloads.
  • Unsplash – https://unsplash.com/ – Also a combination of free and paid downloads.
  • Pond5 – Pond5 offers both a subscription and a pay-per-use approach. I usually pay, at most, $2.50 for an image.
  • Canva – Canva is an excellent source for downloading images, but I use it primarily for graphic design. There is a free version that has some limitations. The principal limit is the inability to download a high-quality version of the image I want. Higher-resolution downloads require a fee. I use the Pro version, which gives me every advantage I want. It costs $119.99 annually.

Launch your website!

So you’ve built your website and are ready to show it to the world. Congratulations! Publishing your site can be daunting, but with some preparation, you can make it go smoothly. Here are a few things to keep in mind as you launch your website:

  • First, Double-check your site for any broken links or errors. Nothing is more frustrating for a visitor than clicking on a link and getting an error message. Before you go live, test your links to ensure they work.
  • Next, take a look at your site’s design and layout. Is everything easy to find and navigate? Is the overall look and feel professional and polished? If not, make some changes before you launch.
  • Finally, once your site is up and running, promote it! Let people know where they can find your site and what they can expect to see there. Use social media, email marketing, and other strategies to get the word out. Launching a successful website takes effort and planning, but it’s ultimately worth it. With these tips in mind, you’re on your way to a successful launch!

Conclusion

So there you have it – a simple guide to creating your website. Do the research, choose the right web host and domain name, and produce quality content. You will then be well on your way to having a successful website that reflects your business in the best possible light.

Have questions or comments? Leave them for us in the comment section below or use our contact form.


Twitter

Top Posts


Amazon Black Friday Deals
You Don't Want to Miss!

Check back at Digital Chowder every day for new Early Black Friday Deals on Amazon! You're sure to find the perfect digital deal for you.
Speechelo text to voice


Friday, November 4, 2022

14 Online Apps & Services for Freelancers


Many online apps and services can help make you more productive if you’re a freelancer. This article will discuss 14 of these tools, including three writing tools, four website-building tools, three creative tools, and four productivity tools.

Writing Tools
Grammarly

Grammarly

Grammarly is a grammar-checking tool that helps improve writing skills. Before I learned about the app, I struggled to write clearly and concisely, but Grammarly has helped me greatly. My sentences used to be too long and complicated, but now I feel better about my writing skills. I use Grammarly for everything from blog posts and emails to website copy. It’s the best tool around for polishing up your writing!

Grammarly is constantly active, no matter what application I am using. As I write, it will suggest changes to improve spelling, style, and tone. Sometimes, it will rewrite sentences to make them neater and simpler.

I am confident in the quality of my work, free of typos, misspellings, and bad grammar.

Grammarly has indeed been a lifesaver for me and my writing.

Jasper AI

Jasper

Before I publish anything, I use Grammarly to check my writing for errors. However, when actually creating content, Jasper AI is where I turn to spark my creativity.

Jasper AI is the perfect tool to help me quickly and easily develop original, engaging content. With Jasper‘s help, I can come up with dozens of ideas for blogs, product descriptions, and web copy.

This can all be done in a fraction of the time it would normally take, and because Jasper integrates directly with social media platforms, I can publish content on these platforms without any hassle.

Sqribble

Sqribble eBook Creator

Artificial intelligence is increasingly automating tasks that have here-to-fore been time-consuming. Sqribble eBook Creator is a leader in using AI to automate the process of eBook creation. With just a few clicks, you can create amazing eBooks that will educate, inform and entertain your readers. And best of all, you don’t need any design, technical or writing skills to start!

Sqribble provides over 50 alluring eBook templates belonging to 15 distinct niche categories. So, no matter what book you want to write – whether it’s a cookbook, a self-help guide, or an eBook on your pastime – we have your back.

With customizable templates, you can make your eBook unique by adding photos, videos, and text. And if you need help along the way, a support team is always available.

Website Tools
Nicepage

Nicepage

Nicepage is a website design app capable of turning out sites in WordPress, Joomla, and HTML.

Nicepage is my choice for web design. It is the tool I use for my website and to build sites for other businesses.

With Nicepage, you can create stunning websites without writing a single line of code! Just use its easy drag-and-drop website builder software to implement your ideas. Install its desktop app and get started designing your website. There are over 10,000 designer-made templates to choose from, so you can find the perfect one for your business. And if you want to customize anything, it’s easy to do with no coding required. Websites created in Nicepage are mobile-friendly, so they’ll look great on any device.

If you want a website that runs on WordPress or Joomla, design the general layout in the Nicepage desktop application. Afterward, export it as a template file and install it onto either WordPress or Joomla. A Nicepage Plugin will be included with the installation to enable you to continue the design and do editing from within the CMS.

Although I recommend Elementor, I prefer Nicepage because it is more flexible and gives me more freedom. With Nicepage, my creative ideas aren’t restricted by its capabilities. This saves me a lot of time not having to find a way to make my ideas work — they do.

Elementor

Elementor

With Elementor, you can create a stunning website without any coding! With its easy-to-use drag-and-drop editor, you can create beautiful pages in no time. And with 100+ full website Kits and endless possibilities, you can let your creativity shine. Plus, Elementor‘s world-class hosting and robust security features will give you the peace of mind you need to focus on creating the website of your dreams. 

Elementor attempts to do it all with its own built-in features that eliminate the need for other plugins and thus do away with plugin clutter. And with 90+ widgets and countless built-in capabilities, you can create any website you can imagine. 

You won’t go wrong with Elementor as your choice for website creation.

Pretty Links

Pretty Links

Pretty Links isn’t just for those looking to make money from their content with affiliate links. It has plenty of other benefits, too. Pretty Link’s main purpose is link shortening, but it also tracks clicks for each link created within the program.

While this obvious perk is especially enticing to affiliate marketers, anyone wanting to see how many people are clicking on certain parts of their website can benefit from Pretty Links‘ click-tracking feature. Use Pretty Links as a link shortener for every link on your website, and you will easily track what parts of your website people are viewing or interacting with.

Plus, Pretty Links makes it a breeze to put links on your site. Just add a keyword or phrase when you create the link using Pretty Links. Then, Pretty Links will automatically insert that link any time the keyword appears. And if you ever need to change a link, you will not have to go through your site to change every link usage. Simply update it in one spot – Pretty Link – and it’ll be good to go sitewide!

Pond5

Pond5

Pond5 is a great resource for finding professional content at an affordable price. It has everything you need for your project, with millions of royalty-free photos, videos, audio clips, and more. And their license allows you to use their content without worry.

The main reason I use Pond5 is that a subscription isn’t required to access the media library- you can pay for each item separately. Most of the photos I purchased cost less than $5.00. If you would rather have a subscription, though, they are available at different price points depending on the content you want to access. You can also buy Credit Packs, which offer a 20% discount off the total purchase price.

Creative Tools
Snagit

Snagit

Techsmith’s Snagit is a screen capture software that lets you quickly and easily share what’s on your screen with others, so you don’t have to waste time with back-and-forth emails or messy file attachments. Just share a link to your Snagit capture, and they can view it in their browser.

With Snagit, you can not only take screenshots and mark them up, but you can also record a video of your screen. This is especially useful if you want to show someone how to do something or navigate a process step-by-step. Plus, once you’re done recording, Snagit will automatically turn it into a shareable video that’s easy for anyone to understand.

Snagit is my favorite tool to use when I need help with website design or illustrations for blog posts. The video screen capture feature also comes in handy whenever I need to show someone how a particular software works.

Camtasia

Camtasia

Camtasia is another app created by Techsmith. With Camtasia, you can quickly and easily create professional-looking videos without prior video editing experience. Camtasia is quick to learn and easy to use, so you’ll be up and running in no time. It is the ideal tool for creating high-quality videos that engage your audience and help them learn more than text alone. Camtasia is perfect for creating video tutorials, how-to videos, software demo videos, meeting recordings, training videos, and lessons.

Canva Pro

Canva

Canva Pro is an excellent choice to up your design game. This design software makes design simple, convenient, and reliable. With time-saving tools that make anyone look like a professional designer, you can create anything you need in no time.

Need to add some curved text, photo effects, or image enhancer? How about adding frames to photos or even text to videos? It’s all covered. And if you want to take your content to the next level, the online video recorder and converter let you record, edit, trim, and splice videos — all in one place. Plus, you can easily convert them to MP4 format for easy sharing.

When it comes to design, I’m a novice. But with Canva‘s array of templates and tools help my ideas take shape by imitating the professionals. Not only does Canva have great samples that spark creativity, but their design tools are user-friendly. Whenever I need graphics for product promotion or to design a logo, business card, or flyer, I go to Canva.

Productivity Tools
Keeper Security

Keeper

Keeper Security offers a top-notch solution to protect your passwords and personal information from cybercriminals. With Keeper you will be Joining millions of people who use Keeper to protect their online identities. You’ll never again have to remember or worry about a password.

Powered by cutting-edge technology, Keeper offers unparalleled protection against ransomware attacks by generating high-strength, random passwords for each website, application, and service you use. In addition, BreachWatch® monitors the dark web 24/7 and alerts you if your credentials are detected in a public data breach so that you can take action immediately.

I have depended on Keeper for several years. Not only does it enable me to retrieve a saved password quickly, but it will also manage the process of registering a new user account and storing the necessary username and password for later use. It is not only for passwords, though. You can also use it to store credit card accounts, driver’s license numbers, and health insurance credentials.

I use Keeper’s Chrome extension to quickly locate the URL of any website I frequent from Keeper’s database. Once the desired website launches, Keeper is on standby to automatically enter my username and password so I can easily log in.

Todoist

Todoist

As my task manager and to-do list app, Todist is my choice to keep me more focused, organized, and calm. With Todoist, you can add tasks like “read work emails every day at 10 am” in seconds using natural language recognition and recurring dates. Plus, your to-do lists are automatically sorted into Today, Upcoming, and custom Filter views to help you focus on your most important things.

Todoist allows you to break big tasks into smaller ones, share projects with your team, and add reminders. You can also use Todoist’s apps, extensions, and widgets on any device or platform, so you’re never far from your to-do list.

Todoist seamlessly integrates with your voice assistant, calendar, and over 30 other tools to make productivity effortless, whether at home or on the go. Todoist also has the added bonus of promoting a sense of calm by letting users know that they won’t forget any new tasks that come to mind–enter them into Todoist!

Hubspot

Hubspot CRM

CRM stands for “customer relations management,” but at Hubspot, it means much more than managing your contacts. With the easy-to-use HubSpot CRM, you’ll never have to manually update reports or wonder how your team tracks toward quotas. Get a real-time view of your entire sales pipeline on a visual dashboard.

Access detailed reports on sales activity, productivity, and individual performance. Then use those insights to track team performance and spot opportunities for growth. Enjoy unlimited users, data, and up to 1,000,000 contacts with no time limit or expiration date — whether you’re a team of 1 or 1,000.

Using Hubspot‘s WordPress plugin, people who sign up to join our email list are automatically added to our Hubspot list. Their activity on our website is tracked so we can track preferences and habits.

ezyCollect

ezyCollect

ezyCollect has cutting-edge technology to help you get paid faster and protect your business from unpaid invoices. What’s even better, their system is fully automated so that you can save time and effort. You’ll feel like you have an extra person on your team! And with their humanized automation, you can connect with customers more personally.

Within the first 12 months of using ezyCollect, businesses typically see a 43% reduction in outstanding overdue bills. That’s huge! And with their easy-to-use payment portal, customers can view and download invoices, pay one or more invoices on the spot, part-pay, or pay later while they get paid upfront. This makes it super easy for them to pay their invoices and means you don’t have to chase them up for payment.


Twitter

Top Posts


Transform any text into a human-sounding voiceover

Speechelo

Get a paid online writing job!

Online Writing Jobs

10 Smart E-Commerce strategies to Increase Your E-Commerce Sales

Increase Your E-Commerce Sales If you need help to increase your e-commerce sales despite putting in much effort, you're not alone. With...