In this article, I will highlight Snagit Capture and Screen Recording features.
Snagit is a powerful screen capture and recording software that helps users quickly and easily capture their screen or record videos of screen activity. With its extensive suite of features, Snagit makes it easy to take screenshots, annotate images, draw professional-looking graphics, and record videos with audio.
With this article, I will only cover some of the features of Snagit. There are too many to attempt them all. I have been using Snagit for over 20 years, and in that time, I haven't used them all myself. Occasionally I will come across a new feature and wish I had already been using it.
My primary purpose in this article is to demonstrate Snagit's capabilities for those uninitiated about Snagit. Therefore, I will not demonstrate advanced features or provide a "how-to" of specific features.
Taking Screen Captures with Snagit.
Left Column

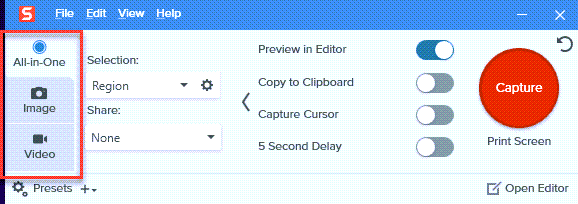
This image shows the main window of Snagit. This window is our starting point. We will work our way through the features from left to right. Starting with the left column, we will talk about the type of capture we will take.
Type of Capture
There are three choices:
- All-In-One - If you select all-in-one, you will wait until later to choose whether to capture an image or do a video capture. After activating the capture process and selecting the area, you can choose whether to do an image or video capture.
- Image - Choosing an image capture from this window will limit our capture to a single image. The image capture also provides several options as to the area to select for the capture.
- Video - Again, choosing a video from this window will limit the capture to video capture. It will also show other options to be selected, such as using the webcam to include our image in the capture and recording audio with the video.

Moving from the far left column in the main window to the center column, we have three choices if we take an image capture.
Capture Selection
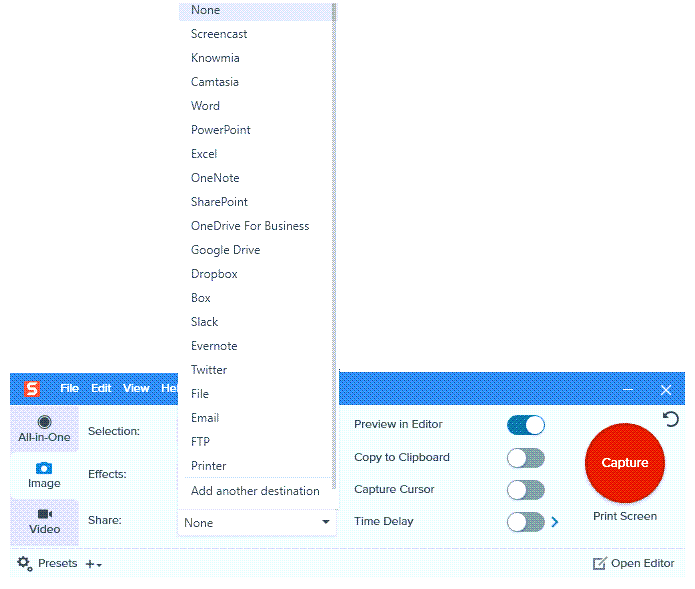
The first choice is the area we will select. Notice the drop-down menu in the image. Only a few of the options are visible in the menu, but they include the following:

- Region - Choosing a region allows us to drag the mouse over the area we want to select.
- Window - This refers to an active window open on our desktop. It may be a word processor or another available app.
- Full Screen - Everything on the desktop will be included in a full-screen capture.
- Scrolling Window - This capture option will cause the active window to automatically scroll to the bottom of the page, capturing the whole rather than just the initially visible portion.
- Panoramic - A panoramic capture is similar to a scrolling window. In contrast, you will select a portion of the page width and then scroll as far down the page as you wish using the mouse. This process will capture everything within the width of your selection and to the bottom of your scroll.
- Grab Text - With grab text, a section of text on the screen is selected and then converted to editable text.
Choice of Effects

You will see the effects drop-down menu in the image to the right. Only a portion of the possible effects is visible. Effects include a border, shadow, edge, etc. SnagIt includes the selected effect in the final capture.
Share CaptureAgain, a drop-down menu will list numerous choices to share the capture. These include:

- Screencast - A cloud storage service of SnagIt.
- Word
- PowerPoint
- Google Drive
- Dropbox
- Evernote
- Many more
To summarize, you can choose an image or video capture, the area of the screen to capture or the entire screen, an effect to add to the image if desired, and an option to share the capture.
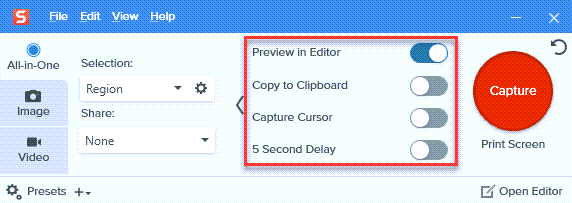
What To Do With The CaptureWe are now ready to address the right column. Once you have made a screen capture, what will you do with it? Your choices include:

- Preview in the Editor - This choice will automatically send the capture to the SnagIt Editor, where you can remove unwanted portions of the capture or make additions and enhancements.
- Copy to Clipboard - Using this choice; you can paste the capture wherever you choose.
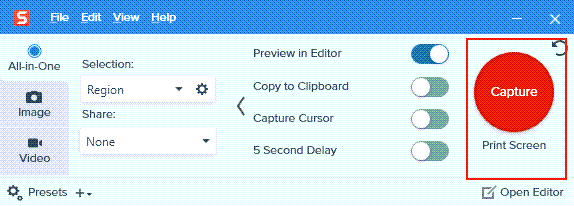
Now it is time to start a capture. We have three options.

- The hotkey - Notice the image highlighting the hotkey setup. The hotkey can be whatever combination of keys you want unless that combination is already in use. Below the capture button, you will see your current hotkey. Mine is the print-screen keyboard key. If you press the capture button, you can change it to the combination of keys you want to use.
- Press the big red button that says "capture."
- From SnagIt Editor
Video Demonstration
Please watch the video below for a demonstration of the SnagIt features we have discussed. As they say, "A picture is worth a thousand words." Words would never explain using the SnagIt Editor or a screen recording video. But the video will provide a demonstration.
Conclusion
So as you can see, Snagit is a powerful and versatile tool for capturing, recording, and editing screenshots. It's easy to use with a range of features that make it perfect for professionals who need high-quality images or videos and casual users who want something quick and straightforward. With its hotkeys, capture widget, Snagit Editor presets, and more - you can easily create beautiful graphics in no time!
This demonstration may have made you interested in checking it out further. If so, use this button for a free SnagIt download. You will receive a 15-day free trial. Using SnagIt is the best way to decide if it is a good fit for you.
Free SnagIt Download


No comments:
Post a Comment