Friday, May 12, 2023

7 Reasons Why You Need Grammarly for Error-Free Writing

7 Reasons Why You Need Grammarly for Error-Free Writing

If you're tired of making grammar mistakes, look to Grammarly for your solution! This tool can help you catch errors and improve your writing.

Writing is essential to our daily communication, whether in emails, social media posts, or professional documents. However, writing error-free content can be challenging, especially if English is not your first language. That's where Grammarly comes in.

Grammarly is an online grammar-checking tool that helps you write better by detecting common grammatical, spelling, and punctuation issues. Here are seven reasons why you need Grammarly for error-free writing.

1. Catch spelling and grammar errors.

The most obvious reason to use Grammarly is to catch spelling and grammar errors. Whether you're writing an email, a blog post, or a research paper, Grammarly can help you catch mistakes you might have missed otherwise. Grammar and spelling errors can be the difference between a well-crafted piece of writing and one that appears amateurish.

Writing free from errors is essential to effectively and accurately convey your message. It's like having a personal editor review your work and suggest improvements. Plus, Grammarly can catch errors other spell-checkers might miss, like contextual spelling mistakes and misused words.

2. Improve sentence structure and clarity.

In addition to catching spelling and grammar errors, Grammarly can also help improve the overall structure and clarity of your writing. The tool can suggest sentence structure, word choice, and even tone changes to make your writing more concise and effective. This can be especially helpful for professional writing, where clear communication is key. With Grammarly, you can ensure that your message is getting across in the most effective way possible.

Personally, sentence structure and clarity is my most vulnerable aspect when writing. While I am susceptible to spelling and grammar errors, they are not my main writing problem. My problem is complex and wordy sentences that lack clarity. With Grammarly, I have no worries about sentence structure or other errors. Seldom do I disagree with the suggestions offered.

3. Enhance vocabulary and word choice.

One of the key features of Grammarly is its ability to suggest alternative words and phrases to improve your writing. This can help you avoid repetitive language and make your writing more engaging and varied. Additionally, Grammarly can suggest more precise words to convey your intended meaning, helping you to communicate your ideas more effectively.

Grammarly helps enhance vocabulary and word choice in several ways:

  • Provides synonyms: Grammarly suggests synonyms and alternative words or phrases when you use repetitive or overused language. With its extensive database of synonyms and related words, Grammarly can help you expand your vocabulary and improve your writing skills.

This introduces variety to your writing and helps you avoid boring or dull content. With a broad range of synonyms, you can find the perfect word to convey your meaning.

  • Offers related words: Besides synonyms, Grammarly provides related words and phrases to help you be more precise. If there's a more specific or appropriate word for your meaning, Grammarly will suggest it. This helps ensure you are communicating accurately and strengthening your writing.
  • Expands vocabulary: Over time, using Grammarly's suggestions helps you learn new words and expand your vocabulary. You adopt suggested synonyms and related words into your writing vocabulary as you accept them. The more you use the tool, the more your vocabulary grows.
  • Checks word usage: Grammarly checks for proper word usage, including commonly confused words like "their" vs. "there" or "your" vs. "you're." This helps avoid embarrassing mistakes and ensures you use the right words, even if they are spelled similarly.

Overall, Grammarly's vocabulary and word choice features are invaluable tools for taking your writing to the next level. With a broader range of words and more precise language, your writing will be stronger, more engaging, and error-free.

4. Eliminate plagiarism.

Another reason you need Grammarly is its ability to detect plagiarism. Whether you're a student writing a research paper or a professional creating content for your website, plagiarism can have serious consequences.

Grammarly's plagiarism checker compares your writing to billions of web pages and academic papers to ensure your work is original and properly cited. This can save you time and help you avoid the embarrassment and legal issues of plagiarism.

With the increasing use of artificial intelligence to assist our writing, having a checker to cover our backs for plagiarism has become an even greater benefit.

5. Improve writing style and tone.

In addition to catching grammar and spelling errors, Grammarly can help improve your writing style and tone. The tool provides suggestions for sentence structure, word choice, and even the overall tone of your writing. This can be especially helpful for those who are not native English speakers or those who want to improve their writing skills. With Grammarly, you can ensure your writing is clear and concise. The result is higher quality content with greater professionalism.

6. Saves Time:

Manually proofreading your work is a time-consuming process that can take hours, depending on the length of your document. With Grammarly, you can save time by quickly correcting errors and focusing on other important aspects of your work, such as content development or research. As a result, you can finish tasks quickly and efficiently with Grammarly's help.

7. Provides Accessibility:

Grammarly provides a level of convenience and accessibility that is hard to beat. With Grammarly, users can access their tools anywhere, as long as they have an internet connection.

Whether on your desktop computer, mobile device, or web browser, Grammarly can help you catch errors and improve your writing. Whether on my computer or phone, I find Grammarly offering suggestions when writing Emails or texts.

Using a grammar checker when writing a text seems laughable when so much of our texting experiences involve shortcuts. But sometimes, I don't want to risk being misunderstood, even in a text.

All of this makes Grammarly an indispensable tool for writers who need help on the go. You can write confidently, knowing that Grammarly is always there to help you catch errors and improve your writing.

Grammarly Prices and Plans

Grammarly offers three plans: Free, Premium, and Business. I'm showing below some of the Free and Premium plan features. The Business Plan needs to be listed since it is mainly aimed at teams.

Go Here to review prices and plans.

In conclusion, Grammarly is essential for anyone who wants to write error-free content. It saves time, increases productivity, ensures accuracy, improves writing skills, and provides accessibility. So, if you're serious about your writing, consider using Grammarly to help you produce high-quality, error-free content.


https://digitalchowder.com/7-reasons-why-you-need-grammarly-for-error-free-writing/

Wednesday, May 3, 2023

Digital Resources for the Budget-Conscious Home Business

Digital Resources for the Budget-Conscious Home Business

If you are a home business owner, you are always looking for digital resources to make your task more efficient with more professional outcomes. To help, I have done some of the work for you. In this article, I have listed our service picks to amplify productivity and reach more clients or customers.

Most of these picks are products I use, and I can attest to their benefits and reliability. I know by reputation and referral to be reliable for those I do not use. The sixteen products listed are in four categories: Writing Tools, Website Tools, Creative Tools, and Productivity Tools. Do you have recommendations you think should be included in the list? Please leave your recommendations in the comment section below.

Writing Tools

Grammarly

Before using Grammarly, I struggled with creating clear and concise content. My writing often sounded overly verbose with long, complex sentences. However, since starting to utilize Grammarly, I feel much more confident in my writing ability across all platforms - whether it be a blog post, email correspondence, or even website copy. Nowadays, you'll find me constantly turning to Grammarly for help polishing up any written piece!Grammarly is constantly working in the background of whatever application I am using, whether it's a browser, my email program, or a word processor. Grammarly periodically offers suggestions for improving spelling, style, and tone as I write. It will even rewrite entire sentences to make them cleaner and more straightforward.I am confident in the quality of my work, free of typos, misspellings, and bad grammar.

Try Grammarly

Jasper

Before I publish anything, I use Grammarly to check my writing for errors. However, when actually creating content, Jasper AI is where I turn to spark my creativity.Jasper AI is the perfect tool to help me develop original, engaging content quickly and easily. With Jasper's help, I can develop dozens of ideas for blogs, product descriptions, and web copy.This can all be done in a fraction of the time it would normally take, and because Jasper integrates directly with social media platforms, I can publish content on these platforms without any hassle.

Try Jasper

Sqribble eBook Creator

Artificial intelligence is increasingly automating tasks that have here-to-fore been time-consuming. Sqribble eBook Creator is a leader in using AI to automate the process of eBook creation. With just a few clicks, you can create amazing eBooks that educate, inform and entertain your readers. And best of all, you don't need any design, technical, or writing skills to start!Sqribble provides over 50 alluring eBook templates belonging to 15 distinct niche categories. So, we have your back no matter what book you want to write - whether it's a cookbook, a self-help guide, or an eBook on your pastime.With customizable templates, you can make your eBook unique by adding photos, videos, and text. And if you need any help along the way, a support team is always available.

Try Sqribble

Website Tools

Nicepage

Nicepage is my choice for web design. It is the tool I use for my website and to build sites for other businesses. With Nicepage, you can create stunning websites without writing a single line of code! Just use our easy drag-and-drop website builder software to implement any ideas you have. There are over 10,000 designer-made templates so that you can find the perfect one for your business. And if you want to customize anything, it's easy to do with no coding required. Plus, all our websites are mobile-friendly and will look great on any device. Get started building your dream website today with Nicepage!Although I recommend Elementor, I prefer Nicepage because it is more flexible and gives me more freedom. With Nicepage, my creative ideas aren't restricted by its capabilities. This saves me a lot of time not having to find a way to make my ideas work -- they do.

Try Nicepage

Elementor

With Elementor, you can create a stunning website without any coding! With its easy-to-use drag-and-drop editor, you can create beautiful pages quickly. And with 100+ full website Kits and endless possibilities, you can let your creativity shine. Plus, Elementor's world-class hosting and robust security features will give you the peace of mind to focus on creating the website of your dreams. Elementor attempts to do it all with its own built-in features that eliminate the need for other plugins and thus do away with plugin clutter. And with 90+ widgets and countless built-in capabilities, you can create any website you can imagine. 

Try Elementor

Pretty Links

Pretty Links isn't just for those looking to make money from their content with affiliate links. It has plenty of other benefits, too. Pretty Link's main purpose is link shortening, but it also tracks clicks for each link created within the program. While this obvious perk is especially enticing to affiliate marketers, anyone wanting to see how many people click on certain parts of their website can benefit from Pretty Links' click-tracking feature.Plus, Pretty Links makes it a breeze to put links on your site. Add a keyword or phrase when creating the link using Pretty Links. Then, Pretty Links will automatically insert that link whenever the keyword appears. And if you ever need to change where the pretty link goes, update it in one spot - Pretty Link - and it'll be good to go sitewide!

Try Pretty Links

Pond5

If you need professional content but don't want to spend a lot, Pond5 is a great solution. It has everything you need for your project with millions of royalty-free photos, videos, audio clips, and more. And their easy-to-understand license means you can use their content without worry.The main reason I use Pond5 is that you don't need a subscription to access the media library- you can pay for each item separately. Most of the photos I purchase cost only $2.50. If you would rather have a subscription, though, they are available at different price points depending on what type of content you want to be able to access. You also have the option of buying Credit Packs which offer a 20% discount off the total purchase price.

Try Pond5

Creative Tools

Snagit

Snagit is a screen capture software that lets you quickly and easily show someone what's on your screen so you don't waste time with back-and-forth emails or messy file attachments. Just share a link to your Snagit capture so they can view it in their browser.If you want to go further, you can record yourself talking and clicking through a doc, mockup, or series of steps. Snagit will automatically turn it into a shareable video that's easy for anyone to understand.Snagit is my go-to tool whenever I need to design a website or illustrations for a blog. Its video screen capture feature is also helpful for demonstrating software features.

Try Snagit

Camtasia

With Camtasia, you can quickly and easily create professional-looking videos without prior video editing experience. Camtasia is quick to learn and easy to use, so you'll be up and running quickly. With Camtasia, you can engage your audience with high-quality videos that will help them learn more than text alone. Camtasia is the perfect tool for creating video tutorials, how-to videos, software demo videos, meeting recordings, training videos, and lessons.

Try Camtasia

Canva

Canva Pro is an excellent choice to up your design game. This design software makes design simple, convenient, and reliable. With time-saving tools that make anyone look like a professional designer, you can create anything you need quickly.Need to add some curved text or photo effects? Image enhancer? How about adding frames to photos or even text to videos? It's all covered.And if you want to take your content to the next level, the online video recorder and converter let you record, edit, trim, and splice videos — all in one place. Plus, you can easily convert them to MP4 format for easy sharing.When it comes to design, I'm still a novice. But with Canva's templates and tools, I can help my ideas take shape by imitating the professionals. Not only does Canva have great samples that spark creativity, but their design tools are user-friendly too. Whenever I need graphics for product promotion or to design a logo, business card, or flyer, I go to Canva.

Try Canva

Productivity Tools

Keeper

Keeper Security offers a top-notch solution to protect your passwords and personal information from cybercriminals. With Keeper you will be Joining millions of people who use Keeper to protect their online identities. You'll never again have to remember or worry about a password.Powered by cutting-edge technology, Keeper offers unparalleled protection against ransomware attacks by generating high-strength, random passwords for each website, application, and service you use. In addition, BreachWatch® monitors the dark web 24/7 and alerts you if your credentials are detected in a public data breach so that you can take action immediately.I have been depending on Keeper for several years. It enables me to retrieve a saved password quickly, and it will also manage to register a new user account and store the necessary username and password for later use. I don't only utilize it for passwords, though - credit card accounts, driver's license numbers, and health insurance credentials are also included.

Try Keeper

46 of the best productivity tools for work and life

Fingerprint for Success has put together a collection of 46 of the best productivity tools. These tools will help you organize your personal life, manage your work, and collaborate with others.Fingerprint for Success is a professional & personal development platform for individuals & teams to make amazing things happen at work and in life!

Try Fingerprint for Success

Clockify

Utilized by millions, Clockify is a highly-regarded time-tracking software and timesheet application that enables you to log work hours across multiple projects. With Clockify, logging work hours across multiple projects has never been easier. With Clockify, you can keep track of your time spent on different projects, assign billable rates, and track your overall productivity. This feature makes it easy to keep track of time spent on individual projects, ensuring accurate billing and enabling project managers to make informed decisions about resources and allocations.

Try Clockify

Todoist

As my task manager and to-do list app, Todist is my choice to keep me more focused, organized, and calm. Make it yours too. With Todoist, you can add tasks like "read work emails every day at 10 am" in seconds using natural language recognition and recurring dates. Plus, your to-do lists are automatically sorted into Today, Upcoming, and custom Filter views to help you focus on your most important things.Other features include breaking tasks into subtasks, sharing projects with others, giving tasks a priority level, setting up reminders, and more. Plus, with Todoist's apps, extensions, and widgets, you can access your to-do list from any device or platform. And with integrations with your calendar, voice assistant, and over 30 other tools, Todoist makes it easy to stay productive no matter where you are or what you're doing. 

Try Todoist

Hubspot CRM

CRM stands for “customer relations management,” but at Hubspot, it means much more than managing your contacts. With the easy-to-use HubSpot CRM, you’ll never have to manually update reports or wonder how your team tracks toward quotas. Get a real-time view of your entire sales pipeline on a visual dashboard.Access detailed reports on sales activity, productivity, and individual performance. Then use those insights to track team performance and spot opportunities for growth. Enjoy unlimited users, data, and up to 1,000,000 contacts with no time limit or expiration date — whether you're a team of 1 or 1,000.Using Hubspot's WordPress plugin, people who sign up to join our email list are automatically added to our Hubspot list. Their activity on our website is tracked so we can track preferences and habits.

Try Hubspot

ezyCollect

ezyCollect has cutting-edge technology to help you get paid faster and protect your business from unpaid invoices. What's even better, their system is fully automated so that you can save time and effort. You'll feel like you have an extra person on your team! And with their humanized automation, you can connect with customers more personally.Within the first 12 months of using ezyCollect, businesses typically see a 43% reduction in outstanding overdue bills. That's huge! And with their easy-to-use payment portal, customers can view and download invoices, pay one or more invoices on the spot, part-pay, or pay later while they get paid upfront. This makes it super easy for them to pay their invoices and means you don't have to chase them up for payment.

Try ezyCollect
https://digitalchowder.com/digital-resources-for-the-budget-conscious-home-business/

Tuesday, May 2, 2023

How to Use Online Teaching to Create a Home Business

How to Use Online Teaching to Create a Home Business

Are you aware you can leverage online teaching strategies to generate significant income and build a fruitful home-based business? If you are looking for an approach to establishing an online business, teaching online is a possibility you may still need to consider. Read on to learn more.

Online teaching for a home business is becoming an increasingly popular option for entrepreneurs. The trend is towards providing high-quality, personalized learning opportunities that can be scaled and customized to each individual's needs. Many platforms allow instructors to build ready-made curriculums or create custom ones, generating income without investing in their physical space or equipment. And you can do it from home while reaching a global market of students.

Here are some considerations you will need to think about as you determine whether online teaching is a viable option for you:

Consider Your Interests and Credentials

interests and credentials

The starting point is to ask yourself, "What do I have to offer?" Abraham Lincoln is quoted as saying, "You can fool all the people some of the time and some of the people all the time, but you cannot fool all the people all the time." Take this principle to heart as you consider what you have to offer.

You want to avoid attempting to bluff your way through a topic about which you have only a passing acquaintance. At least some of your more astute students will catch on. There are better ways to build an ongoing, successful business. Neither is it the way to establish a business you will love and have the drive to pursue. Your love for the subjects you teach will also become transparent to your students.

So passion is a crucial ingredient for the subjects you choose to teach. Another critical component is to have the appropriate credentials. This does not necessarily translate to formal education or certification, although these could be helpful. Your experience and grasp of the subject qualify you as well. A good question to ask yourself if your qualification is experience and/or understanding of the subject is whether or not your approach to the subject is acceptable among the experts in that subject.

If your answer to that question is either "No," or "I don't know," don't automatically eliminate that option. For example, I have had years of experience coding in PHP and MYSQL and have built many applications that work as they should. But I am self-taught, and I knew I didn't always use "best practices" in my coding. I also knew there were shortcuts to some of my approaches, which I needed to be made aware of.

So I chose a relatively simple solution for these shortcomings. I took some online courses through Udemy from teachers who are coding experts. All I needed was a couple of courses to help fill the gaps. I learned best practices through an introductory course in which I already knew the coding techniques. And through a more advanced class, I learned coding shortcuts making my processes more efficient. Plus, the cost for these two courses was less than $50 combined.

Determine Your Target Market

target market

Once you know what you might teach, your next step is determining if a market exists. As you consider your market, here are some additional questions you will want to answer:

  • Subject - You determined your topic in the first step, but now you need to know the interest in your subject.
  • Demographic - With this question, you are interested to know who will want to take your classes. The subject question asks IF there is an interest, and this question asks WHO has the interest. The demographic question includes:
  • Age - Knowing the age of your potential students will be important in designing your courses and the methods you use.
  • Application - How do you anticipate your students will use what they learn in your course? Knowing this will also play an essential role in the design of your courses. For instance, will they use it as a hobby or a pre-requisite for a job?

How to determine your market - You may wonder how to assess your market. Here are some ideas; you will discover others as you begin the process.

  • YouTube, Rumble, etc. - These venues host many mini-courses. Search your subject to learn what is offered on these venues and the traffic they generate. You will also get ideas for methodology.
  • Test videos - Making your own 5-10 minute video addressing an aspect of your subject will give you experience making videos. It will also allow you to measure the response to your topic, your approach, and how you present yourself. Unless, by chance, your video goes viral overnight, your feedback will be slow in coming. A consideration is establishing your channel, creating regular videos, and establishing yourself through this venue. Then use it to promote your online classes once you have made them. Admittedly, this is a slow approach that could take months.
  • Social Media - I don't see this as influential as the video option, but I'm also not proficient in social media. When looking for how-to help, I go to YouTube or Rumble. Nevertheless, browsing and searching social media is a potential source for market research.
  • Online teaching websites - I give a list below of several online teaching sites. These sites should be invaluable to you in knowing the subject trends and popularity. They will also show what your competition might be.

Develop a Unique Teaching Style

teaching style

To be successful as an online teacher, you’ll need to stand out from the competition. As such, creating a unique teaching style and model that fits your target market and builds on your strengths is essential. As you seek direction to discover your unique style, remember you are unique. So, start by being yourself and not someone else.

While remaining true to your personality and strengths, seek ways to utilize those characteristics while fitting your target market. Fitting your target market might include terms or illustrations you use, as well as ways you find to engage them. The amount of engagement will also be a consideration.

Additionally, you will have to consider not only your audience but also your venue. Unless you use live webinars, you cannot engage your students directly. A pre-recorded video is used in most settings, and engagement is built into the recording. That said, there are many visual possibilities, from using physical objects in the room with you to capturing activities on your computer screen. Problem-solving activities are another possibility. But you are certainly not limited to your imagination. Plenty of examples are available through online videos.

Design an Engaging Course Syllabus

course syllabus

A practical course syllabus is critical for your success as an online teacher. When designing your syllabus, consider adding components that provide added value to students, such as clear learning objectives, engaging activities, and meaningful projects. Additionally, ensure that your course schedule allows adequate time for assignments and practice quizzes to help keep students on track and motivated throughout the course.

A well-designed syllabus should provide structure and flexibility to ensure students get the most out of their learning experience. This could include clear learning objectives, meaningful activities, and engaging projects or assignments.

As you design a course, the syllabus is the starting point instead of starting with a lesson. This may seem obvious, but it is still worth stating. With a syllabus, you will declare the course’s objectives, an overall outline, and the specific lessons to complete the outline and meet the goals.

A temptation I fight with the design of almost every course I design is to jump right into the first lesson before I have done anything else. I have created a general idea for the course and gotten excited about some of the big ideas I have in mind. So when it comes time to get something in writing, I am anxious to start writing out some of those ideas. Then I fall into the trap of getting carried away with an idea and losing sight of the course’s overall objective. I haven’t even figured out what that objective should be.

Craft High-Quality, Relevant Content and Assignments

relevant content

So, you identified your market and determined the nature and methodology for the content. Then you create a syllabus that will address the needs of your market in a way that will give them value. Now it is time to complete the lessons.

Each lesson will seek to meet the overall objectives while balancing content, application, and relevance to your students. It should be clear how each lesson builds on the previous one and how students can apply their learning in practical situations. Assignments should also be designed to provide a challenge but not become overwhelming. Finally, students should receive regular and timely feedback on their assignments to help them understand and retain the material for future use. Two examples of feedback might be using a quiz or a problem to solve.

Online Teaching Platforms

  • Coursera - Coursera offers over 4,000 courses from top universities and industry leaders. The courses shown on Coursera are divided into three levels: beginner, intermediate, and advanced.-
  • Udemy - Udemy offers over 100,000 courses in a wide variety of subject areas. From coding to photography to marketing, Udemy has something for everyone.
  • edX - edX was founded by leading research universities, including Harvard and MIT. It offers a wide range of courses from top universities and industry leaders and professional certification courses.- Udacity - Udacity offers courses designed to develop and hone practical skills in data science, programming, artificial intelligence, cloud computing, and more. Learners can access a wide range of courses from top universities, industry leaders, and technology companies such as Google, AWS, IBM, and Microsoft.
  • Khan Academy - Khan Academy is an online learning platform that offers free courses and resources to help learners of all ages learn, practice, and succeed. The platform provides comprehensive curriculum-based lessons in a wide range of subjects, including math, science, history, economics, and more.
  • Codecademy - Codecademy is an online learning platform that provides free tutorials and resources to help learners develop coding skills. The platform offers a comprehensive curriculum-based curriculum for a variety of programming languages, including Python, Java, HTML, CSS, JavaScript, SQL, and more.
  • Skillshare - Skillshare is an online learning platform that offers courses and workshops on creative, professional, and educational topics. It provides users access to lessons created by industry professionals, experts, and educators worldwide. With Skillshare, users can explore a variety of topics ranging from marketing and design to art and business.
  • FutureLearn - FutureLearn is an online learning platform that allows students to access high-quality, interactive courses from top universities and institutions worldwide.
  • Academic Earth - Academic Earth is an online learning platform that provides free access to courses from leading universities and institutions, including Harvard, Yale, Stanford, and MIT.
  • Open Education by Blackboard - Open Education by Blackboard is an online learning platform that offers users access to free, high-quality education materials worldwide. It is a comprehensive resource for students of all ages, with content tailored to different levels and interests. The platform offers tutorials and courses on a range of topics, including humanities, social sciences, technology, math, and more.

View Video

You can view a video of the article for a more hands-on presentation.

Conclusion

Online teaching for a home business is an excellent way to generate income. With the range of online platforms available, entrepreneurs can create personalized and high-quality learning experiences tailored to their customers’ needs. By understanding how different courses build on each other, providing assignments with appropriate challenge levels, and offering feedback in various forms, instructors can ensure they provide value while earning money. With these tips in mind, you, too, can use online teaching as a source of revenue for your own home business!

Have questions or comments. Please use our comments feature below or use our contact form.

Jasper Boss Mode
https://digitalchowder.com/how-to-use-online-teaching-to-create-a-home-business/


Monday, May 1, 2023

A Step-by-Step Guide to Add an Email Account to Your Desktop App

A Step-by-Step Guide to Add an Email Account to Your Desktop App

Once you know the essential steps, you can add a new Email account using your business domain to a desktop app like a pro. With this guide, you will learn how to add your domain email to any compatible desktop client in just a few simple steps!

I design websites for small organizations and small businesses as a web developer. Most of my clients want one or more email accounts using the domain of their website, such as "myemail@mybusiness.com." I do all this for the client as a part of the website development. So far, so good.

Once the email accounts are created, I send the account information to the client to access them how they prefer. This information includes the webmail URL they can use to send and receive the email. In most cases, though, the preference is to add the account(s) to their desktop email client, such as Outlook. This is where problems arise, and I receive calls for help configuring the setup on their desktop client.

So in this article, I wish to provide a Step-by-Step Guide to Adding a New Email Account to Your Desktop App. Here is what we will be covering:

  • Custom domain email accounts versus Google, Outlook, and similar accounts- Step-by-step addition of email account using Outlook- Step-by-step addition of email account using Mailbird

View Video

You can view a video of the article for a more hands-on presentation.

Custom domain email accounts versus Google, Outlook, and similar accounts

I assume you are reading this article because your attempt to add an account to your desktop email app did not work automatically. Now you don't know what to do. I would also assume the email account you are trying to add is not a Google, Outlook, or similar account.

Many desktop email apps are slanted toward common accounts such as Google. If your email uses your domain name, it is being served by a less common email server and may not fall smoothly into the protocol of your desktop app. This does not mean it will not work, though. but it will require some more advanced steps.

In the following examples, I will use the Outlook desktop app, a common app, and the Mailbird app, a less common app. These two examples should cover most issues you might encounter with the app you are using.

Adding A New Email Account Using Outlook

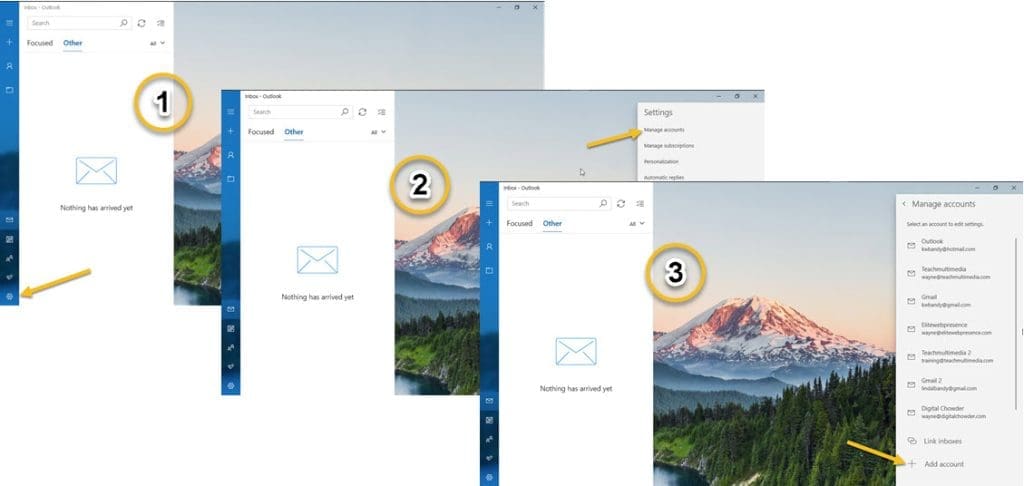
For this example, I use the free Outlook version on Windows 10 instead of the Microsoft Office version. With Outlook open, our first step is to look for the setup icon at the bottom of the left-side menu. This opens a menu on the right side from which we will select the first option, "Manage accounts."
Outlook 1-3

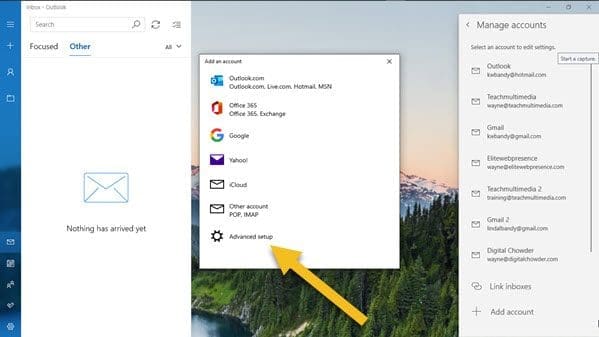
The "Manage accounts" option opens a list of email accounts already added to the app. At the bottom of the list, you will see "Add account." Click on this, and you will be given several options to select how to add a new account. These include Outlook.com (live.com & MSN), Office 365, Google, Yahoo, and iCloud.
Outlook 4

This list illustrates what I said about common apps being slanted toward standard email accounts. If the email account you want to add is not among these options, you have two remaining choices: Another account (POP, IMAP) and an Advanced setup. You can try the "Other account," which will attempt to connect automatically. But if it does not connect, you have no other options. This leaves you feeling lost. So your remaining option is to use the "Advance setup" option.

Advanced Setup: You will need additional information to complete the advanced setup. If you use a custom domain-based email created by someone else, you must have them send you this information.

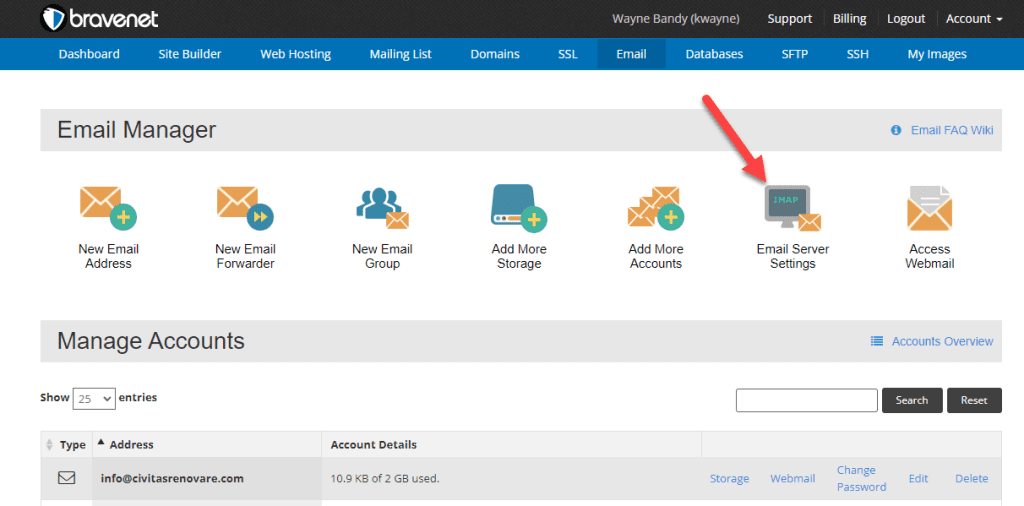
If you have built your website and have access to the dashboard of your website hosting service, log onto the dashboard and go to the email settings. From this page, you are looking for "Email server settings."
server settings

Your hosting dashboard will look different. This is only an example. Go to the email account if you do not have a specific server settings button. Look for three dots to the right of the listing. Click the dots to reveal a menu that should include server settings. Here is the information you will be given (your server & ports will be different):

Incoming Mail Settings
Email Protocol: IMAP
IMAP Server: mail.bravehost.com (yours will be different)
IMAP Port: 143
Connection Security: TLS/StartTLS
Username: The email address you are working with is always the username.
Password: The password for this specific email account.
Authentication Type: Password
Outgoing Mail Settings
SMTP server: mail.bravehost.com
SMTP port: 587
Connection Security: TLS/StartTLS
Username: The email address you are sending from (probably the same email used for incoming mail.)
Password: The password for this specific email account.

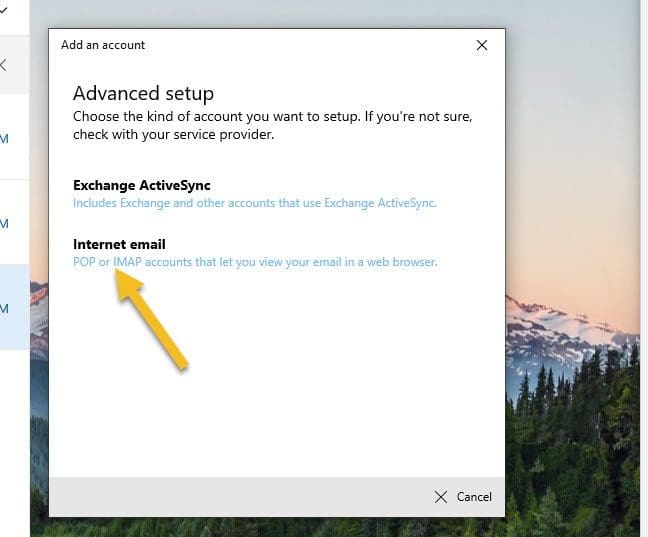
With this information, you can click the "Advanced setup" button. Your next choice is to select "Exchange ActiveSync" or "Internet email." Choose "Internet email."
Outlook 5

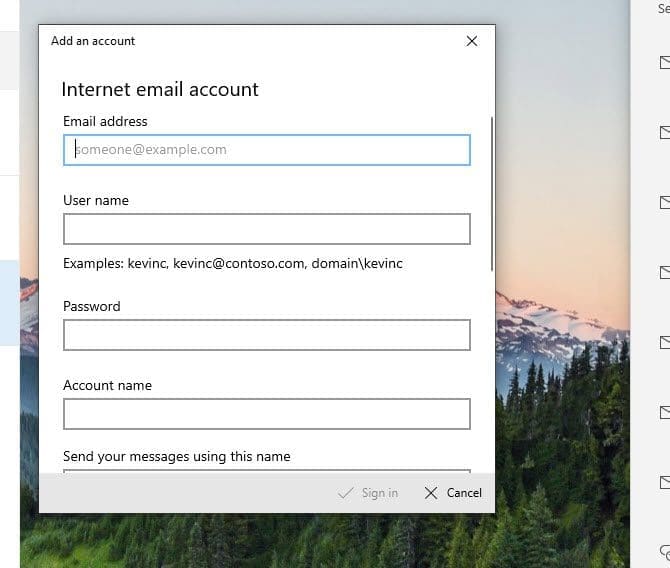
On the next screen, you will begin to enter your information. First, enter your email address. Next, it asks for your User name. This can be confusing since the user name for most email accounts is the email address. So if you are unaware of a different user name, enter the email address. Enter the password next, followed by the account name. Again, this could be confusing. Unless you have a specific name for the account, enter the name you want as a label for this account in your app.
Outlook 6

Then it asks for the name you want to use for sending messages. You can use the name you choose. There is no specified name. Label it with the name you want to identify to recipients of your email.

The following box asks for the "Incoming email server." This should be in the data you gathered for this account setup. Be sure to notice there is both an incoming and an outgoing server. The server name for both may be the same or may not.

IMAP vs POP: Account type is next. The choices are POP3 OR IMAP4. What is the difference? POP3 leaves your email on the server while downloading new mail to your computer. Once you have the account in your app, you can go into account settings to check the frequency you want it to delete old mail from the server.

In my opinion, IMAP4 is a cleaner choice. IMAP syncs the email between the server and your computer, so both sources have identical mail. To keep your mail clean, you only need to do it on your computer. The server will sync to your computer and vice versa.

You are asked to enter the outgoing server after choosing your account type. As mentioned above, the outgoing server may or may not be the same as the incoming server. The information you glean from your host dashboard will show what this should be.

After you have followed these steps, four selections remain:

  • Outgoing server requires authentication
  • Use the same username and password for sending email.
  • Require SSL for incoming email- Require SSL for outgoing email

All four selections will probably be checked by default. Unless you know otherwise, you should leave them checked.

Now you are ready to click on "Sign In." Hopefully, all will go well, and the account setup will complete successfully. But what happens if it does not set up successfully? Never fear. You still have options.

By choosing the advanced setup option, an account will be set up whether or not all the information you enter is correct. This allows you to return to the newly created account to edit information. All other choices you make will fail to create a new account if a connection is not made. This does not allow you to review the information to check why a connection was not made.

Follow Up On New Email Account: Using the advanced setup option, a new email account is created regardless of whether a connection was successfully made. You may not be given a message about whether or not the connection was made. So you will need to check out the new account.

Go back to the left-side menu to your list of email accounts. Find the new account and click on it. Are any emails in the inbox? If not, run a test. Send a test email to another email account you may have, and send a test email from that email to this account.

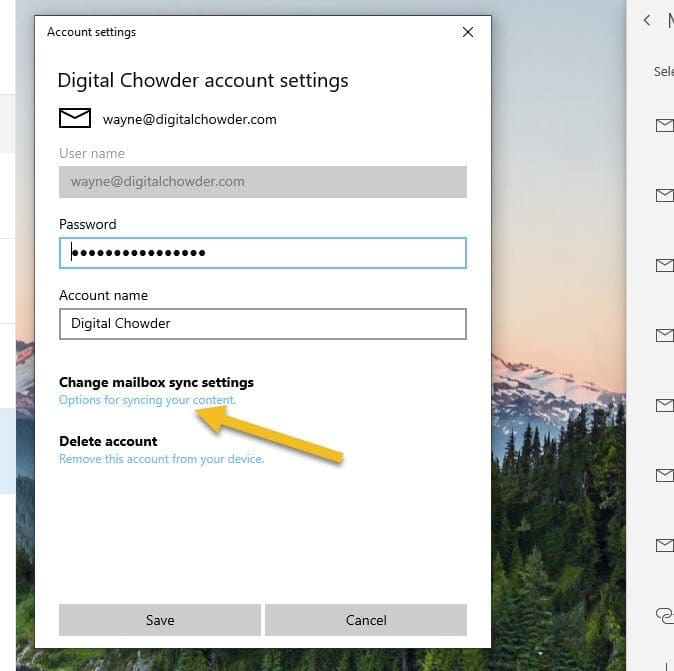
You must edit the new account settings if no email is in the inbox and your test fails. You will follow the same steps as before. Click the gear icon at the bottom of the left-side menu and return to "Manage accounts" from that menu. Find the new account from the list of email accounts and click on it.
Outlook 7

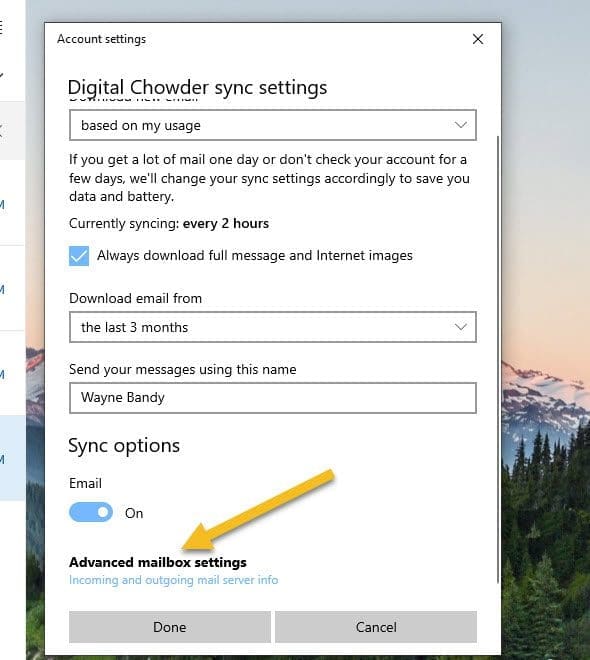
Go down to "Change mailbox sync settings." You are not interested in the sync settings now, but the settings you need are in this section. There is only one thing on the following page you are interested in: "Advanced mailbox settings." Click on this link.
Outlook 8

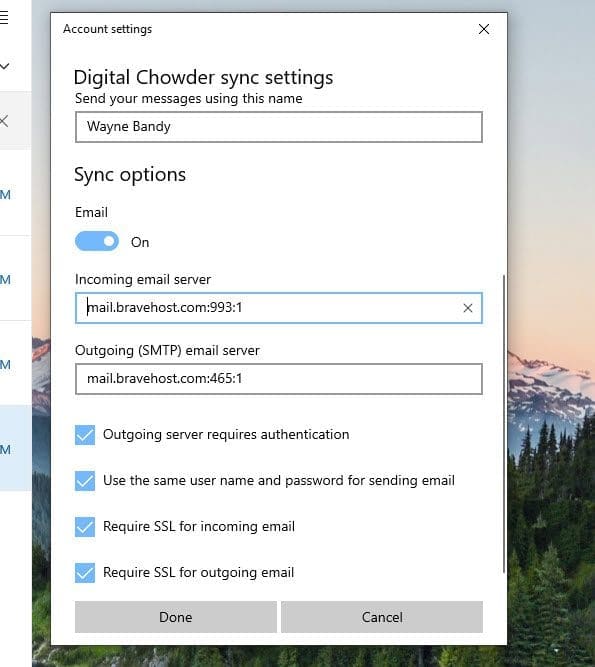
Now you can see the mail server settings and port numbers. In my case, the setting I found for the incoming email server is mail.bravehost.com:993:1. Is the first part (mail.bravehost.com) the correct incoming mail server setting? Is 993 the correct incoming port number? If you check back on the email settings listed above, you will see that the incoming port number should be 143. So this setting should be changed.
Outlook 9

The outcoming email server settings I found are mail.bravehost.com:465.1. Again, the port number is incorrect. It should be 587. So this setting should also be changed. This is a common issue that is encountered. All the other settings may be correct, but the port numbers are incorrect.

Now that these settings have been corrected, I will click the "Done" button. Then I will click the "Save" button in the next window. After clicking "Save," I got a link next to the account name saying "Fix account." After clicking this link, I saw the password box was empty. It must have been automatically removed when I edited the server information. I entered the password and clicked save again. No messages appeared.

I went to the inbox for this new account, and since I found no mail in it, I sent a test email from another account. The test was successful.

Besides demonstrating what to do when a new email account is not created automatically, it also demonstrated some of the issues you may encounter in the setup process. In this instance, that included the port numbers being set incorrectly, and my password was removed.

Adding A New Email Account Using Thunderbird

For our next step-by-step demonstration, we will use Thunderbird.
Thunderbird 1-3

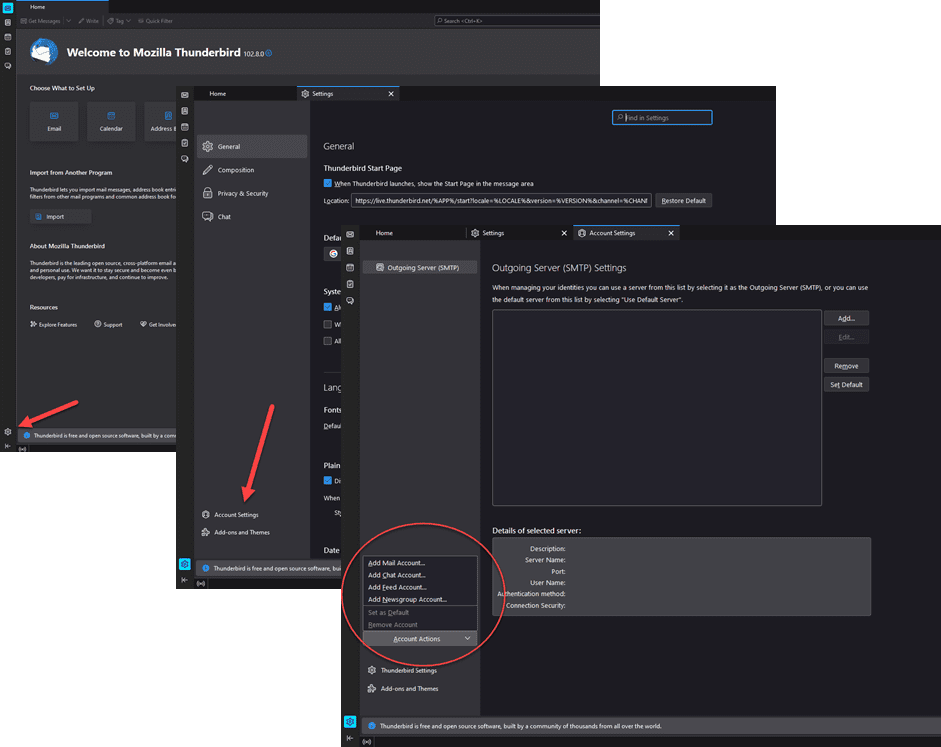
Look to the bottom of the left-side menu, where you will see the gear icon. Click on it to open a window with "Account settings." Then look toward the bottom of the left-side menu for "Account Settings." Look toward the bottom of the left-side menu for "Account Actions." Click on the down arrow and select "Add Email Account."

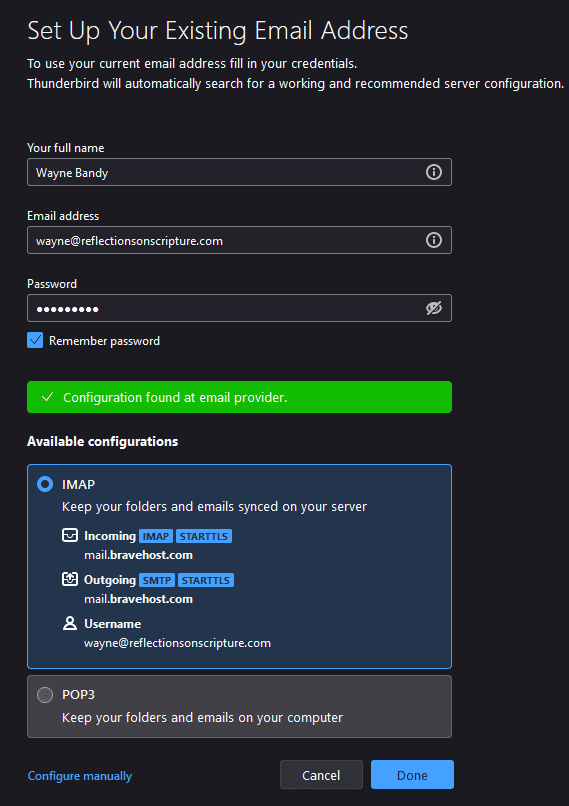
Under "Set Up Your Existing Email Address," enter the Email address you are adding along with the password in the appropriate boxes. Now you will have two options, "Configure manually" and "Continue." We will do both options for this demonstration so you can see what to expect.

If you prefer not to do the automatic configuration, skip to "Manual Configuration" below.
Thunderbird 4

Automatic Configuration: So I will first select "Continue." In the next window, Thunderbird will look for the Email account using the address and password you entered. Then you will see the results. By default, it shows the IMAP settings it found. Compare this information with the information you have from your email server. If all is correct, you can click "Done," and you are ready. If any information is incorrect, click "Configure manually" and complete the setup.

You can also choose to use POP3 instead of IMAP if you prefer. If so, you will also need to check that the information is correct and click "Done" if it is or "Configure manually" if not. My information is correct, so that I will click "Done," and this demonstration stage is completed.

I will remove my email setup and repeat the process by selecting "Configure manually" for this setup.

Incomplete Setup: If you have followed the instructions to this point, found that the server information was correct, and clicked "Done," but it did not complete successfully for some reason, you may have an incomplete setup in which the Email account was added, but does not connect to the online Email server. In this case, you will need to follow these instructions.

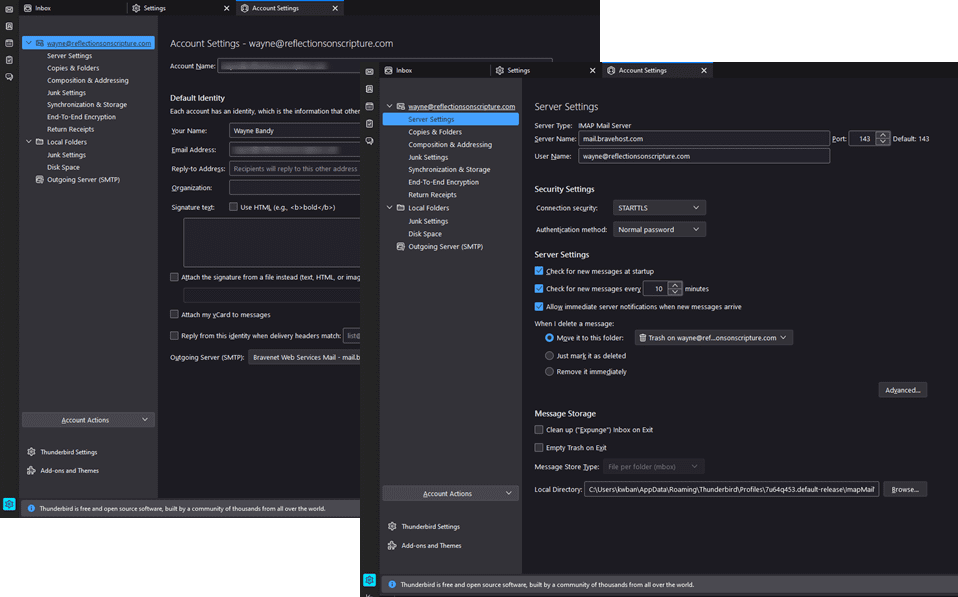
Starting from the "Inbox" page, click on the gear icon at the bottom of the left-side menu, which will take you to "Setting." Then click "Account Settings" toward the bottom of the left-side menu. You will find the Email account you just created listed on the "Account Settings" page. (As in the first Thunderbird step)
Thunderbird 6

Click on the Email address to see information for the default identity. Check that the Email address is correct. Go to the bottom of the page to "Outgoing Server (SMTP). To the right, you will see the button "Edit SMTP Server." Click the button, and you can edit Outgoing server information to coincide with the information you have from your online server. This will include:

  • Server Name 
  • Port number 
  • Connection security 
  • STARTTLS is the typical setting.
  • Authentication method 
  • Normal password is the typical setting.

Server Settings: Next, click "Server Settings" in the left-side menu under the Email address for the account. The Server Type will show the option you selected in the initial setup steps. If it shows IMAP and you prefer POP, or vice versa, you must remove the account and start over, following the steps below in "Manual Configuration."

If the Server Type is correct, check that the Server Name and Port number are correct. The User Name should be the Email address for this account. Connection security and Authentication method will be the same as those you selected for the Outgoing server.

Connection security and Authentication method will be the same as the settings you entered for the Outgoing server.

The remaining server settings are unrelated to the connection with your online Email server. These settings configure the behavior of your Email app.

Manual Configuration:

Thunderbird 1-3

You will follow the same steps you followed in the first steps using Thunderbird. So, from the "Inbox" page, go to the gear icon at the bottom of the left-side menu. Click the icon, which will open the "Settings" page. Now, go to the bottom of the left-side menu and click "Account Settings." Then click the down arrow for "Account Actions" and select "Add mail account." This opens the "Account Setup" page. Next, click on "Configure manually."
Thunderbird 7

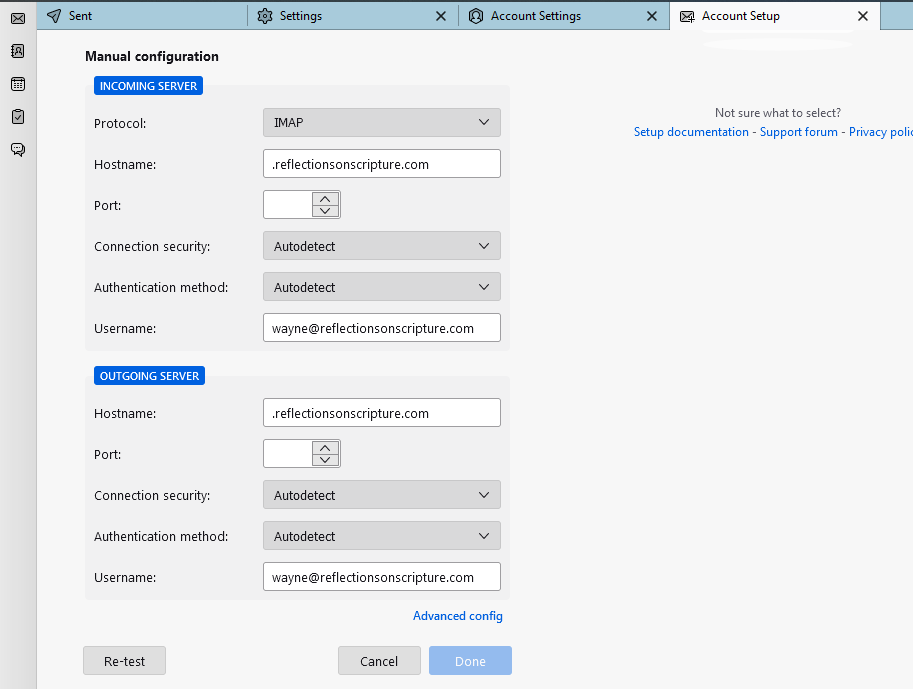
You are now on the "Account Setup" page. You will see the Email address for the account you are adding and the password you entered. Then you are shown manual configuration settings for "Incoming Server," and "Outgoing Server."

Incoming Server:

  • Choose Protocol 
  • IMAP or POP (For an explanation of IMAP and POP, go to "IMAP vs. POP" above)
  • Hostname 
  • Thunderbird will automatically fill this using the Email address you are adding. Your online server may use that protocol with something like "mail" as a prefix. Many do not, though. Check the information you have from your online server.
  • Port - Enter the port number given by your online server.
  • Connection security 
  • autodetect should work.
  • Authentication method 
  • autodetect should work here also.
  • Username 
  • This is your Email address.

Outgoing Server:

The Hostname may be different from the Incoming server. Check your online server information. The Port number will be different than the Incoming server. Check your information. The remaining information can be left as is.

Click "Re-test" to see if these settings work. If so, you can click "Done," and your account is ready to go. If not, double-check all your server settings for typos or other errors. Sometimes an app will change port numbers after you have entered them.

Conclusion:

Regardless of the desktop email app you are using, all of the above information must be correct. If the app cannot supply this information automatically, you must use whatever option you have available to enter the information manually. The main purpose of this demonstration is to show you how to find and use that option and what to do when you find it.

Entering server information manually may seem rather daunting when first confronted with it. But by following the steps shown in this demonstration, you should be able to do it like a pro.

If you follow these steps to add a new email account and are still unsuccessful, please ask questions in the comment section below. Let me know if you found any guidelines confusing or hard to understand.

Jasper Boss Mode
https://digitalchowder.com/a-step-by-step-guide-to-add-an-email-account-to-your-desktop-app/
Saturday, April 29, 2023

4 Recommended Content Writing Apps for the Home Business

4 Recommended Content Writing Apps for the Home Business

Here are my recommended writing apps for the home-based business. There are many good writing apps available for creating good content. In this article, I want to emphasize that I am writing with a home-based business in mind. If you have a home-based business, the odds are that you are the only employee. You are the owner, CEO, CFO, copywriter, secretary, and a few of your titles. The point is that writing content may not be one of your primary skills. But content writing is a must for any business. Writing website content, promoting products, or writing proposals are examples. And yet, if you are like me, writing clear and grammatically correct sentences is not in the skill set.

So what are you to do? No doubt you will do as I did - go looking for help. So I am sharing with you some of the fruit of my effort. Two of the apps I'm recommending in this blog are apps found in my toolbelt of necessary apps. Others come from research results.

Grammarly content writing

Grammarly:

Grammarly is my primary writing tool. As its name suggests, it monitors grammar. The free version scans grammar, spelling, and punctuation. If you step up to the Premium version, for $12 per month, you will also get:

- Clarity-focused sentence rewrites - Automatically rewrite hard-to-read sentences.- Tone adjustments- Eliminates unnecessary qualifiers to sound more confident.- Inclusive language - Assure your words are respectful and current- Word choice - Find vivid words to enliven each message- Formality level - Write with the appropriate tone (formal, informal, casual, and so on)- Fluency - Ensure your word choice sounds natural and fluent

My writing puts each of these features to work. Giving Grammarly a whirl was a no-brainer for me. I started with the free version and soon recognized I needed extra help. So I upgraded to Premium.

You can work online with Grammarly or install the desktop version. The desktop version will work inside your writing apps. As you use your word processors or email clients, Grammarly is there to help.

The Premium version uses a browser plugin known as the editor. The editor gives a more comprehensive experience. I will use the desktop version in my first draft when I'm writing a publication. Next, I copy and paste the content into the editor to check clarity, engagement, and plagiarism.

If content writing is not a natural skill for you, this is hard work. But the outcome will be worth it. The more you use it, the more you begin to recognize your errors on your own.

As a disclaimer, I should add that Grammarly will not create engaging content. That is on you.

Check Out Grammarly


Hemingway content writing

Hemingway App:

Some think of Hemingway App as a competitor to Grammarly. I have seen some reviews arguing about which is best. Such approaches miss the point of each app, though. Whether one app is better depends more on the user's needs. Each app has different emphases. I have already described Grammarly as having grammar, spelling, and punctuation emphases. The Premium version expands to include clarity, tone, word choice, and other features.

In contrast, Hemingway App concentrates on readability. It will rate your use of adverbs, passive voice, and simple phrases and sentences. Since I need considerable help in writing, I use Hemingway App alongside Grammarly. So I start by writing a draft in Evernote using Grammarly. I allow it to check my grammar, spelling, and punctuation. Then I copy the draft into Grammarly Editor to pick up on clarity, tone, word choice, and fluency. Before I found Hemingway App, my writing task was complete at that point.

I copied a finished text into the editor when I first tried Hemingway. Remember, this text had already been through two drafts with Grammarly. The result shocked me. My writing masterpiece was full of adverbs, passive voice, and complex sentences. I had some hard work ahead determining how to reword these complex sentences. How was I to remove the unwanted wording? At a one-time cost of only $19.99, adding Hemingway Desktop to my toolbelt was well worth the price.

Hemingway includes more than writing features. It also has HTML formatting such as bold, italic, H1, H2, quote, bullets, and links. So after cleaning up your content, you can prepare it for viewing in four different formats. Or you can publish it to WordPress.

What are your writing needs? Is it related to grammar or readability? Knowing this will help you know which app is best for you. Both apps are available for use without cost. You can take trial runs without making a commitment.

I hope this information will help you in choosing.

Check Out Hemingway App


Verblio content writing

Verblio:

Another content writing resource for you is Verblio. It is a much different alternative from the two already discussed. Verblio's self-description says, "On-demand content creation to power digital marketing and SEO." As this description suggests, Verblio is an on-demand content creation service. This on-demand service can be an excellent solution for the home-based business owner. If you don't have the time or don't like to write, you can have a writer on retainer at less cost.

So how does this work? There is a monthly fee based on the size and number of content pieces you want each month. First, decide the length of content pieces you want. Do you want a microblog post or website content with no more than 300 words per piece? Your cost per piece will be $34.95. But what if you wish to have content for short blog posts, newsletters, or website Content? You could need as many as 600 words at $69.95 per piece. Should your need be for Blog Posts, eBook Chapters, or even more Website content, you could be up to 1,000 words per piece. Your cost will be $119.95 per piece.

Verblio has content categories of up to 2,000 words per piece and beyond that, check for custom lengths. You get the point. It is more affordable than having a content writer on staff.

But that's not all. You can also sign on for extra services. It breaks down like this:

- Basic - This level of service is for content only. There is no regular monthly fee. You are paying for each content piece.- Photo - Photo service adds $19.95 to the cost of your content piece. For this, you receive two hand-selected stock photos per content piece.- Optimize - Optimize gives you proofreading, CMS formatting, and SEO optimization. This service costs $39.95, and the cost of your content piece.- Verblio Complete - Verblio Complete moves you into a completely new dimension. You will pay $149.95 for this service and the cost of your piece. The bottom line is that Verblio will pair you with a "Hubspot," who is your account manager. This person will manage the whole project for you.

There is one more option. The list above is for pay-by-the-piece services. But if you need regular monthly content of a more lengthy nature, you can choose to pay a monthly fee. For https://www.verblio.com/ instance, you can get four 1,000-word pieces with optimization included. This cost is $639.60 per month. Pay by the year, and you will save over $1,200.

Check Out Verblio


sqribble content writing

Sqribble:

As I introduce you to Sqribble, I will take you in another direction from where I started in this blog. We haven't left the topic of content writing. But we are no longer suggesting apps or services that help you write with clarity or to use correct grammar. Sqribble is about how to deliver your content. This app is an eBook creator. As a home-based business owner, you may have never considered producing an eBook. So I should start with why you might want to do so.

As business owners, we are always trying to expand our customer base. Why do you create content even though you may not enjoy it?

Is it not because of your need to reach out to new and old customers? Publishing an eBook is another way to do this with effectiveness. Here are a few reasons why:

- You might want to publish an ebook because it effectively promotes your product(s). How are you doing it now? An attractive flyer? A brochure? A webpage? Email? An eBook can contain the same content, be as attractive, and you can share it with ease. Offer it with a link in an email promotion or on a webpage. Once it is in the hands of a potential customer, they can open it on any mobile device for viewing.- eBooks can help attract new leads. Offer it in an email or website as a free item in exchange for a person's email address. Besides building your contact list, you add contacts interested in what you sell.- An eBook can be a marketable product. Add it to your products for sale. The use of eBooks is on the rise.

In the world of eBook creation, I am recommending Sqribble. If you do an internet search for eBook designers, you will get many results. A large number of these will say they are free. But when you go to their website, you will see a menu tab for pricing - a good clue that they are not free. Sure enough, they are not. A free version is available but with limited options. Then there will be 3-4 paid versions with monthly charges. Often a free version of an app will give you all you need for a particular tool. You must ask yourself if a free version of one of these eBook designers will provide all you need.

Next, you will want to determine what end product you will get with a particular designer. Often the 'designer' converts your PDF file to a flipbook or EPUB file. Is this what you want? And is it the outcome for which you are paying?

In your internet search results, you will see comparisons between Designrr and Sqribble. Why these two? Designrr has been the leading eBook designer for the past 2 to 3 years. Sqribble has arrived on the scene with competing features and values. In these comparison articles or videos, writers have drawn different conclusions. Some prefer Designrr, and others prefer Sqribble. Here are the main reasons I recommend Sqribble:

  • Better template design choices: Designrr and Sqribble use templates for their eBook designs. Select a template, import your content, click create, and your eBook is born. It is a simple, straightforward approach. I find Sqribble's templates to offer a wider variety and more attractive selection.
  • Free Content: Both eBook creators give several options to import content. These include file upload, copy/paste, and import from web pages. Only Sqribble has the option to provide ready-made content. This content comes from various topics and is free without copyright issues. They have researched for you.
  • Better Value: The reason I find most compelling in favor of Sqribble is its value. Designrr has four plans starting at $29 per month and going up to $99 per month. Each has a seven-day free trial period. Sqribble offers a one-time fee of $67. While there is no trial period, the risk is low. You can find sale prices for less. Once you sign up for Sqribble, you will see extra features, but each will have a one-time cost. After a year of Designrr on the $29 plan, you will have paid $348. You may not need to design an eBook every month, but you still pay for the service.

Check Out Sqribble

We independently select these products — if you buy from one of our links, we may earn a commission.


https://digitalchowder.com/4-recommended-content-writing-apps-for-the-home-based-business/

Friday, April 28, 2023

5 Social Media Manager Apps for Small Businesses

5 Social Media Manager Apps for Small Businesses

As a home business owner, you know that staying connected with your community is critical. But with so many moving parts to your marketing campaigns, it can be tough to keep up. That’s where social media management apps come in.

We’ve rounded up five social media management apps you can rely on to keep you engaged and connected with your community.

1. TweetDeck

TweetDeck is a third-party platform that streams tweets according to the way you want them. If you’re unaware of Tweetdeck, it is a free scheduling tool specifically for Twitter. Originally an independent app, TweetDeck was subsequently acquired by Twitter Inc. and integrated into Twitter’s interface.

As you can imagine from the name and that Twitter owns it, TweetDeck is primarily an app for Twitter. But it does have a limited number of Facebook functions. These include being able to post to your Facebook Page, but it doesn’t offer tools for managing any of the content or making any changes to your account. The same can be said for TweetDeck and LinkedIn.

To use TweetDeck, log into your Twitter account and navigate to https://tweetdeck.twitter.com. The app will load with your Twitter content filling four columns: Home, Notifications, Messages, and Trending. Additional columns such as List, Collections, Likes, Mentions, Followers, etc., can be set.

Using various columns, you can track what others are saying about you, providing updates through links, videos, sharing photos, and tweeting.

2. HootSuite

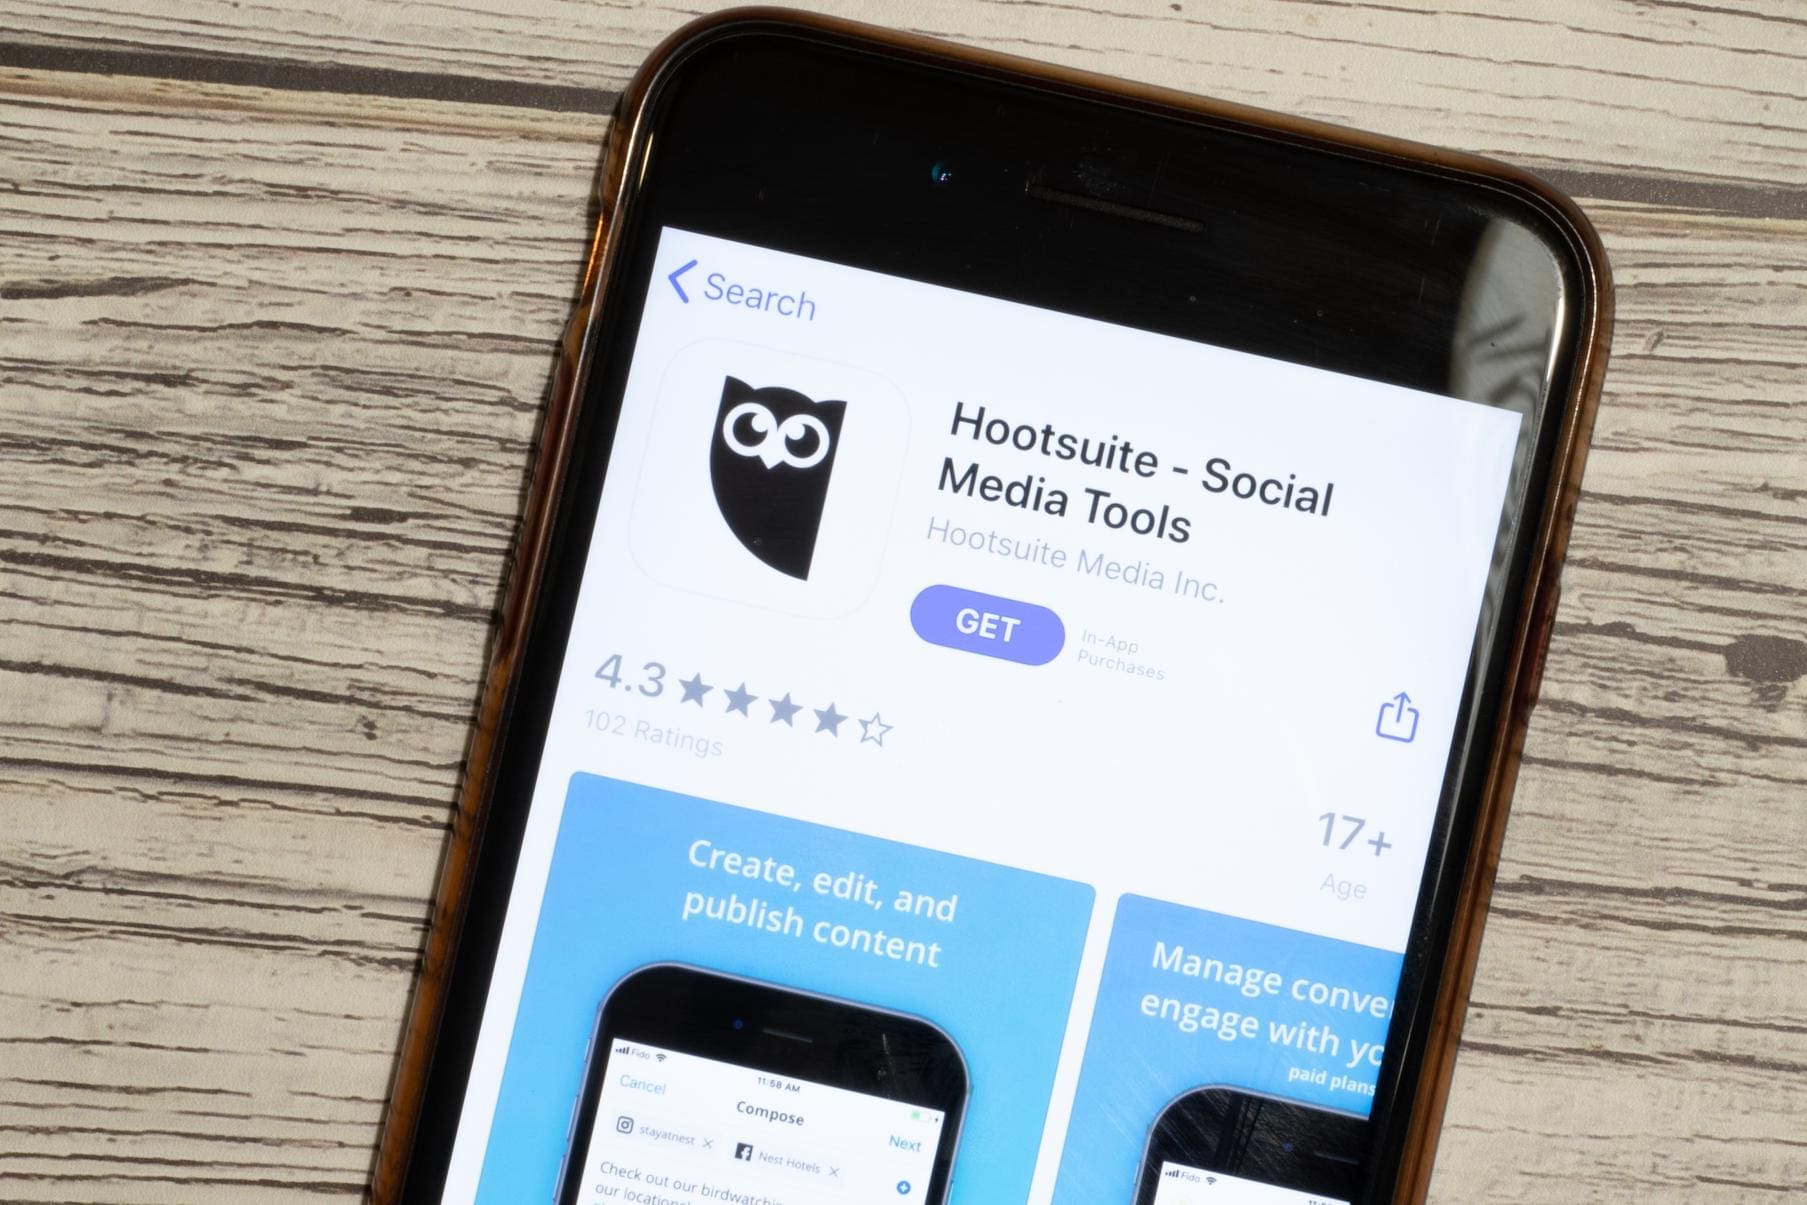
Hootsuite is one of the market’s most popular social media management apps. With it, you can manage all your social media accounts in one place, track brand mentions, schedule posts, and more. It’s an excellent tool for busy home business owners who want to stay connected with their followers and customers.

Through HootSuite’s dashboard, groups may collaboratively schedule updates to WordPress, Facebook, Twitter, LinkedIn, and other social networks through mobile, desktop, or web platforms. Teams additionally may track industry trends and campaign results.

HootSuite is fully integrated with most social networks, allowing you to manage your activities on a simple dashboard for your Facebook, Twitter, Instagram, YouTube, or LinkedIn accounts. The app has a simple, intuitive dashboard with advanced workplace filters. Some other features of Hootsuite include:

- A Wise guide. It shows you how to schedule a post, add a social network, check keywords/mentions, and share content using Hootlet and social media networks.- Social media courses where you can learn the basics of social media marketing.- Hootsuite forums allow one to connect your Facebook or Twitter page to this forum.

Pricing Plans:

- Free Plan - You can monitor two social media accounts with this plan. It allows one user, five scheduled messages, and a publishing calendar.- Professional Plan - Cost is $49/month. Allows one user, ten social accounts, unlimited scheduled messages, plus several additional features.- Team Plan - Cost is $179/month. This plan adds several features, but the main details you will notice are the number of users and social accounts that are allowed. This plan enables three users and 20 social accounts.- Business Plan - Cost is $739/month. Allows five users, 35 social accounts, and several additional

 features.


Todoist ad2

3. Audiense

The Audiense platform makes it easy to analyze your community and take actions that will help you grow. You can clearly understand what’s going on in the Twitterverse and manage communities more effectively than ever with actionable data at every turn - all while saving valuable time!

If you want a tool that will help grow your following and keep people engaged, then Audiense is the perfect social media management application. Key features include targeting individuals based on their interests or demographics; crafting engaging content for those interested in specific topics that matter most to them - all while monitoring analytics so Twitter can give feedback about how well it’s working!

The Audiense tool can be used with your Hootsuite or Buffer account to offer analytic reports that will help you tailor SM campaigns. Here are eight favorite features of Audiense:

  • - Famous Followers – With Audiense, you can tap into the robust social networks of your “famous” followers.
  • - New Followers – There are many ways to sort through your new follower list, but one of the most useful is by followdate. Find out when they were favored or active last and start following them then!
  • - Inactive Friends – Why are you still following that person? They haven’t posted anything in ages! Unfollow and start following people who share your interests.
  • - Search All Twitter when List Building – You can now search through your followers, friends, or all of Twitter to build lists more efficiently than ever!-
  •   Not Following You Back– If your new friends don’t follow back after two weeks, it’s time to ditch them. But keep in mind that Twitter monitors your follower: friend ratio by limiting the number of “friends” on an account and will ban anyone who has too many followers yet doesn’t engage with those following them regularly enough!
  • - Follower Bio Tag Cloud – You can use this technique to find the keywords that appear most frequently in your followers’ bios. This will make it easier to stay on top of what people care about!
  • - Advanced Search Among Friends or Followers – The advanced search feature will allow you to determine who is connected with your account. You can use keywords, locations, or friends and family members’ names to learn more about them!
  • - Analyze Your Lists – This is a big-time saver. No more clicking through one connection after another, just bulk actions to eliminate useless stuff instantly!

Pricing Plans:

  • - Free 
  • - Basic analytics and community search.
  • - Twitter Marketing 
  • - $39/month. Advanced Community Analytics, Tweet Analytics, Data Exports, Advanced Audience Manager, community search, Broadcasting DM Campaigns, Twitter Ads
  • - Audience Insights - $696/month. I will not list the features of this plan since it is not likely of interest to the home business owner.

4. Sprout Social

Sprout Social is yet another social media management tool much like Hootsuite. It offers the ability to manage multiple channels all in one place. An important feature that sets this social media tool apart is the inbox. All your messages and opportunities for engagement will arrive in one place, whereas Hootsuite displays messages in columns.

Here is a further comparison of Sprout Social with Hootsuite:

  • - Bulk Scheduling 
  • - Offered by both
  • - Platform Certification & Training 
  • - Offered only by Hootsuite
  • - Social CRM 
  • - Offered only by Sprout Social
  • - Chatbots 
  • - Offered only by Sprout Social
  • - Optimize Send Times 
  • - Offered by both

The Add Keyword option is another powerful feature. Adding your keyword here lets you keep track of all your brand mentions. Sprout Social also offers excellent analytics service. In the report section, you can monitor and create reports on engagement, team performance, trends, etc.

Sprout Social has three membership tiers to choose from. You can start with a free 30-day trial and later upgrade to one of the following:

  • - Standard 
  • - $89/user/month (when paid annually). You get:
  • - 5 social profiles
  • - All-in-one social inbox
  • - Monitor and engage with messages across Facebook, Twitter, Instagram, WhatsApp, TikTok, and LinkedIn.
  • - Publish, schedule, draft, and queue posts
  • - Social content calendar
  • - Review management
  • - Profiles, keywords, and locations monitoring
  • - Tasking and social CRM tools
  • - Group, profile, and post-level reporting
  • - Paid promotion tools to boost Facebook posts
  • - Professional 
  • - $149/user/month (when paid annually). 
You get:
- 10 social profiles
- Everything in Standard, in addition to:- Competitive reports for Instagram, Facebook, and Twitter- Incoming and outgoing message content tagging- Custom workflows for multiple approvers and steps- Scheduling for optimal send times- Response rate and time analysis reports- Trend analysis for Twitter keywords and hashtags- Paid social reporting for Facebook, Instagram, Twitter, and LinkedIn- Advanced - $249/user/month (when paid annually). You get:- 10 social profiles- Everything in Professional, in addition to:- Message Spike Alerts for increased message activity- Digital asset and content library- Chatbots with automation tools- Saved and suggested replies- Inbox rule builder for automated actions- Automated Link Tracking- Set up rules to automatically add link tracking to links posted in Sprout, helping you better identify your social traffic.

5. Buffer

How would you like to manage five social platforms with just one tool? With Buffer, this is possible. You can schedule posts and share content on Facebook, LinkedIn, Google+, Twitter, and App.net as if it’s child’s play.

Buffer is a social media management tool that makes sharing content across your social media channels easy. You can create a schedule for sharing content, and Buffer will automatically post it at the right time. Buffer also offers a variety of tools to help you analyze your social media performance and track how well your content is performing.

You can run your marketing campaigns using Buffer’s scheduling tool from a centralized dashboard. Then measure your social media performance in real-time and adjust your key performance indicators on the go. 

According to Buffer users, the best thing about the app is the visual content plan editor, which allows you to add images with custom URLs. Its analytics feature also gets high marks.

There is more than one way to use this tool. You can share and post content by adding a browser extension or using a tablet or Smartphone application. You can also visit their site to schedule the content.

Pricing Plans:

- Free:- Manage up to three channels. - Basic publishing tools- Landing page builder- Essentials: $5/mon/per channel- Planning & publishing tools- Analytics tools- Engagement tools- Landing page builder
- Team: $10/mon/per channel- Essentials features, plus:- Unlimited team members & clients- Draft collaboration tools- Easy, clear exportable reports- Agency: $100/month/10 channels- Team features, plus:- Custom access & permissions- Agency-friendly pricing

Conclusion:

Whether you’re looking for a more streamlined way to manage your social media or want to get more involved with your online community, these five social media management apps will help keep you connected. Have you tried any of them? What was your experience? Let us know in the comments below!

Let us know of other topics you wish we would address. While you’re at it, why not sign up to receive our blog in your inbox?


https://digitalchowder.com/5-social-media-manager-apps-for-small-businesses/

Thursday, April 27, 2023

6 Steps to Building A Website for Your Small Business

6 Steps to Building A Website for Your Small Business

6 Steps to Building A Website for Your Small Business

Introduction

You need a website to promote your business but can't afford to pay someone to build it for you. What are you to do? Your first option is to recognize it is unnecessary to be an expert web developer to build your website. Read on to learn six critical steps to building a website. We will point you toward some of the needed resources along the way.

Research the type of website and features you need 

When you're ready to build a website, the first step is to do your research. There are many different types of websites, and it's crucial to pick the one that's right for you. You'll need an eCommerce website to sell products or services. If you're a blogger or writer, you'll need a site that's easy to update and add new content. And if you're promoting a brand or business, you'll need a professional site that's easy to navigate.

Once you've figured out what website you need, the next step is determining what features are important to you. Do you need a shopping cart? A contact form? A blog? A newsletter sign-up? Take some time to figure out what you need, and then start looking for a web builder with all the features you need.

Select a Web Builder and Web Host

Once you have determined the type of website you need and some of its requirements, the next step will be to assess your web builder. Here I'm referring to the application you will use to build the site. Knowing what web builder you will use will help you decide on a web host.

A web host is a service that leases storage space on its servers. Web servers have software specific for connecting or broadcasting websites to the internet. You will need a web host to make your website available on the internet. The amount of storage space and bandwidth required will determine the service's cost. 

As suggested above, a site with a shopping cart will be more data-driven than one primarily used for blogging. Therefore, the shopping cart will use more bandwidth than the blog.

While storage and bandwidth are factors to consider when selecting a web host, your web builder will be another factor.

In its article, "10 Best Website Builders for Small Business: Compared for 2022," WebsiteBuilderExpert recommends these five web builders for small businesses:

- Wix– Best small business website builder.- Squarespace– Best for building your brand.- GoDaddy– Best for businesses that need to get online quickly.- Weebly– Best for value for money.- Zyro– Best for business basics.

Each of these five builders comes as part of a web hosting service package. Each is respected, and each is drag-N-drop in functionality, and thus easy to use. Using Wix as an example, Wix is a hosting service. For $22 per month, you get a free domain and free SSL certificate for one year, plus the web builder. You also get 5 GB of storage and one hour of video play. The video play is their way of limiting bandwidth.

WebsiteBuilderExpert gives Wix the top ranking in this list of builders, so it is a quality builder, as are the others.

I will discuss WordPress in a different category, which is not on the list but is one of the most popular platforms for building websites. WordPress is independent of any web hosting service. That said, some hosting services cater specifically to WordPress. Two of these are Siteground and Bluehost. These two services are special WordPress tools included in their service.

Pick a domain name

A domain name is what identifies your website on the internet. The name must be registered with a domain service and configured to locate your website when entered into a browser. A fee is required to register the domain name and is due annually to remain active. While specific sought-after names can be expensive, the typical cost is around $15 annually.

Choosing the right domain name for your business is vital for several reasons.

  • First, it's one of the first things potential customers will see when looking for your site. Therefore, you want to ensure that it's easy to remember and relevant to your work.
  • Second, the domain name is a crucial part of your branding. It should be unique and reflect the image that you want to project.
  • Third, you'll want to choose an available domain name.
  • Finally, you will want a domain name with good keyword value.

What is a keyword? A keyword is a term that best describes the content on your page or post. It's what you want to rank for when people search for that keyword or phrase in Google or other search engines. So, when they search, your page should come up. Several keywords may describe a page's content. In this case, you will want to use multiple keywords. Multiple keywords will broaden the search possibilities for finding your content.

Based on the name and nature of your business, there will be words that best describe your business and perform well in search engine search results. Therefore, it could be profitable to do some keyword research to find a good keyword on which to base your domain name. Some services offering free keyword research are Keywords Everywhere and Ubersuggest.

Create your website content

Creating your website content can be a fun and rewarding experience or a real chore. It will depend on your skills and interests. Even if you know what you want to say, you may be at a loss for how to say it. How can you say it using good grammar and sentence structure while capturing the attention of your audience?

How to say what I want to say is where it becomes a chore for me. But I have discovered some tools that do much of the hard work for me and allow me to post content confidently:

  • Jasper ai - Jasper uses artificial intelligence to generate content and word it clearly and engagingly.
  • Grammarly - As its name suggests, Grammarly addresses spelling, grammar, and sentence structure. If you subscribe to the Jasper service, Grammarly will come with it. I subscribe to Grammarly separately, allowing me to use it wherever I write. Even in email. As I write, it is there offering corrections and making suggestions. When I complete an article, I don't need a proofreader to catch what I have missed. Grammarly has my back.
  • Ubersuggest - When it comes to writing content, Jasper and Grammarly are adequate. Ubersuggest is a multi-tasker. As I mentioned above, it does keyword research. But it also does website analysis and offers SEO help to increase traffic to your website. It has yet another feature for which I suggest it in this context. It, too, has an AI writer. Though it is not as robust as Jasper, it is beneficial in giving help with content. If I need a boost to start writing on a topic, I go there first to 'prime the pump.'

Add Images

A website without images can be a very dull site, indeed! At least visually. But where can you find images, photos, or videos that are free or inexpensive, about which you can be confident you have permission to use?

We all know about Google images, a rich storehouse of graphic content. But which images can you use on a website, and which are prohibited? Sure, you can contact the content owner, but that takes time, and you may or may not receive a prompt reply. So I rely on four services:

  • Graphic River - A combination of free and paid downloads.
  • Unsplash - https://unsplash.com/ - Also a combination of free and paid downloads.
  • Pond5 - Pond5 offers both a subscription and a pay-per-use approach. I usually pay, at most, $2.50 for an image.
  • Canva - Canva is an excellent source for downloading images, but I use it primarily for graphic design. There is a free version that has some limitations. The principal limit is the inability to download a high-quality version of the image I want. Higher-resolution downloads require a fee. I use the Pro version, which gives me every advantage I want. It costs $119.99 annually.

Launch your website!

So you've built your website and are ready to show it to the world. Congratulations! Publishing your site can be daunting, but with some preparation, you can make it go smoothly. Here are a few things to keep in mind as you launch your website:

  •  First, Double-check your site for any broken links or errors. Nothing is more frustrating for a visitor than clicking on a link and getting an error message. Before you go live, test your links to ensure they work.
  • Next, take a look at your site's design and layout. Is everything easy to find and navigate? Is the overall look and feel professional and polished? If not, make some changes before you launch.- 
  • Finally, once your site is up and running, promote it! Let people know where they can find your site and what they can expect to see there. Use social media, email marketing, and other strategies to get the word out. Launching a successful website takes effort and planning, but it's ultimately worth it. With these tips in mind, you're on your way to a successful launch!

Conclusion

So there you have it - a simple guide to creating your website. Do the research, choose the right web host and domain name, and produce quality content. You will then be well on your way to having a successful website that reflects your business in the best possible light.

Have questions or comments? Leave them for us in the comment section below or use our contact form.

Top Posts


https://digitalchowder.com/6-steps-to-building-a-website-for-your-small-business/

10 Smart E-Commerce strategies to Increase Your E-Commerce Sales

Increase Your E-Commerce Sales If you need help to increase your e-commerce sales despite putting in much effort, you're not alone. With...