Wednesday, April 26, 2023

5 Free Email Marketing Tools to Help You Grow Your Business

5 Free Email Marketing Tools to Help You Grow Your Business

(We independently select these products — if you buy from one of our links, we may earn a commission.)

If you're looking for ways to grow your small business, email marketing is a great place to give attention. With the free email marketing tools we will highlight in this blog, you can create beautiful newsletters, schedule automated emails, and track conversions. But first, let's discuss the question of why use email marketing.

Why Use Email Marketing

If you are not currently using email marketing with your home business, take a minute to read further and consider or re-consider adding it to the arsenal of marketing tools for cultivating active customers. You may have already considered using email marketing and rejected it in favor of social media or another venue. Allow me to suggest that you may not be properly framing the use of email versus another approach. The argument should not be one of either/or. It is not email versus social media or some other form, but email AND social media or another format. The two are not competing for marketing methods but complementary techniques.

Social media and SEO strategies are methods for driving traffic to your business site or page, but they are not necessarily the best methods for making customers of those who show up at your site or on your page. That is where email marketing can contribute. Campaign Monitor published data comparing email with social media. According to their statistics, the average click-through rate on social media is roughly 2.5%. Meaning that out of every 100 visitors to your content, 2-3 people will click on the item you are pitching to them. Even then, they are not yet customers. So far they have just decided to check further. They have not yet decided to buy or do whatever you're asking them to do.

Email, on the other hand, has an open rate of between 15-25%. In other words, 6-10 times greater than the response rate of social media. This is not such a head-scratcher when you consider that the email is going to people who have chosen to receive your emails. They already have a positive impression of your product or content. You have at least a slight relationship with them and none with most of those coming to your site. The longer someone remains on your email list and receives contact from you, the greater your relationship. So they are already predisposed to open a link in your email.
This image has an empty alt attribute; its file name is Camtasia_Ad2.png

Another interesting data from Campaign Monitor is that email generates $38 for every $1 spent on it. An amazing 3800% ROI. So maybe it is worth rethinking your use of email marketing.

As you consider using email, your challenge will be determining how to glean those potential emails from people who appear at your site or page. Consider this. Your advertising dollars on Facebook or Twitter will only benefit you if you continue paying them. Whatever activity you generate with an ad campaign will not be repetitious once the campaign is finished. At least, for the most part. Another ad campaign will be required to get another uptick in activity that is similar. But you can send emails regularly with little cost and gain 6-10 times the results of your ad campaign. Might the wise thing be to put some or even most of your advertising money into building your email list without spending nearly as much overall on advertising?

I would say that email marketing is an essential consideration for any business. It's the best way to keep in touch with your customers and tell them about new products, services, or discounts. But it's more than just sending out mass emails. With the services described below, you can personalize your messages, making them more relevant for each email list segment.

Email campaigns allow you to:

  • Target a specific audience
  • Reach a large number of people
  • Spend less to produce and send
  • Customize them to fit the needs of each recipient

Should You Use An Email Marketing Service?

So if it is a good idea to use email marketing to enhance customer relations, is it also a good idea to use an email marketing service to manage your email marketing? My answer to this is yes. Here are some reasons why I think it to be a good idea. But after reading the reasons, I believe it to be a good idea; I will also suggest a hybrid approach in which you might use a combination. In other words, combine the use of a marketing service with the help of an SMTP relay service.
This image has an empty alt attribute; its file name is Pond5_graphics_ad-3.pngCase for Using An Email Marketing Service:

Arguably the best reason to use a marketing service is to comply with the CAN-SPAM Act of 2003. This was an act of congress attempting to cut down on the onslaught of spam emails. The act established compliance standards for authentic bulk email practices instead of SPAM emails. By using a service, there is the assurance of complying with these standards. All of the services operate in strict compliance since their business relies on them. 

Another side to this issue is working with standards established by email and internet service providers to avoid spam filters. Working with marketing services will give confidence that your emails will make their way to your recipients' inboxes. Besides knowing how to navigate the filters set up by these providers, the providers also recognize reputable marketing services. They are less likely to mark emails coming through as spam.

Other advantages -

  • Templates - Each service has pre-designed templates and drag-and-drop design tools to edit the templates. This provides a simple but quality email design that complies with CAN-SPAM and Email & Internet Service Provider standards. The designs are also aimed at higher open rates. Just as important is that these templates will work with all email clients and software. You can be assured it will work in Outlook, Hotmail, Gmail, Yahoo, or any other client.
  • List Management - Another great reason to use a marketing service is that you don't have to give thought to managing your email list, regardless of its size. Connect your website opt-in forms to the service, and each new address is added automatically. And if a person chooses to be removed from the list, it goes through the service, and you receive a notice.
  • Analytics - A third important reason to use a marketing service is analytics. All the essential information you need is available. Who opened that last email? Who clicked on the links, and which links did they choose? While you can pay little attention to list management, leaving it all up to the service, you will want to pay close attention to analytics. Using this information you will know better what works and what doesn't.

Use of A Hybrid Marketing Approach:

By hybrid marketing approach, I'm referring primarily to a combination between a marketing service and an SMPT relay service. First I need to explain what an SMPT relay is.

SMTP stands for "Simple Mail Transfer Protocol."Email servers use these protocols to transfer e-mail messages and attachments over the internet. Whether using your private email server or a public one such as Gmail, SMTP is a secure connection between that server and the internet. While you can set up your server, you will not be able to send emails securely without SMTP. 

It is possible to send email from a private server using the SMTP settings of a personal email account you may have with Gmail or another email provider, but there will be restrictions. Only a certain number of emails can be sent per hour or per day. If you try to send more emails than the number permitted, your account will be blocked.

Using your email server to send a secure email to thousands of recipients is impossible. And if you attempt to send an unsecured email, bypassing SMTP, recipients will block it, and your domain will likely be blacklisted. This is where SMTP relays come in. You can use your email server to send to thousands of recipients by using the SMTP settings of the relay. And the cost will be less than that of the marketing services. But neither are you getting all the features of the marketing service.

  Using a relay is not for everyone. For many, the technical requirements of setting up a personal email server by coding your server would be too great. And even if you use a software package ready to go out of the box, too much time and effort are required. Additionally, unless you have an email list of more than 2,000, it just doesn't make sense. The free marketing services will adequately meet your needs.
This image has an empty alt attribute; its file name is Sqribble_ad2-1.pngSo why might you want to use an SMPT relay service?

There are savings with an SMPT relay service, but you will not have campaign management tools essential to carry out a marketing campaign. But these campaign tools are not as necessary with your highly engaged recipients as with those less engaged. More engaged recipients could be routed through an SMTP relay, while those needing more encouragement could be assigned to the campaign management service.

Using this approach, you are saving with those who are more engaged and paying for the more expensive management tools to reach the less involved. Again, this makes the most sense when you have large numbers in your email list. For example, using a relay service such as Sendgrid, for $19.95, you can send up to 50,000 emails per month. This could be one mailing to 50,000 recipients, five mailings to 10,000 recipients, or another combination that equals 50,000 for the month.

By comparison, MailChimp charges are based on the number of contacts in your mailing list. With 10,000 contacts, the lowest cost plan would charge $87 per month and allow ten mailings. While this provides 100,000 emails per month, the cost is the same even if you send only one mailing. So a list of 10,000 contacts costs $87 per month with MailChimp and $19.95 per month with Sendgrid.

A Comparison of 5 Email Marketing Services

About Free Plans

All five email marketing services listed in this blog have a free plan with additional plans available to accommodate more extensive, more extensive lists and more advanced features. This is an excellent approach for small home businesses allowing them to start free in the early days when their mailing lists are small and progress to paid plans as they grow.  When your business has grown to need a paid plan, you know whether that service is a good fit for your business.

As you read through each service below, be on the lookout for those that offer full features in their free plans. Thus, the main difference between free and paid will be the number of emails you send.

MailChimp

MailChimp is an easy-to-use email marketing service that allows you to easily manage your contacts, build campaigns, and automate your business processes. It also offers a variety of features that make it easier than ever to design and deliver high-quality emails.  Business News Daily has chosen MailChimp as the best email marketing software for beginners. 

Mailchimp's free plan includes:

  • Up to 500 contacts, with 10,000 sends per month
  • A daily limit of 2,000.- 1-step automation - This feature allows you to place sign-up forms on your website that are automatically stored in your Mailchimp account and tagged as you indicate.
  • Marketing CRM - Customer relationship management (CRM) helps to create stronger connections with your customers. An audience dashboard enables you to learn the individual preferences of those in your list, making it possible to address specific preferences in subsequent mailings.
  • Landing Pages - The free account includes free website and landing page hosting. In addition, free landing page templates are provided, allowing a tight integration for CRM.
  • Social posting - Enables posting on your social accounts.
  • Facebook & Instagram ads - An ad tool for Facebook & Instagram to help design and optimize ads.
  • Postcards - Allows sending physical postcards

With a list of 500 contacts, you could send 20 emails per month to your list. You are also limited to one audience, meaning one contact list. This will place some limitations on personalizing your emails. But since you can add tags to those in your list, you still have some segmentation options.

Design Tools include:

  • Creative Assistant
  • Content Studio
  • Basic email templates

MailChimp Integrations:

  • WordPress
  • QuickBooks
  • Shopify
  • Stripe
  • Zendesk Activity
  • LinkedIn
  • Facebook
  • Formstack
  • SurveyMonkey
  • Many more

Benchmark

Business News Daily designated Benchmark as the best email marketing software for "Ease of Use." It, too, has a free plan that:

Benchmark's free plan includes:

  • Up to 500 contacts
  • 3,500 emails per month
  • Basic Email Marketing
  • Lite Marketing Automation
  • Simple Lead Generation
  • Basic Reporting

Email Marketing:

  • Drag & Drop Email Builder
  • Responsive Email Templates
  • Smart Content
  • RSS Email Campaigns
  • List Management
  • Basic Segmentation
  • Responsive Templates
  • Signup Forms
  • Basic Drip Campaigns

Additional Features:

  • Email Delivery Management
  • Basic Drip Campaigns
  • Sign-Up Forms
  • Polls & Surveys
  • Live Engagement Reports
  • Opens by Hour Reports

Given the limited number of contacts and monthly emails, Benchmark's free plan is definitely for the small business just getting started. Should these limitations be too restrictive, the first step into a paid plan costs $13 per month for 500 contacts, but an unlimited number of emails sent p

If the size of your contact list and the number of emails allowed each month is your primary concern, MailChimp will be the obvious choice compared to Benchmark. If not, your concerns will lie more with the marketing, design, or other features offered. I have listed most of those features here for both services, but you will want to go to the sites to get more into the details.

Another feature you may be interested in is the integrations with services outside Benchmark. Here are just a few of the Benchmark integrations, but there are many more:

  • WordPress
  • Google
  • Facebook
  • Flickr
  • Zapier
  • PayPal
  • Shopify
  • ZOHO
  • many more

  • TodoistAWeber

AWeber's free plan is similar to MailChimp and Benchmark. It allows up to 500 contacts and 3,000 emails per month. AWeber has only two plans, Free and Pro. The Pro plan gives all features the service has to offer and starts at $16.15 per month with a limit of 500 contacts or subscribers. Once you subscribe to the Pro plan, you are on a sliding scale based on the number of subscribers. Everything else remains the same. This includes an unlimited number of emails each month. When the number of subscribers exceeds 500, you begin paying $26.15 per month for up to 2,500 subscribers.

With the focus of this blog on free plans, I will list only those features that come with the free plan:

Usage:

  • Subscriber limit - 500  
  • Email sends - 3,000/mo
  • List profiles - 1

Email:

  • Create and send newsletters
  • Email automation
  • RSS to email
  • Drag-and-drop email builder
  • 100s of email templates
  • HTML emails
  • Dynamic content
  • AMP emails
  • Hosted broadcast archive
  • Thousands of professional images

Landing Pages:

  • Sell Products and Services with AWeber Ecommerce
  • Unlimited landing pages
  • Beautiful landing page templates for a variety of goals
  • Thousands of professional images
  • Video landing pages
  • Buy and connect domains
  • Google Analytics

List Building:

  • Sign up forms
  • WordPress plugin

Segmentation:

  • Tagging subscribers
  • Send to basic segments

Reporting:

  • Simple subscriber and message analytics

AWeber Ecommerce:

  • Sell products and services
  • Subscriptions and payment plans
  • Sales tracking
  • Purchase tagging

Integrations:

  • Facebook
  • PayPal
  • WordPress
  • Shopify
  • WooCommerce
  • Hundreds more integrations

iContact

Again, I will start with the number of contacts and emails with the free plan. iContact looks very similar to the previous services:

  • Up to 500 Contacts
  • Up to 2,000 Sends per month

iContact has only one other plan beyond the free plan,, the Advanced one. As with aWeber services, once you are in this Advanced plan, you receive every feature the service offers and pay based on the number of contacts in your list. So when your list exceeds 500, you move into the advanced plan, starting with a limit of 1,500 contacts and unlimited emails. At this level, the plan costs $23 per month.

Features included in the free plan include:

Email Marketing:

  • Drag & Drop Editor
  • HTML Editor
  • Template Library
  • Stock Image Library
  • In-line Photo Editing
  • A/B Split Testing

Automation:

  • Automation Editor
  • Targeted Automation Follow Ups

Landing pages:

  • Landing Page Creation & Hosting 
  • 1 Page

Real-time Campaign Reporting:

  • Email Reporting
  • Automation Reporting
  • Landing Page Reporting

Contact Management:

  • Sign-up Forms
  • List Segmentation 
  • 1 Segment

Integrations:

  • Custom API
  • Integrations Directory
HubSpot

HubSpot is difficult to compare to the other email marketing services listed here. Business News Daily tagged HubSpot as the best "Bundled Marketing Solution." This is an apt description - a bundled marketing solution. But this refers to only one Hub of HubSpot. The Marketing Hub. There is also a Sales Hub, a Service Hub, a CMS Hub, and an Operations Hub. But we will concentrate only on the Marketing Hub.

Registering for a HubSpot free account gives you lifetime access to a whole array of free features. These features are promoted as "scalable for scaling companies."


https://digitalchowder.com/5-free-email-marketing-tools-to-help-you-grow-your-business/

Monday, April 24, 2023

Transform Your Writing With Jasper, The AI Writing Assistant

Transform Your Writing With Jasper, The AI Writing Assistant

Jasper Boss Mode

Content creation is vital in promoting businesses and individuals in today's digital age. Writing engaging and creative content can be a challenging task. Still, with the help of artificial intelligence, this chore has been made more accessible than ever before. One such AI-powered tool that has been making waves in the writing world is Jasper, the AI writing assistant.

If you are tired of struggling with writer's block or spending hours editing your work, you will find Jasper, the AI writing assistant, a big help. Jasper can help you streamline your writing process and improve the quality of your work. With Jasper's advanced technology and user-friendly interface, you can take your writing to the next level.

What is Jasper, and how does it work?

Jasper is an AI-powered writing assistant that helps users create engaging and creative content. Designed to make content creation more manageable, it utilizes natural language processing (NLP) models and machine learning algorithms.

Jasper works by analyzing and interpreting user input requests. It utilizes various data sources to understand the context of the user's request and generate a creative and engaging response. It understands the user's intent, and through its NLP models, Jasper can generate content for a specific tone or style.

Jasper's algorithms learn over time through machine learning, developing more intelligent responses as it accumulates more data. Its technology constantly evolves, meaning its capabilities will only continue to expand. This changing nature of technology makes Jasper AI a valuable tool for content creators, writers, and businesses.

Using Jasper is simple. The user can input their request using natural language, and Jasper will generate a response in a matter of seconds. Users can then edit or modify the content to fit their requirements.

Jasper can help users create content for various purposes, such as social media, blog posts, email marketing campaigns, product descriptions, etc. Using Jasper can produce high-quality content faster, improve their writing skills, and boost their online presence.

How can Jasper improve your writing process?

Jasper is an AI writing assistant that can help improve your writing process in several ways. Here are a few examples:

- Increased productivity: With Jasper's help, you can generate ideas, outlines, and even complete drafts more quickly than working alone. So you can create more content in less time, freeing you to focus on other aspects of your job or business.- Enhanced creativity: Sometimes, getting your creative juices flowing takes a little inspiration. Jasper can provide that inspiration by suggesting topics, throwing out new ideas, or even playing around with different writing prompts.- Improved quality: Jasper's AI models help you write more effectively by catching errors, improving sentence structure, and suggesting alternative words or phrases. So you can produce higher-quality content that will resonate with your readers.- More efficient editing: Jasper can also help you with editing, making catching and correcting mistakes easier. Whether you're working on a blog post or a social media update, Jasper can help ensure everything is accurate, polished, and ready to share.

Overall, Jasper is a valuable tool that can save time, boost creativity, and help you produce higher-quality content. Whether you're a writer, marketer, or business owner, Jasper can help take your writing process to the next level.

Features and benefits of using Jasper.

Here are some of the key features and benefits of using Jasper:

  • Creative Writing:
    Jasper can help you write creatively. Whether it's social media posts or blog articles, Jasper can assist you in generating attention-grabbing headlines, memorable captions, and compelling content.
  • Speed:
    Jasper is fast. Say goodbye to writer's block and endless hours crafting the perfect sentence. With Jasper, you can quickly generate high-quality content and move on to your next task.
  • Flexibility:
    Jasper is flexible. Whether you need help with a blog post, a social media post, or even a short story, Jasper can assist you with all types of writing.
  • - Easy to Use:
    Jasper is simple to use. With just a few clicks, you can start creating engaging content. You don't need to have any writing expertise to use Jasper.

Benefits:

  • Improved Productivity:
    With Jasper's help, you can double or even triple your productivity. By reducing the time it takes to create content, you will have more time to focus on other tasks.
  • Improved Engagement:
    Jasper can help you make your content more engaging. Using Jasper's creative writing abilities, you can capture your audience's attention and keep them interested.
  • Increased Traffic:
    Jasper can also help you generate more traffic to your website or social media platforms. Creating captivating content can attract more visitors and increase your following.
  • Cost Effective:
    Jasper is cost-effective compared to hiring a full-time writer. Jasper's fees are considerably lower than that of an experienced content writer, making it an affordable solution for small businesses and startups.

How to integrate Jasper into your writing workflow.

Integrating Jasper into your writing workflow can be a game-changer for content creation. Jasper saves time and effort, and it also lends a helping hand in coming up with creative and engaging content. Here are some steps to integrate Jasper into your writing workflow:

  • Set up Jasper:  To get started, you must set up your device's Jasper interface. You can access Jasper through an online platform to communicate seamlessly with the AI writing assistant.
  • Define the scope of work: Clearly define the writing task or content requirements you want Jasper to help you with. Jasper can help you with various content needs, such as social media posts, blog articles, short stories, etc.
  • Provide Jasper with the necessary inputs: To ensure that Jasper provides accurate and relevant content, you must give it the required inputs, such as keywords, topic, tone of voice, target audience, and other relevant information.
  • Review the content provided by Jasper: Once you have provided Jasper with the necessary inputs, it will provide you with the output based on its AI models. Review the content provided by Jasper and make any necessary edits or suggestions.
  • Use the content provided by Jasper: After reviewing and making any necessary edits to the content provided by Jasper, you can use the content productively. Jasper can help speed up your writing workflow and make producing quality content easier in less time.

Integrating Jasper into your writing workflow can greatly benefit content creators. From saving time and effort to producing quality content seamlessly, Jasper is a fantastic AI writing assistant.

Success stories and testimonials from Jasper users.

Many writers have already experienced the benefits of using Jasper in their writing process. From saving time to improving the quality of their writing, Jasper has helped writers of all levels achieve their goals. Here are just a few success stories and testimonials from Jasper users:

  • "Jasper has completely transformed the way I write. Its AI-powered suggestions have helped me improve my writing style and catch errors I would have otherwise missed." - Sarah, freelance writer.
  • "As a non-native English speaker, Jasper has been a game-changer for me. Its grammar and spelling suggestions have helped me write more confidently and effectively." - Juan, content marketer.
  • "Jasper has saved me so much time in the editing process. Its automated suggestions have helped me quickly identify and fix errors, allowing me to focus on the creative aspects of writing." - Emily, novelist.

What is the cost of using Jasper?

Jasper AI has three subscription plans, Starter, Boss Mode, and Business. The Business plan is a custom plan with a custom price. As for the Starter and Boss Mode plans, each has a 5-day free trial along with a monthly or yearly payment plan.

Starter Plan:

Cost - $49 per month on the monthly plan and $40 yearly.

Features Include:

  • Jasper Chat - Interact with AI in a natural dialog with an easy-to-use interface to generate content quickly.
    • 50+ AI templates - AI that helps you write short-form content like product descriptions, paragraphs, ads, and so much more.
    • Browser extension - Add Jasper to your Google Chrome browser to write better everywhere.
    • Support for 30+ languages - Need to write content in another language? Jasper can read inputs in your language and write quality content in 30+ languages.
    • Email support - Contact a human in less than 10 minutes during business hours M-F 9am - 5pm CST.
    • Words Per Month - 20,000 Words- Up to 5 users

Boss Mode Plan:

Cost - $99 monthly on the monthly plan and $82 yearly.

Features Include all features of the Starter Plan plus these:

  • Up to 5 users- Automated workflows
  • Google Docs style editor- Compose & command features
  • Live chat support 
  • 50,000 Words
  • Up to 5 users
  • Jasper Art
  • Documents
  • Commands
  • Jasper Chat
  • Recipes
  • 30+ Languages

Video Demonstration

View the video below to demonstrate some of the Jasper AI features.


Conclusion

Try Jasper today and join the growing community of writers who have improved their writing process with the help of AI technology. Click on the graphic below and get more information and a free trial.

Jasper Boss Mode
https://digitalchowder.com/transform-your-writing-with-jasper/

Saturday, April 15, 2023

Unlocking the Power of Nicepage: My Personal Guide - Part 4

Unlocking the Power of Nicepage: My Personal Guide - Part 4

Nicepage wordpress theme builder

Introduction

This article is my final installment in a four-part series about one of the best web builders: Nicepage. It's not an instructional set of videos. Still, instead, I'm focusing on some of the fantastic features that make this builder a standout for me.

  • In video number one, I discuss why NICE pages, subscription plans, and the accompanying desktop app are so effective in helping you design both offline and online. It's one of the features that has made it my go-to choice for all my web development projects.
  • In video two, you'll witness the fantastic design features that Nice Page offers, many of which are exclusive to this platform.
  • Then in the previous video, I presented the diverse publishing choices that come with a Nicepage desktop app. These include WordPress, HTML, and Joomla. Publishing directly to the Nicepage servers is another choice.- In this final video, we'll be exploring Nicepage within WordPress. I will show you how to use the plugin that comes with it to get your website up and running in no time. And as a bonus, I'll also share tips on customizing your site online and offline. So let's get started.

Installing the Nicepage Theme

In the last video, I demonstrated the installation of the Nicepage website design in WordPress that I created in the desktop app. I installed it the same way as any other WordPress theme.

We exported the website design to a WordPress zip file from the desktop app. Then, going to WordPress, we select "Appearance" in the menu and "Themes." We then click on "Add New" followed by clicking on "Upload Theme." We locate and install the zip file we exported from our desktop app. Once installed, we need to activate our theme and customize it. Now, notice in the main menu on the left the addition of the Nicepage plugin.

Using Nicepage Editor

Now, let's go to "Pages" from the main menu. Hover over the page you want to edit and click "Edit with Nicepage."

The first thing I want to point out in the editor is that you can do everything within the page editor without leaving it, including:

  • Switching to another page
  • Creating a new page
  • Editing the menu

The image's arrows indicate "Pages" and "Menu Items." I can do it all right here.

Also, if you don't use an SEO plugin, you can add meta information from the page editor. Notice the image highlighting page settings. I decided to use SEO plugins because they have additional features not included with Nicepage.

You can view all these features demonstrated in the video further down the page.

Browser View of Page

In the second video, I demonstrated several design features in Nicepage. With the page loaded in the browser, we can view those features.

  • Animation View the video and notice the animation in the first two blocks of the page. Trigger these instances by scrolling. Animation can also be triggered by hovering. In either case, there are numerous animations from which to select.
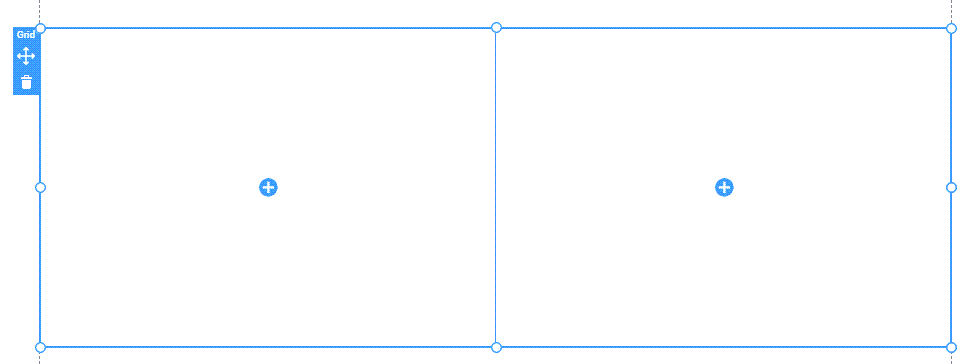
  • Grid - A grid in Nicepage is similar to a table in which you can create multiple cells. Each cell can contain images, text, or any other type of content. A significant advantage of the grid is to tie content units together as the page responds to various devices. Otherwise, as a responsive page adjusts for multiple devices (desktop, laptop, tablet, phone), the content can become unstable in its positioning.
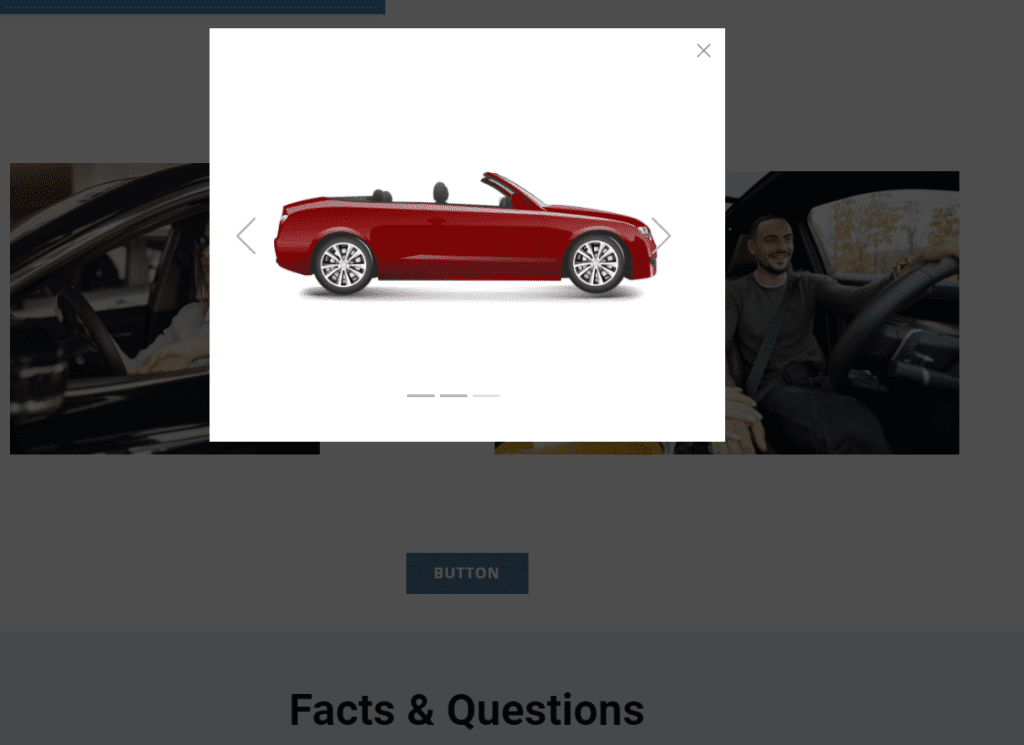
  • Modal - A modal is a popup that overlays the page. It can have a transparent background that allows the page to show through. You can create any content in a modal. I like to use image slide shows. Create a single image or button as a hyperlink to launch the modal. The modal can display other images.

Modals can be triggered, as mentioned, with a link, timed to launch after the page has loaded, or set to launch when a view shows intent to leave the page.

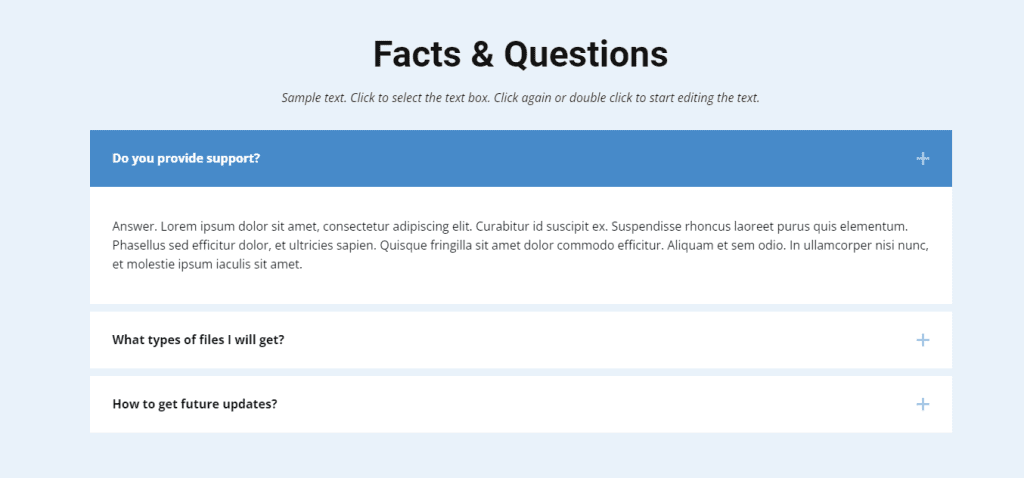
  • Accordion - An accordion is a series of labels with content that 'accordions' out when you click the label. (Also on the video)
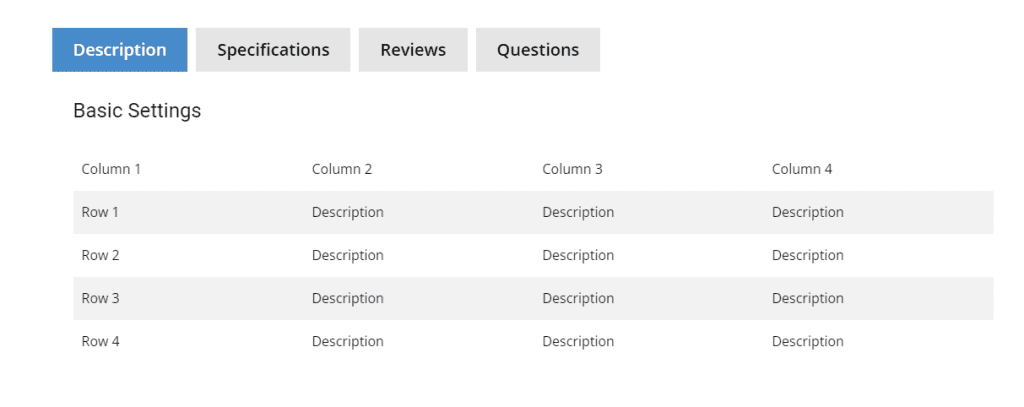
  • Tabs - Tabs are similar to accordions. Whereas accordion labels are vertical, tab labels are horizontal, revealing additional content when clicked. (On the video)

Resizing Images

Resizing images is simple on Nicepage. Drag any side or corner of the image and drag it; the image will respond while keeping its aspect ratio. This feature is probably true in any web builder. However, occasionally I will need help sizing an image to fit a particular spot without losing portions of the image I want. I often get around this problem by using HTML.

To use the HTML image tag for an image, I insert an HTML element in the cell or box where I want the picture. I enter a simple image tag in the HTML code, including the image file's location and the width I want. I do not include the height. By doing this, the browser will automatically use the correct height to keep the aspect ratio. The same effect will work by using only the height. I use a percentage rather than a fixed width. In this way, the image will be responsive for different devices. In this way, the image will be in full view.

Jasper Boss Mode

Editing Between Online and Offline

The last feature I will highlight is the ability to work online and offline with Nicepage. When I speak of working offline, it refers to using the desktop app. The ability to work offline is my favorite feature of Nicepage.

You may wonder why I want to edit offline when I can do everything I need online. I can do everything online, but every change I save will be public once I have published a page. If I make a significant change to a page, I may save the changes at several stages, so I keep them should something go wrong. Each time I make a save, my incomplete work becomes public. Not a very positive image to portray!

Instead, I will make sure the desktop app has the current version of the page and will make my changes in the app. Once the changes are complete, I will export them from the app and import them online. So how do I do that?

Notice where the location of the cursor in the nearby image and the popup menu next to it. This menu is related to the selected block with a blue border. The popup menu lists "Export Block." Select this and export that particular block to your computer. Then go to the desktop app and open the same page. Select a block and click on the three dots on the left side of the block. Choose to import block and locate the block you just exported from online.

You will need to do this for each block in the desktop app that is not up-to-date. If the same block was already present on the desktop but is outdated, you must delete the obsolete version.

There may be several applications you can make to this feature. Another application would be when you have a block of information on a website page that you want temporarily removed. Using this feature, you could store it on the desktop and then move it back online when you want to display it again.

Conclusion

This article and series conclude. Please use the comment box below if you have questions or comments. Is there a topic you would like me to address in a future article? Share that in the comments.

Be sure to download a free copy of Nicepage and try these features yourself.

Nicepage wordpress theme builder
https://digitalchowder.com/unlocking-the-power-of-nicepage/

Friday, April 14, 2023

My Personal Guide to All the Best Features in Nicepage - Part 3

My Personal Guide to All the Best Features in Nicepage - Part 3

My Personal Guide to All the Best Features in Nicepage - Part 3

This is my third article in a four-part series about my favorite web builder, Nicepage. In the first article, "My Personal Guide to All the Best Features in Nicepage, Part 1," we discussed the Nicepage subscription plans. We also mentioned its desktop app for Windows and Mac allows you to design and edit your website offline. Then, in my second article, "My Personal Guide to The Best Features in Nicepage Part 2," I highlighted special design features in Nicepage that I especially like. Some are even unique to Nicepage.

In this third article, we will discuss the options available on Nicepage, allowing you to publish your site to your website from the desktop app.

Publication Options

I have provided screenshots to help you visualize the comments, but there is also a video further down you can view.

Nicepage Best FeaturesNicepage 

Publishing Options

So let's go to the desktop app for Nicepage. In this case, it is in Windows, but there is also a version for Mac computers. The website showing on the desktop is one I have been working on in the second video for demonstration purposes. We demonstrated some animation, grids, and how they contribute to a responsive website. We also presented a modal, accordion, and tab feature.

Assuming that we are ready to publish our website on the internet, let's look at our publication options. These methods export the site from our desktop app to our online website. So we go to the publication feature, where you can see the following options:

  • Website. This option uploads the site directly to the Nicepage server. This is a simple way to post the site online and allow clients to view it before launching it publicly.
  • HTML. For those who prefer a simple, straightforward website rather than a CMS such as WordPress or Joomla.
  • WordPress. This is the most popular website option, and Nicepage is a leading theme builder for WordPress.
  • Joomla. Though less popular than WordPress, Joomla offers another CMS option.- Image. Publish a one-page image of the site.
  • Website project. This packages the website project for transfer to another computer.

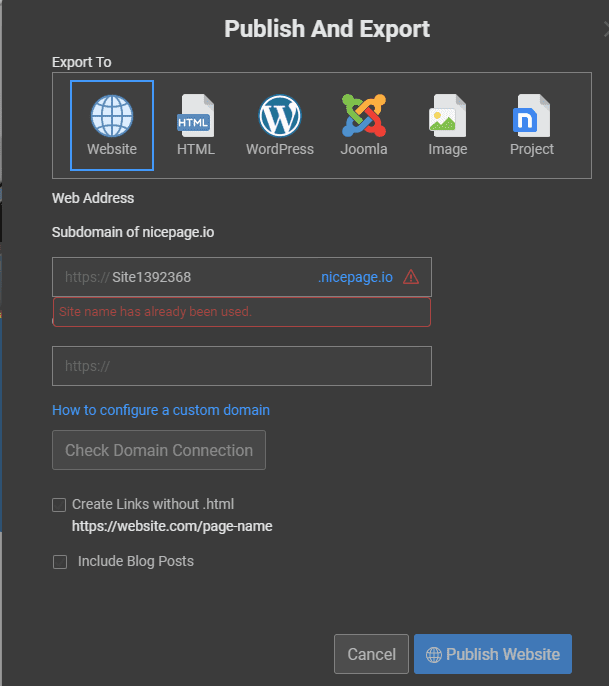
Website Publication

website publicationWebsite Publish option

Starting with the first option, we will publish to a website. The subdomain to which it will be posted is shown in the window. Use this URL to view the site once it's published. A custom domain name that you have registered can also be configured to direct viewers to the Nicepage subdomain. A few other options can also be selected in the window, but we will skip them and go straight to "Publish Website."

Now we can use the subdomain URL to view the site. As you scroll down the home page, you can observe the animation in action with the various page elements as they zoom out or slide in. Click on the button for the modal to have it pop up with the photo slider. And then, you can see how the accordion and tab look and operate. Both are good options for offering viewers an opportunity to view the data or not.

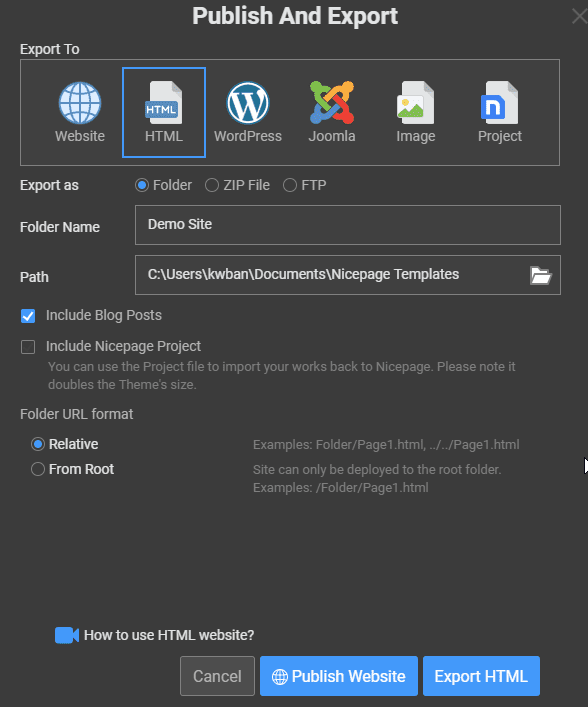
HTML Publication

HTML publication

HTML Publish option

With the option to publish to HTML, we can export the site to a folder, a zip file, or directly to our website using FTP. I use my FTP client, so I take the Folder option and select where to export it.

I will go over to Filezilla, connect to the export folder, and then to my website folder online. I will select all files and folders in the export folder, then drag and drop them into the online folder on my hosting site.

There is no further configuration necessary. I can go to my browser, enter the URL of my website, and immediately view the site. This assumes that my domain is set up with the hosting site and has propagated across the internet.

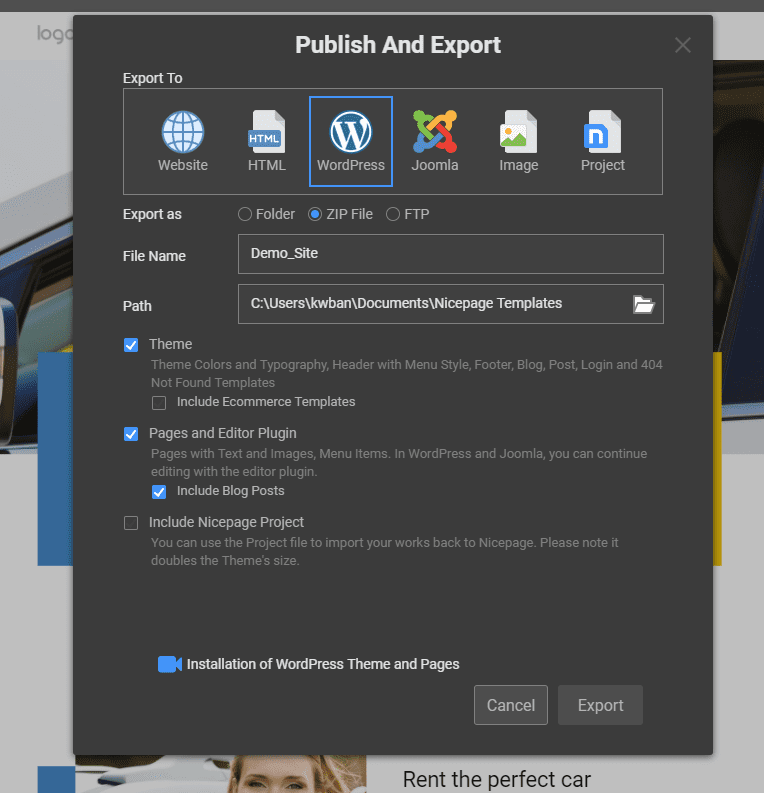
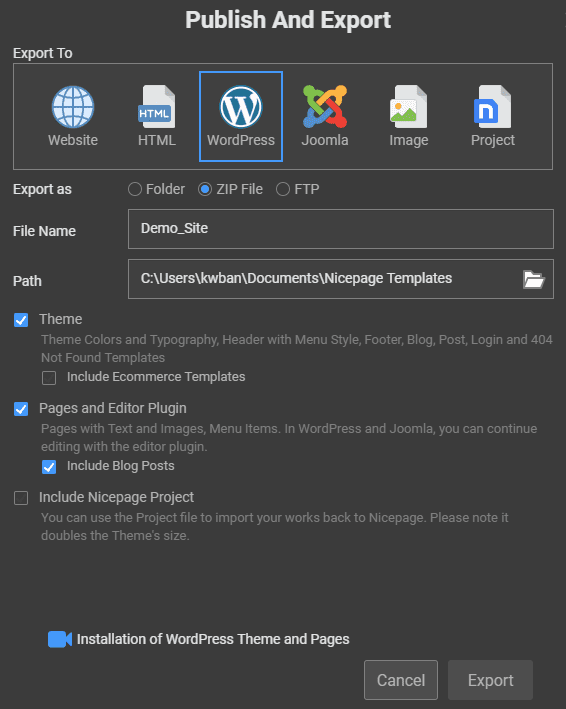
WordPress Publication

wordpress publication

WordPress Publish option

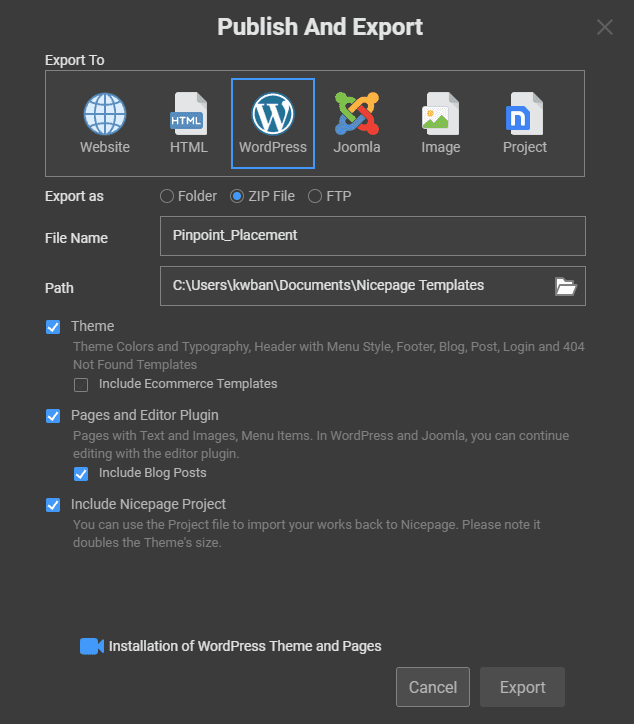
Finally, we will choose the WordPress option for publishing. Again, we can export to a folder, zip file, or FTP. Selecting the zip file option is the most straightforward choice. You will need a more advanced understanding of WordPress to use the folder or FTP approach.

By choosing to export to a zip file, I will install the site on my WordPress website as with any other theme. The only difference will be the import of content and installation of a plugin. The Nicepage plugin will serve as your editor in WordPress to work with your Nicepage web pages.

Before exporting the WordPress zip file, choose which features you want to export to your website. You will want to include the Theme along with pages and Editor Plugin. If you are planning an eCommerce site, retain the templates. If you want to export your site to the desktop app, choose to have the Nicepage Project. Now we are ready to export.

Next, we will go to the wp-admin section of our WordPress website to install the zip file. Once you are in the wp-admin area, select "Appearance" from the left menu and select themes. At the top of the page, click on "add new" and then on "upload theme." You will locate the exported zip file on your computer and click "install."

Now that we have installed our website, we need to activate it. Having done that, click on customize, and you will need to go to self-identity. In this section, you will insert your logo and Favicon from your media library or upload them from your computer. Then go further down to insert the site icon.

Now click the back arrow, then go down to the menus. Under menus, you will need to select the menu you will be using. Most likely, it will already be set.

Next, click the back arrow and go to "Homepage settings." Here you will choose whether the homepage will use the latest post or will be a static page. Although posting is a significant function of my Digital Chowder website, I use a static homepage with links to posts.

At this point, you're ready to click publish and view your WordPress website online.

In my fourth and final Nicepage-oriented article, I will discuss working with your Nicepage-generated website within WordPress. In addition, I will show how to go back and forth between your online and offline versions of the site. You can view all four articles on YouTube for a better visual demonstration of this presentation.

Website Building and Repair

Elite Web PresenceElite Web Presence

Do you find all this a bit overwhelming, or do you not have the time to work with a site? Let me make a suggestion. Go over to Elite Web Presence for some help. Whether you need a complete website build and update, or some cleanup and maintenance, they can do the job for you. They can also help with SEO, along with website backup and security.

Conclusion

Has this series been helpful? Building a website with Nicepage is an easy and efficient way to get your site up and running quickly. Using the tools it offers, you can create an attractive design that drives traffic to your pages and gives customers what they need.

Finally, does all of this sound too daunting or time-consuming? In that case, Elite Web Presence can help build, update or maintain your website to optimize it for success.

Have questions or comments? Please leave them in the comment section below.

https://digitalchowder.com/guide-to-all-the-best-features-in-nicepage-part-3/

Thursday, April 13, 2023

My Personal Guide to The Best Features in Nicepage Part 2

My Personal Guide to The Best Features in Nicepage Part 2

My Personal Guide to The Best Features in Nicepage Part 2

Welcome to the Digital Chowder blog! It is part two of my guide to all of Nice Page's most impressive features. 

I talked about the Nicepage subscription plans and desktop app in the first video. The app is available for both Windows and Mac. The app allows you to do your design work offline on your computer and do as much as you want online. Just an excellent feature that I have not seen with any other web builder in part two.

In this video, we'll talk about some of the design features of Nice Page that I like. This article will not be a how-to but will highlight features I like about Nicepage.

Nicepage App Dashboard:

Nicepage App Dashboard

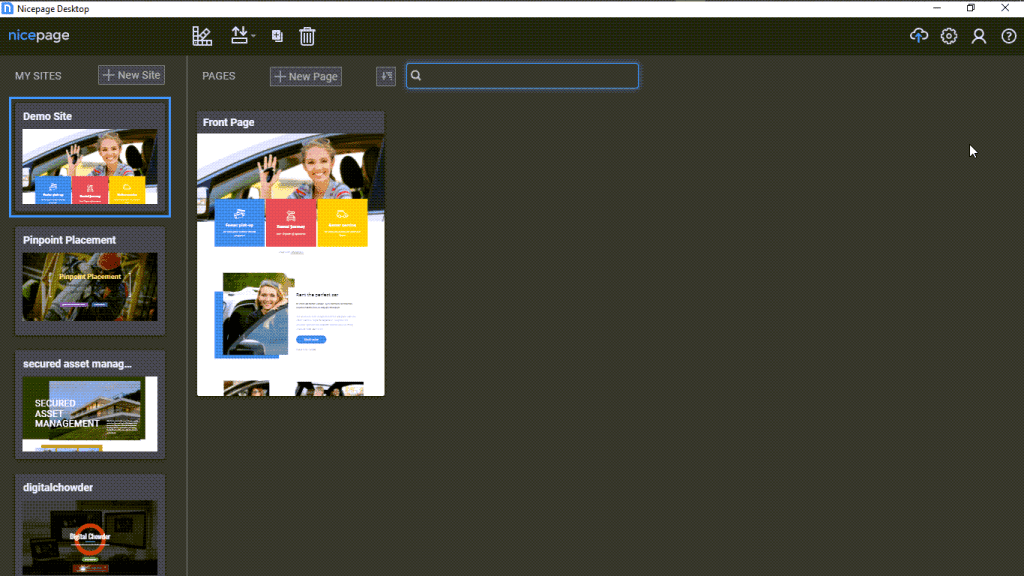
So here we are at the dashboard for the Nice Page app. I use the Windows version. You can see on the left side a list of the websites I am working with on Nicepage. I will select this site I set up as a demo site. So click on it, and we go to the front page of the website design.

Simple Format:

From here, we will talk about the simple Nicepage design format. With some builders, I need clarification on the format and help to know what to do. Also, with some builders, I feel locked into a structure that only sometimes works best for what I want to do. But Nicepage is different.

simple format

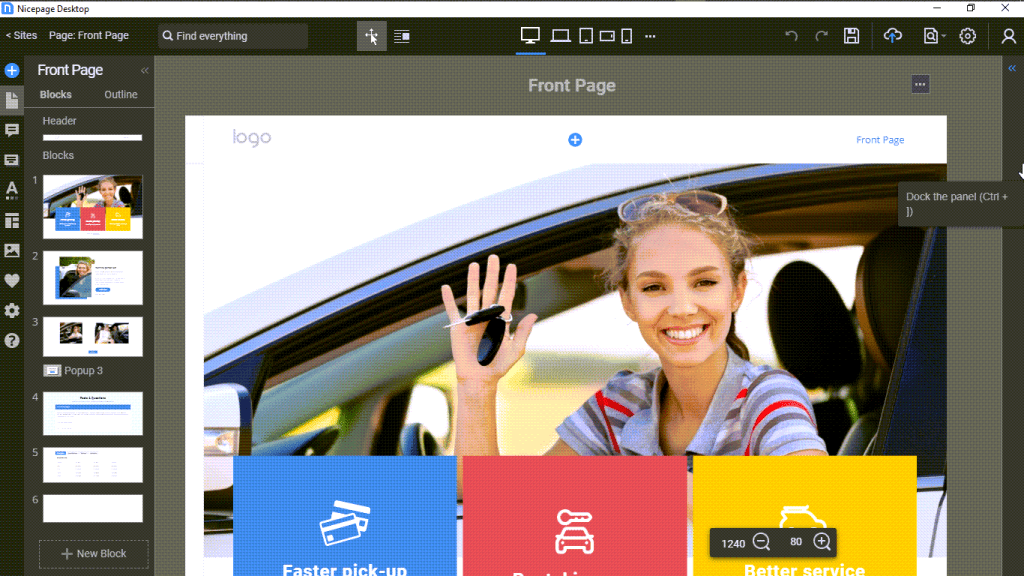
Websites these days are being built using blocks of content. And that is the case with Nicepage. You can see two blocks in this design in the image above, in addition to the header and footer.

Adding and Designing A Block:

Adding a block is a simple matter of clicking on the add block link and then choosing a design template from the library or adding elements of my choice for a preferred design.

We can see in this first block that an image is in the block as an independent element. Behind it is another separate element called a shape. To the right is a list element comprised of three items called cells.

designing a block

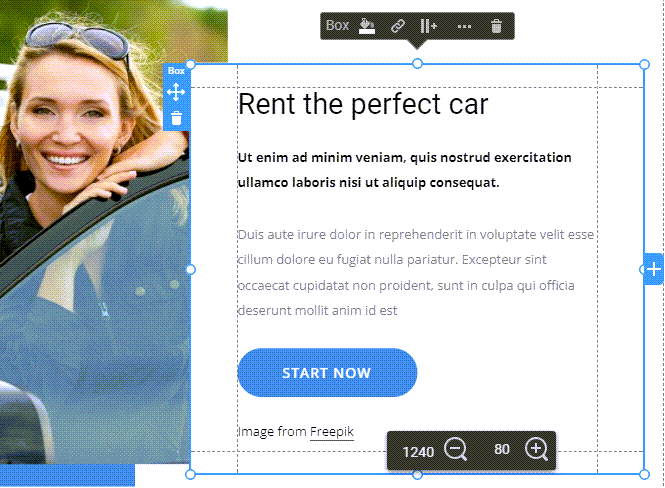
On the right is a box element. And within the box are a heading, text, and a button. And all of these are in the box. The box ties these elements together. The components within the box move with it, going where it goes. This functionality is essential for a responsive website. We are working within a desktop view, but we also want these elements to remain aligned in a phone view.

Another feature that helps to tie elements together for a responsive website is the grid. We can use 2, 3, or more cells in a grid. These cells can be independent of each other or can duplicate one another. 

use of a grid

And here is what the grid looks like with images in desktop view.

And here is what the grid looks like with images in mobile view.

Modal:

Next, we will look at the modal. I am still looking for the modal in other builders, but it is a feature I like to use. It is one of several ways to offer more information but allows the viewer to choose whether to view it. This feature helps keep a more straightforward and cleaner page rather than cramming in information viewers may want to avoid seeing. By so doing, we can prevent losing visitors who become impatient wading through content they don't want to get to the content they do want.

use of a modal

Here is what a modal might look like, but view the video below to demonstrate how it functions.

Three choices are available for launching a modal:

- Button: Launch the modal by clicking a button.- Timer: Schedule the modal to pop up a certain number of seconds after the page opens.- Exit: Set the modal to pop up when the visitor intends to exit the page.

Modal Plus Slider:

A modal will allow the use of any element. I like to use the slider in modals. I suggest using an image linked to a modal so the viewer can click the image and have a slide show pop-up of other related images.

Animation:

Another neat feature of Nicepage is animation. You will need to view the video to see this in action. Two blocks in the sample web page utilize animation, activated by scrolling. As the block emerges on the screen, the animation is triggered. Scrolling triggers the main image in the block shown below to zoom in. Each cell in the grid also uses zoom animation.

Accordion:

The next feature to highlight is the accordion. If you are unsure what the accordion feature is, you may have seen one without realizing it was an accordion. The modal is often used for FAQs, though that is only one use for them. Shown below is a FAQ accordion.

use of an accordian

Reordering Blocks:

Web page blocks serve as units of related content. As such, blocks can serve as visual highlights of their content by using different backgrounds and other graphic design features. An excellent quality of Nicpage is the ease with which you can reorder blocks. Without moving individual elements on the page, you merely need to click an up or down arrow on the block to reorder it above or below the surrounding blocks. Moving a block can amount to significant page editing with the click of an arrow.

Additionally, there may be a block with content that is temporarily unwanted. Will you delete that block you have spent time designing? After all, you will eventually want to include it on the page again. No problem. Hide the block so it does not appear publicly.

Tab:

A similar feature to the accordion is the tab. The tab, like the accordion, allows information to remain hidden until a visitor chooses to view it. So as the example below shows, the tabs identify the data contained under that tab. It is much like a file folder. Clicking the tab reveals its contents.

the tab

Menu:

The last feature to highlight is the menu. The unique and convenient factor of the menu feature in Nicepage is that it is unnecessary to leave the page you are working on to edit the menu. No need to go to the WordPress widget and menu section to make menu changes.

Items on the menu can be added, removed, or reordered within the page design. Same with design elements such as hover, active, background, font, etc.

Conclusion:

I hope this article has been helpful. If you haven't already seen the video or article for part one of this series, I encourage you to read, "My Personal Guide to All the Best Features in Nicepage, Part 1."

Also, I hope you will use this link for a free download of Nicepage and check it out yourself.

If you have found this article to be helpful, please leave a comment below.

Wednesday, April 12, 2023

My Personal Guide to All the Best Features in Nicepage, Part 1

My Personal Guide to All the Best Features in Nicepage - Part 3

My Personal Guide to All the Best Features in Nicepage - Part 3

This is my third article in a four-part series about my favorite web builder, Nicepage. In the first article, "My Personal Guide to All the Best Features in Nicepage, Part 1," we discussed the Nicepage subscription plans. We also mentioned its desktop app for Windows and Mac allows you to design and edit your website offline. Then, in my second article, "My Personal Guide to The Best Features in Nicepage Part 2," I highlighted special design features in Nicepage that I especially like. Some are even unique to Nicepage.

In this third article, we will discuss the options available on Nicepage, allowing you to publish your site to your website from the desktop app.

Publication Options

I have provided screenshots to help you visualize the comments, but there is also a video further down you can view.

Nicepage Best FeaturesNicepage Publishing Options

So let's go to the desktop app for Nicepage. In this case, it is in Windows, but there is also a version for Mac computers. The website showing on the desktop is one I have been working on in the second video for demonstration purposes. We demonstrated some animation, grids, and how they contribute to a responsive website. We also presented a modal, accordion, and tab feature.

Assuming that we are ready to publish our website on the internet, let's look at our publication options. These methods export the site from our desktop app to our online website. So we go to the publication feature, where you can see the following options:

- Website. This option uploads the site directly to the Nicepage server. This is a simple way to post the site online and allow clients to view it before launching it publicly.- HTML. For those who prefer a simple, straightforward website rather than a CMS such as WordPress or Joomla.- WordPress. This is the most popular website option, and Nicepage is a leading theme builder for WordPress.- Joomla. Though less popular than WordPress, Joomla offers another CMS option.- Image. Publish a one-page image of the site.- Website project. This packages the website project for transfer to another computer.

Website Publication

website publicationWebsite Publish option

Starting with the first option, we will publish to a website. The subdomain to which it will be posted is shown in the window. Use this URL to view the site once it's published. A custom domain name that you have registered can also be configured to direct viewers to the Nicepage subdomain. A few other options can also be selected in the window, but we will skip them and go straight to "Publish Website."

Now we can use the subdomain URL to view the site. As you scroll down the home page, you can observe the animation in action with the various page elements as they zoom out or slide in. Click on the button for the modal to have it pop up with the photo slider. And then, you can see how the accordion and tab look and operate. Both are good options for offering viewers an opportunity to view the data or not.

HTML Publication

HTML publicationHTML Publish option

With the option to publish to HTML, we can export the site to a folder, a zip file, or directly to our website using FTP. I use my FTP client, so I take the Folder option and select where to export it.

I will go over to Filezilla, connect to the export folder, and then to my website folder online. I will select all files and folders in the export folder, then drag and drop them into the online folder on my hosting site.

There is no further configuration necessary. I can go to my browser, enter the URL of my website, and immediately view the site. This assumes that my domain is set up with the hosting site and has propagated across the internet.

WordPress Publication

wordpress publicationWordPress Publish option

Finally, we will choose the WordPress option for publishing. Again, we can export to a folder, zip file, or FTP. Selecting the zip file option is the most straightforward choice. You will need a more advanced understanding of WordPress to use the folder or FTP approach.

By choosing to export to a zip file, I will install the site on my WordPress website as with any other theme. The only difference will be the import of content and installation of a plugin. The Nicepage plugin will serve as your editor in WordPress to work with your Nicepage web pages.

Before exporting the WordPress zip file, choose which features you want to export to your website. You will want to include the Theme along with pages and Editor Plugin. If you are planning an eCommerce site, retain the templates. If you want to export your site to the desktop app, choose to have the Nicepage Project. Now we are ready to export.

Next, we will go to the wp-admin section of our WordPress website to install the zip file. Once you are in the wp-admin area, select "Appearance" from the left menu and select themes. At the top of the page, click on "add new" and then on "upload theme." You will locate the exported zip file on your computer and click "install."

Now that we have installed our website, we need to activate it. Having done that, click on customize, and you will need to go to self-identity. In this section, you will insert your logo and Favicon from your media library or upload them from your computer. Then go further down to insert the site icon.

Now click the back arrow, then go down to the menus. Under menus, you will need to select the menu you will be using. Most likely, it will already be set.

Next, click the back arrow and go to "Homepage settings." Here you will choose whether the homepage will use the latest post or will be a static page. Although posting is a significant function of my Digital Chowder website, I use a static homepage with links to posts.

At this point, you're ready to click publish and view your WordPress website online.

In my fourth and final Nicepage-oriented article, I will discuss working with your Nicepage-generated website within WordPress. In addition, I will show how to go back and forth between your online and offline versions of the site. You can view all four articles on YouTube for a better visual demonstration of this presentation.

Website Building and Repair

Elite Web PresenceElite Web Presence

Do you find all this a bit overwhelming, or do you not have the time to work with a site? Let me make a suggestion. Go over to Elite Web Presence for some help. Whether you need a complete website build and update, or some cleanup and maintenance, they can do the job for you. They can also help with SEO, along with website backup and security.

Conclusion

Has this series been helpful? Building a website with Nicepage is an easy and efficient way to get your site up and running quickly. Using the tools it offers, you can create an attractive design that drives traffic to your pages and gives customers what they need.

Finally, does all of this sound too daunting or time-consuming? In that case, Elite Web Presence can help build, update or maintain your website to optimize it for success.

Have questions or comments? Please leave them in the comment section below.

Top Posts

As an affiliate marketer, Digital Chowder earns from qualifying purchases.


https://digitalchowder.com/guide-to-all-the-best-features-in-nicepage-part-3/My Personal Guide to All the Best Features in Nicepage, Part 1


My Personal Guide to All the Best Features in Nicepage, Part 1


Introduction


Hello, and welcome to the Digital Chowder blog. I'm Wayne, and this is the first of four posts and videos I will be doing about All the Best Features of Nicepage, my favorite website builder. This post will not be a how-to about how to use Nicepage. Nor will it be a review comparing Nicepage alongside other web builders. Instead, I will highlight some of my favorite features found in Nicepage.


This first post/video will address the Nicepage subscription plan, why I like it, and why it is a good fit for me. Then I will touch on the desktop app with Nicepage, giving an overview. Finally, I will discuss the options for publishing your website after designing it in the desktop app.


Nicepage Subscription Plans:


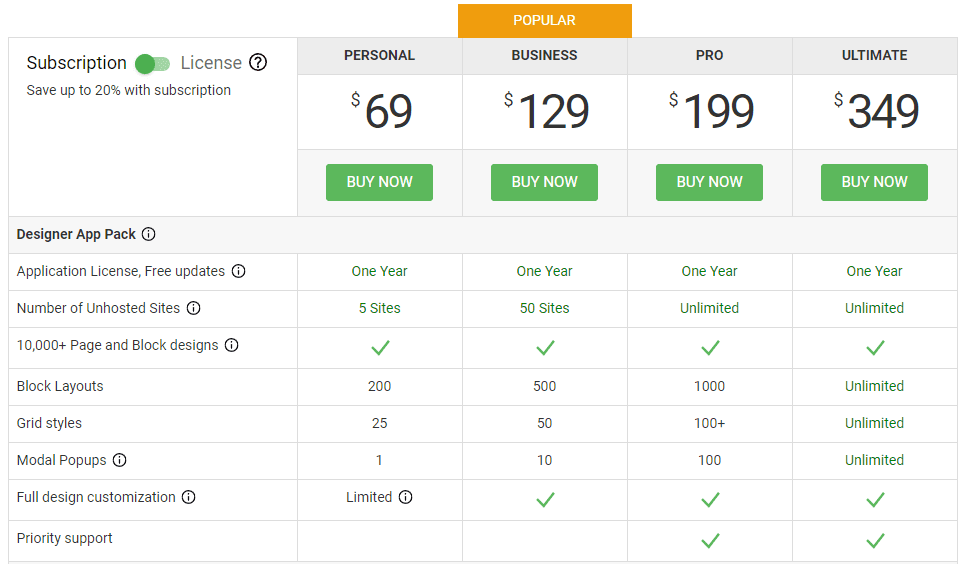
Nicepage subscription plans

If you go to the Nice Page website and then to their premium page, you will see four subscription plans outlined. Each plan has two options: a subscription and a license. So what is the difference? With the license, you're paying a one-time fee to purchase the software; with that, you're getting one year of updates for the software. But beyond the first year, there will be an additional fee if you want any updates. I have chosen the subscription approach. With the subscription, you pay an annual fee and receive the software and all updates during the year. And it is ongoing.


When I started with Nice Page, I used the Personal plan since I only needed one website for my business plus a personal site. With the Personal plan, I could have as many as five websites. So that was quite adequate. But now I design websites for other businesses besides my own. So I need to use Nicepage for more than five websites. However, I don't need an unlimited number of sites.


Elementor subscription plans

So, let's jump over to the Elementor website and look at their plans to understand why the Nicepage subscription is a good fit for me. With Elementor, three plans start with the Essential plan, which is $59 a year. This plan allows you one website. If you jump to the Expert Plan, which is $199 a year, you are allowed 25 websites.


Now let's go back to the Nicepage website. Back there, the Business plan offers a middle ground between the Personal and Pro plans, which Elementor does not have. The Business plan for $129 a year allows me 50 websites and additional features. This is just right for me. I need more than the Personal plan offers, but I don't need all that the Pro plan provides. So the Business plan is the one I use. I would pay $199 annually at Elementor and only get 25 sites.


Desktop App:


The next feature I want to highlight is the desktop app with Nicepage. There is a desktop app for both Windows and Mac computers. If you're building a WordPress website, you also get a WordPress plugin; if you're doing a Joomla site, you get that one.


You can do the whole website on your computer before you import it to your WordPress website. But it is not required. Creating the site layout is the only portion of building a website that requires the desktop app. Once you have created a layout for your website, you can export the site to a zip file and install it as a WordPress theme. You can do the remainder of the design online. Or not! You can also build the complete site on your desktop before installing it online.


Once you have installed the design theme on your WordPress site, you can work back and forth between online and offline.


Once your site is online, you can edit it on the desktop or do it online, whichever you choose. I do both. I like to be able to do major edits on my desktop, knowing that when I do a save, it's not going to go public.


Next, let's look more closely at the desktop app.


You can check the video above to see what I'm talking about in the following comments.


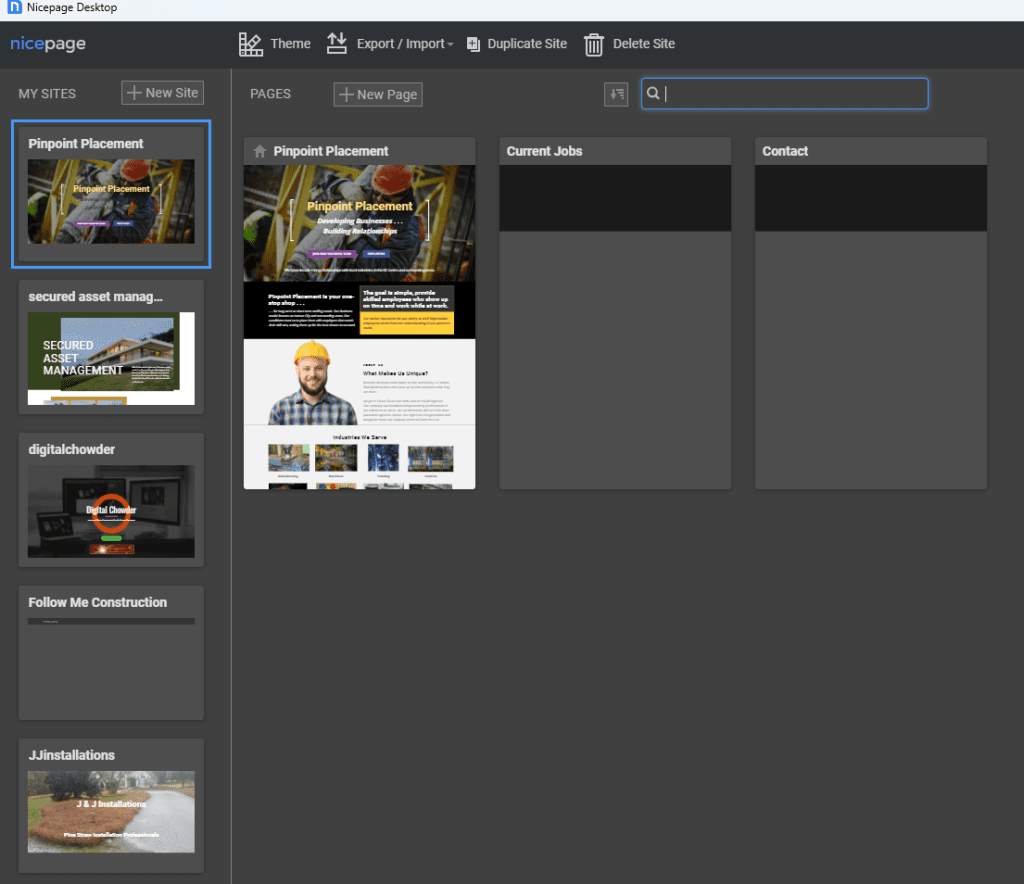
Nicepage desktop app

As you view the desktop application listed in the left-hand column, you will see a list of your websites. Click the appropriate icon to open the site you want to work with. You can also delete a website you are no longer working with from this page. To create a new website, use the "New Site" button.


If you are creating a new website, you can start with a blank website and build the site from scratch, adding elements as you go. Or, you can use your graphics to form the bases of the site. Yet another option is to select a design template from the various categories listed. Once you choose a template, you can stay close to the template design or use it only as a starting point.


Publishing The Website:


When you are ready to export my website to an online host, I can click the "Publish" button. You can publish a temporary Nicepage-hosted site, an HTML format, or a WordPress theme.


publishing the website

The temporary "Website" option is quick and easy. Press the publish button to install the site on the Nicepage server. Then share the subdomain with a client for their review of the site. There is no configuration or installation or uploads to do to have a site looking like the one on your desktop.


Another option is an HTML site. This choice requires an FTP app to upload to the host server.


If you publish a WordPress site, use the output zip file to install in WordPress as you do with any other theme.


Conclusion


In this post, I have given an overview of Nicepage. In the next post, I will detail some of my favorite design features in Nicepage. Meanwhile, I encourage you to get a free Nicepage download and try it. Then come back to the other posts for further help.


Facebook

Twitter

Instagram

LinkedIn

Top Posts


https://digitalchowder.com/all-the-best-features-of-nicepage/

10 Smart E-Commerce strategies to Increase Your E-Commerce Sales

Increase Your E-Commerce Sales If you need help to increase your e-commerce sales despite putting in much effort, you're not alone. With...